Web scraping, also known by other names such as web harvesting or web data extraction, is an automatic method that makes use of code to extract large amounts of data from websites.
Browser-based web scraping can be considered the quickest and simplest method for scraping client-side, JavaScript-based web pages. There are multiple frameworks available to build and run browser-based web scrapers, the most common being Selenium, Puppeteer, and Playwright.
Playwright is a framework that can be used in web scraping to scrape dynamic web content. Through this article, let us learn more about Playwright and how it can be used in web scraping.
What is Playwright?
Playwright is a testing and browser automation framework from Microsoft that comes with APIs available in JavaScript, Python,.NET, and Java.
Playwright comes with headless browser support and can work with multiple pages simultaneously without getting blocked. It supports almost all web browsers, such as Google Chrome, Microsoft Edge using Chromium, Firefox, and even Safari when WebKit is used.
Playwright web scraping has become one of the most popular searched topics recently. This is because of Playwright’s features, such as developer-friendly APIs, excellent documentation, automatic waiting and an active community.
Playwright vs Selenium vs Puppeteer
When web scraping in Python is considered, newer automation testing frameworks like Playwright have serious competition with the well-established player Selenium in the market. Even though the newer entrant, Playwright, has its own pros and cons, why is it preferred over Selenium and Puppeteer? Let’s explore the illustration given below.
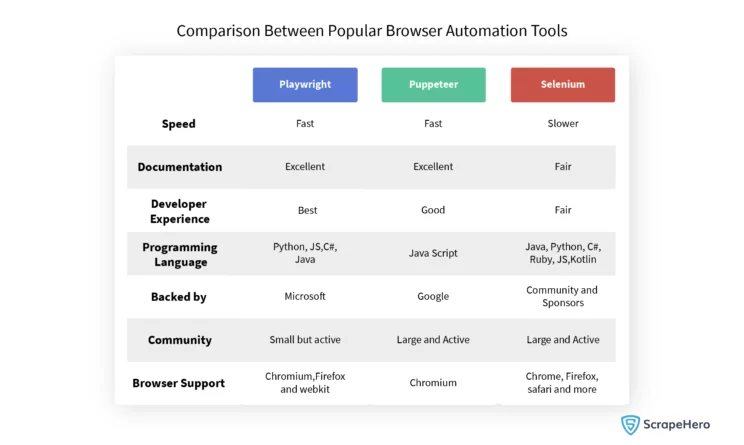
A major difference that can be pointed out between these three browser automation toolkits is that while Puppeteer supports an asynchronous client and Selenium supports a synchronous one, Playwright can support both asynchronous and synchronous clients.
It can also be seen that Playwright comprises capabilities that are more aligned with the modern web and thus support effortless web scraping. That’s why, even when Selenium supports more browsers and programming languages than the other two, Playwright scraping is in greater demand.
Specific Features of Playwright
Playwright and Puppeteer are almost similar. Why is web scraping with Playwright preferred over Puppeteer?
Here are some of the prominent features of Playwright that answer this question:
Cross-browser
Playwright allows us to scrape on multiple browsers simultaneously, including Google Chrome, Microsoft Edge (with Chromium), Apple Safari (with WebKit), and Mozilla Firefox. It also supports the option to pass custom web drivers using the argument executable_path.
Cross-platform
With Playwright, you can test how your applications perform in multiple browser builds for Windows, Linux, and macOS. In other words, it can run parallel tests with different browsers, which speeds up testing. This is also a major reason for the popularity of web scraping with Playwright.
Cross-language
Playwright supports multiple programming languages, which include JavaScript, Typescript, Python, Java, and.Net. This feature is not commonly seen in most of the modern open-source test automation frameworks. So Playwright has become a popular choice for web scraping in JavaScript too.
Auto-wait
Playwright performs a series of checks on items before performing actions to ensure that those actions work as expected. It waits until all relevant checks have been passed to perform the requested action. If the required checks are not passed within the specified timeout, the action will fail with a timeout error.
Web-first assertion
Playwright assertions are created specifically for the dynamic web. It checks whether the condition has been met or not. If not, it gets the node again and checks until the condition is met or it times out. The timeout for assertions is not set by default, so it’ll wait until the whole test times out.
Proxies
Playwright supports the use of proxies. The HTTP(S) proxy or SOCKSv5 can be configured to load pages. The proxy can be set either globally for the entire browser or for each browser context individually. You can even rotate proxies and change IP addresses using Python.
Browser contexts
We can create individual browser contexts for each test within a single browser instance. Browser context is equivalent to a brand new browser profile. This is useful when performing multi-user functionality and web scraping in complete isolation. This delivers full test isolation with zero overhead.
Codegen ability
Playwright is capable of generating code depending on the user’s interactions on the web page. The users, especially the non-technical ones, will find the codegen functionality useful as they will be able to build web scrapers quickly using Playwright Codegen.
Installation
Step-by-step process for installation of Playwright in both Python and JavaScript.
Python:
- Install the python package:
pip install playwright
- Install the required browsers:
playwright install
JavaScript:
- Install using npm
npm init -y npm install playwright@latest
- Install csv writer
npm i objects-to-csv
Building a Scraper
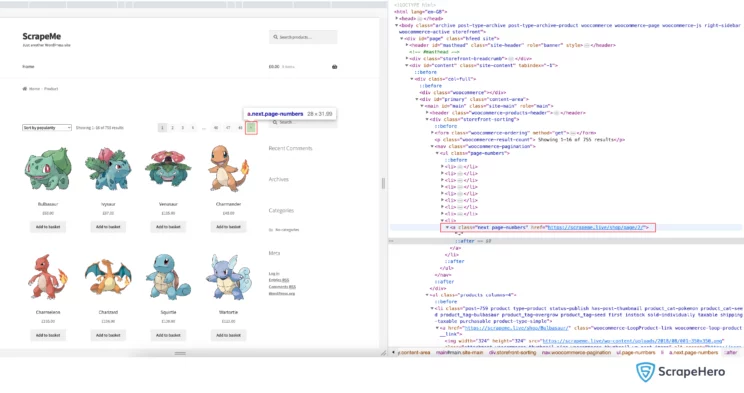
Let’s create a scraper using Playwright to scrape the data of the first 3 listing pages from https://scrapeme.live/shop. We will collect the following data points:
- Name
- Price
- Image URL
Source Code
Here is the complete code for web scraping using Playwright in Python and JavaScript:
Source Code on GitHub
You can view the complete code here:
Python: https://github.com/scrapehero-code/playwright-webscraping/blob/main/intro/scraper.pyJavaScript: https://github.com/scrapehero-code/playwright-webscraping/blob/main/intro/scraper.js
Import the Required Libraries:
In Python, Playwright supports both synchronous and asynchronous operations. But Node.js is asynchronous in nature, and hence Playwright only supports asynchronous operations in Node.js.
In this article about Playwright web scraping, we used asynchronous Playwright.
# Python
<strong>from</strong> playwright.async_api <strong>import</strong> async_playwright
<strong>import</strong> asyncio// JavaScript
<strong>const</strong> { chromium } = require('playwright');Launch the Browser Instance:
Here, we can define the browser (Chrome, Firefox, or WebKit) and pass the required arguments.
Async/await is a feature that allows you to execute functions asynchronously while waiting for results. This can improve the performance of your applications by working on multiple threads instead of performing one operation after another synchronously. The await keyword releases the flow of control back to the event loop.
# Python
# Launch the headed browser instance
browser = <strong>await</strong> playwright.chromium.launch(headless=False)
# Python
# Launch the headless browser instance
browser = <strong>await</strong> playwright.chromium.launch(headless=True)
// JavaScript
// Launch headless browser instance
<strong>const</strong> browser = <strong>await</strong> chromium.launch({
headless: true,
});// JavaScript
// Launch headed browser instance
<strong>const</strong> browser = <strong>await</strong> chromium.launch({
headless: false,
});Create a New Browser Context:
Playwright allows us to create a new context from an existing browser instance that won’t share cookies or cache with other browser contexts.
# Python
# Creates a new browser context
context = browser.new_context()// JavaScript
// Creates a new browser context
const page = await browser.newContext();Create a Page From the Browser Context
To create a new page from a browser context using Playwright, you typically follow these steps:
# Python
# opens new page
page = await context.new_page()// JavaScript
// Open new page
<strong>const</strong> page = <strong>await</strong> context.newPage();This will open a Chromium browser. Now, let’s navigate to the listing page. We can use the below code lines to perform the navigation:
# Python
# Go to https://scrapeme.live/shop
<strong>await</strong> page.goto('https://scrapeme.live/shop')// JavaScript
// Go to https://scrapeme.live/shop
<strong>await</strong> page.goto('https://scrapeme.live/shop');Find and Select All Product Listings:
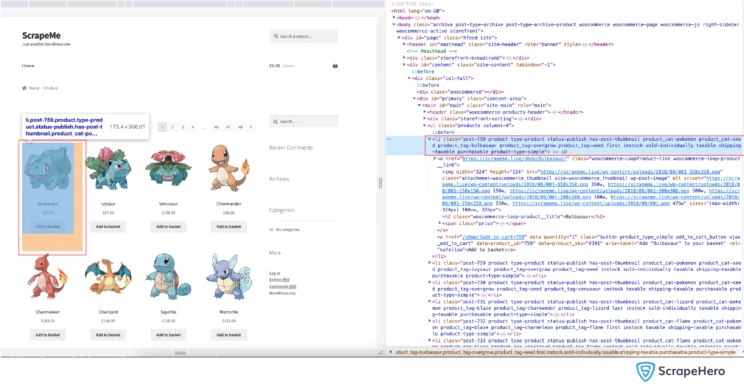
The products (Pokemons) are listed on this page. In order to get data for each product, we first need to find the element that contains the data for each product and extract the data from it.
If we inspect one of the product listings, we can see that every product is inside a <li> tag, with a common class name “product”.
We can select all such products by looking for all <li> tags with a class name “product”, which can be represented as the CSS selector li.product .
The method called query selector all lets you get all the elements that match the selector. If no elements match the selector, it returns an empty list ( [] ).
# Python
all_items = <strong>await</strong> page.query_selector_all('li.product')
// JavaScript
<strong>const</strong> product = <strong>await</strong> page.$$eval('li.product', all_items => {})Select Data From Each Listing:
Make sure you extract the following data points from each product listing to complete your Playwright scraping:
- Name
- Image URL
- Price
In order to get these details, we need to find the CSS Selectors for the data points. You can do that by inspecting the element and finding the class name and tag name.
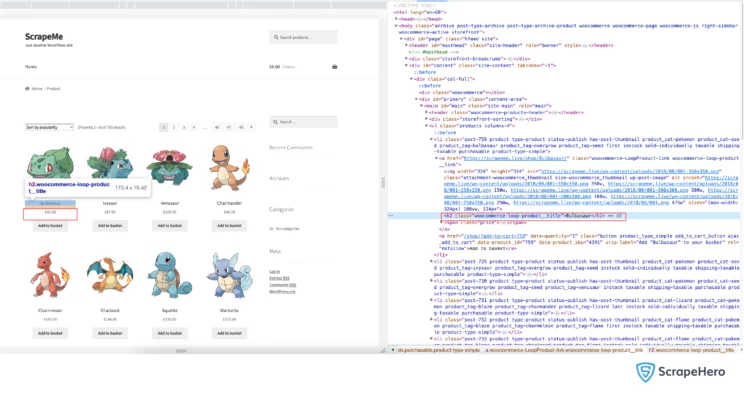
We can now see that the selectors are:
- Name- h2
- Price- span.woocommerce-Price-amount
- Image URL- a.woocommerce-LoopProduct-link.woocommerce-loop-product__link > img
We can use the function query selector to select the individual elements. The query selector returns the first matching element. If no element matches the selector, the return value resolves to null.
You can see the implementation below:
# Python
# Looping through listing pages
for i in range(2):
name_el = <strong>await</strong> item.query_selector('h2')
// JavaScript
// Looping through listing pages
for (let i = 2; i < 4; i++)
{
<strong>const</strong> name_el = <strong>await</strong> product.querySelector('h2')
}Extracting Text From the Elements:
The next step in your Playwright web scraping is the extraction of the text from the elements. We can use the function inner text to extract the text.
# Python
name = <strong>await</strong> name_el.inner_text()// JavaScript
<strong>const</strong> name = name_el.innerText;Navigate to the Next Page:
Now, we need to extract the data from the next page. To perform this action, we need to find the element locator of the next button. For this, we can use the method locator in Playwright.
The method locator returns an element locator that can be used for various operations, such as click, fill, tap, etc. The function supports pattern matching(RegEx), XPath, and selectors.
# Python
next = page.locator("text=→").nth(1)// JavaScript
next = page.locator("text=→").nth(1)Now, we need to click on the next button. To perform this, we can use the function click. You may need to wait for the required elements to load on the page. To ensure this, we can use the function wait for selector.
# Python
<strong>await</strong> next.click()
# wait for the selector to load
<strong>await</strong> page.wait_for_selector('li.product')// JavaScript
<strong>await</strong> next.click();
// wait for selector to load
<strong>await</strong> page.waitForSelector('li.product');Close the Browser and Context:
After completing the task, we need to close all the context and browser instances.
# python
<strong>await</strong> context.close()
<strong>await</strong> browser.close()// JavaScript
<strong>await</strong> context.close();
<strong>await</strong> browser.close();After closing both the context and browser, we need to save the data into a CSV file. For saving into CSV in JavaScript, we need an external package to be installed. The installation command is given below.
npm i objects-to-csv
Setting Up Headless Mode and Proxies in the Browser:
Why do you need proxies for web scraping?
A proxy hides your IP address and allows seamless access to your data without being blocked. With a proxy, the website you request no longer sees your original IP address but instead sees the proxy’s IP address, allowing you to browse the website without getting detected.
Why do you need a headless browser?
A browser without a user interface (UI) is called a headless browser. It can render the website like any other standard browser. They are better, less time-consuming, and faster. Since the headless browser does not have a UI, it has minimal overhead and can be used for tasks like web scraping and automation.
Both of these can be achieved while defining and launching the browser:
// JavaScript
<strong>const</strong> browser = <strong>await</strong> chromium.launch({
headless: true,
proxy: {
server: '<proxy>',
username: '<username>',
password: '<password>'
}
});# Python
browser = playwright.chromium.launch(headless=True, proxy={
"server": "<proxy>",
"username": "<username>",
"password": "<password>"
})Wrapping Up
Playwright is a browser automation and web scraping tool that extracts data from websites by interacting with them and automating complex workflows.
In this in-depth article, we have covered web scraping with Playwright in Python and JavaScript. We have created a scraper using Playwright and collected the name, price, and image URL of a website.
Note that you can optimize your Playwright web scrapers using code profiling. Also, learn about blocking specific resources in Playwright from our previous articles.
Web scraping can be employed for research, lead generation, data mining, and much more. ScrapeHero’s web scraping services facilitate scraping that enables decision-making for various businesses that rely on big data.
Frequently Asked Questions
- What is web scraping in Python ?
Web scraping is an algorithm that extracts substantial data from websites. For data extraction, manipulation, visualization, and cleaning various Python libraries are used.
- What libraries are used for web scraping in Python?
Python has an enormous collection of libraries that can be made available for web scraping. These include Selenium, Pandas, BeautifulSoup, Scrapy, Urllib, Python requests, LXML, etc.
- Can you use Playwright for web scraping?
Yes. Web scraping using Playwright is a popular method that is widely accepted and carried out. Playwright becomes an excellent tool for web scraping in Python due to its reliable features that support all modern browsers.
- Which one is better—Playwright web scraping or Puppeteer web scraping?
Playwright and Puppeteer are used for testing web applications and interacting with web pages. Both of these are exceptional tools for automating browsers but some features of Playwright make it a better choice for large-scale web testing tasks.
- How do I scrape a JavaScript website with Python?
JavaScript websites can be scraped with Python in various ways, depending on the need. Some popular methods include the usage of Requests and BeautifulSoup, headless browsers with Selenium, Open Source JavaScript Web Scraping Tools and Frameworks like Puppeteer or Playwright, API requests, reverse engineering API calls, custom JavaScript rendering engines, or even third-party services.
We can help with your data or automation needs
Turn the Internet into meaningful, structured and usable data