Codegen is a command-line tool that comes bundled with Playwright. It assists in generating the test script code based on the user’s interactions with the web page. Codegen plays a vital role when it comes to web scraping with Playwright, as it is used to build browser-based web scrapers with ease.
You might already be familiar with optimizing Playwright web scrapers using code profiling tools. In this article, you will learn about the concept of Playwright Codegen and how a Wikipedia scraper and an Amazon scraper using Playwright Codegen can be built. Note that Node.js is used here as a JavaScript runtime environment.
Basics of Web Scraping With Playwright Codegen
Let’s dig a little deeper into the concept of web scraping with Playwright Codegen, taking a simple example.
Python
$ playwright codegen example.com
JavaScript
$ npx playwright codegen example.com
As you can see, there are two windows open: the browser and the Playwright Inspector. You can use the browser window to interact with the website while the Playwright Inspector records all your interactions.
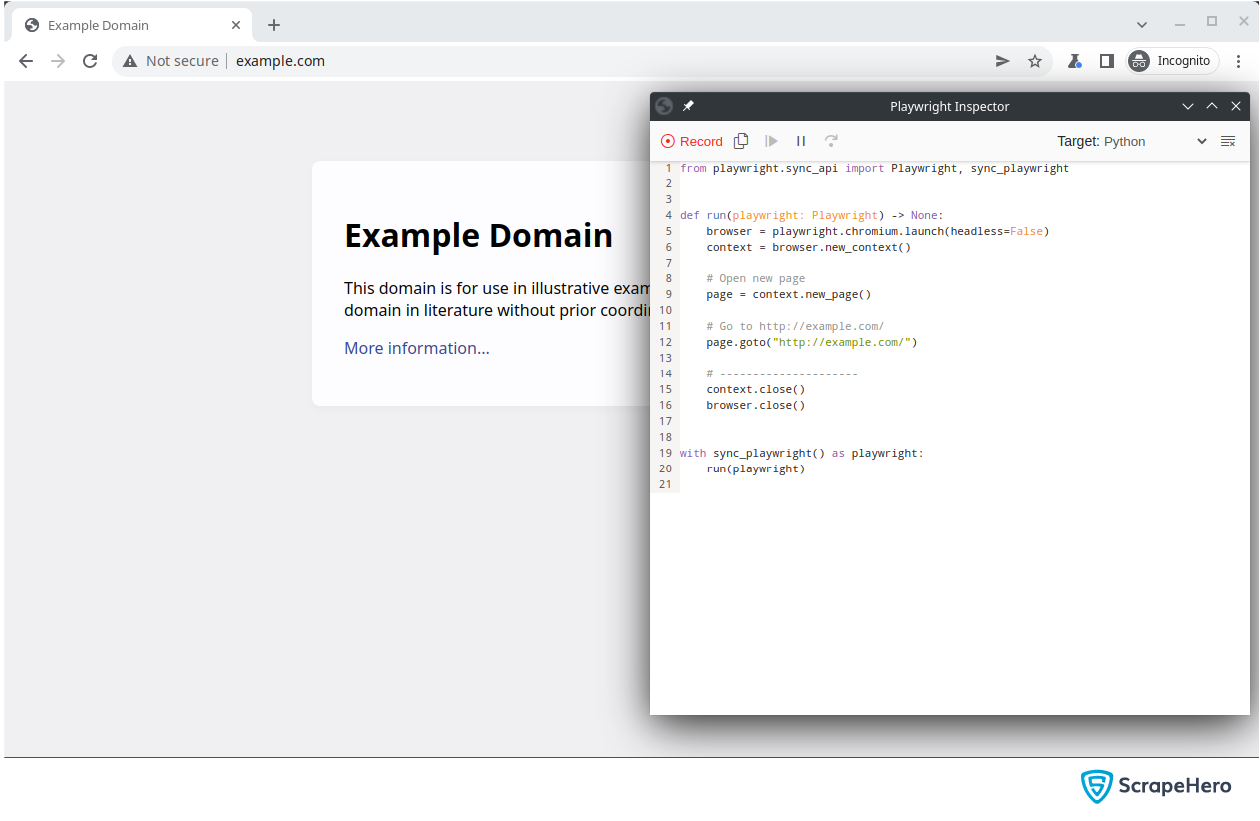
Playwright Inspector
You must clearly understand the concept of the Playwright Inspector before you begin with web scraping using Playwright Codegen. A Playwright Inspector will record all the interactions performed on the browser and convert them into code in other programming languages.
Features of Playwright Inspector
Some of the prime features of the Playwright Inspector tool include:
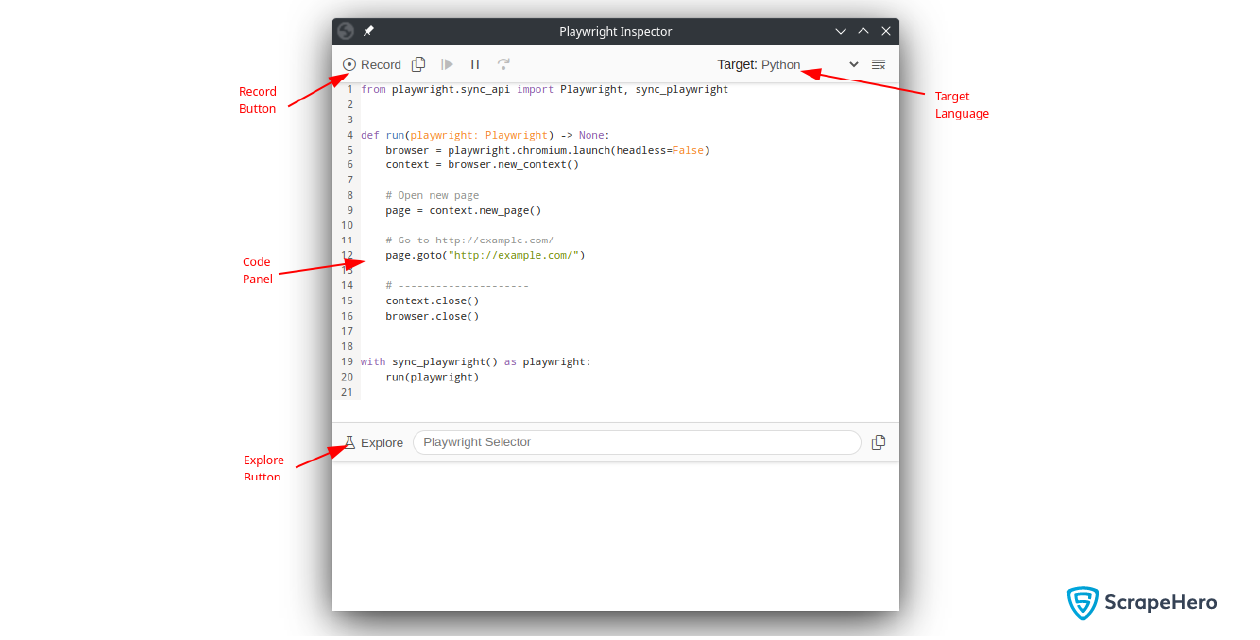
Record Button
In the top left-hand corner, you can see the Record button, which allows you to start or stop recording activities you perform on the browser.
Target
You can see the Target selector in the top right-hand corner. It shows all the languages supported by the Playwright Inspector. All your recorded interactions will be converted into the selected language by choosing a different language.
Code Panel
The Code panel contains the code lines of the recorded interactions. An initial template will be present, which launches the browser and navigates to the specified website.
Explore
Explore allows you to get the CSS selector of any element on the page. Instead of writing custom selectors, you can use this feature to get the selectors quickly. The button will not be visible when you are recording.
Pros and Cons of Codegen
Codegen offers several advantages. But it does have its own drawbacks. Here are some pros and cons of using Codegen for web scraping with Playwright:
Pros of Codegen
Code Generation
Codegen generates most of the code for navigation and interactions. This allows you to get started quickly with your web scraping project. Even though most of the code is auto-generated, it needs to be fine-tuned for particular use cases.
Commented Code
When building scrapers using Playwright Codegen, you get to notice that automatic comments for each line of code are generated without any manual intervention. This is an outstanding feature of Codegen.
Code Conversion
The Target button can easily convert your code to multiple languages, such as JavaScript, Python, and TypeScript.
Initial Template
By default, a basic template will be provided. The template will have the code to start the browser and go to the targeted page.
Improved Test Readability
Codegen uses explicit element locators as well as descriptive function names to produce clean code. This way, the test scripts are more understandable and easier to review.
Cons of Codegen
Need Optimization
Sometimes when you create scrapers using Playwright Codegen, you will have to do some manual optimization. This is because for specific use cases the generated code may not serve the purpose.
Choosing Dynamic Selectors
Codegen may choose selectors that are not static across web pages. You need to modify it manually.
Lack of Customization
Manual modifications may also be required for the generated code for customization, like adding assertions, validating data, or dynamic test flows.
Maintenance Challenges
For an updated UI structure, the generated code may require updates. So it is essential to review and maintain the code regularly.
Creating Wikipedia Scraper Using Playwright Codegen
Let’s build a simple scraper for Wikipedia that searches for celebrity names and collects information about them. Create the Wikipedia scraper performing the following tasks:
- Go to https://www.wikipedia.org/
- Enter the name of the celebrity and click on the suggestion that comes first. This will lead you to the celebrity’s page.
- Save the entire page.
To start Codegen, run the code given below:
$ playwright codegen https://www.wikipedia.org/
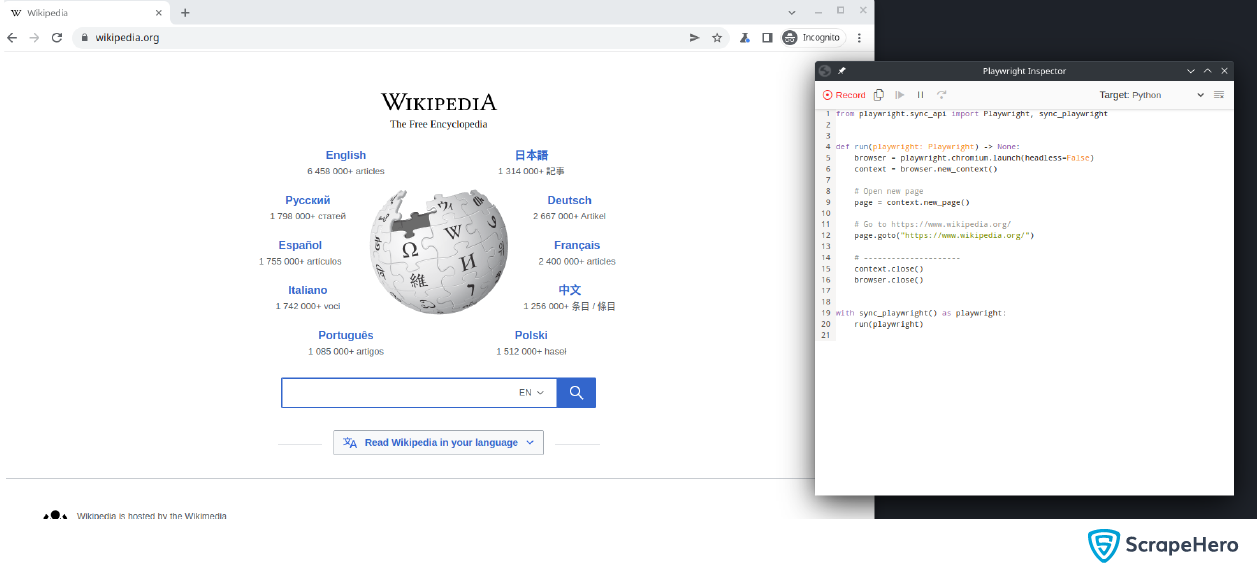
You now have two windows open.
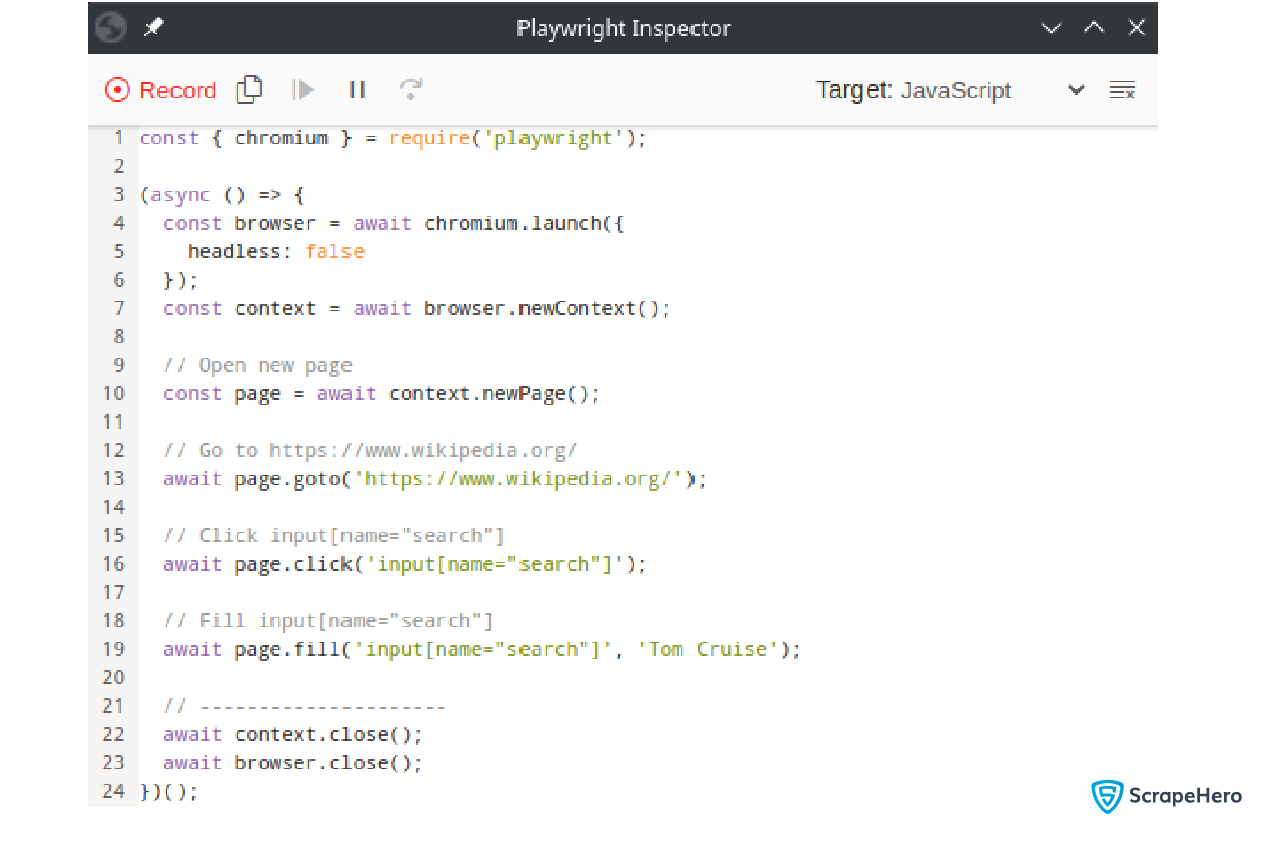
An initial template will be present in the code panel, which launches the browser and navigates to Wikipedia. Let’s search for “Tom Cruise”.
As you type the celebrity name, you can see the equivalent code being generated in the Playwright Inspector:
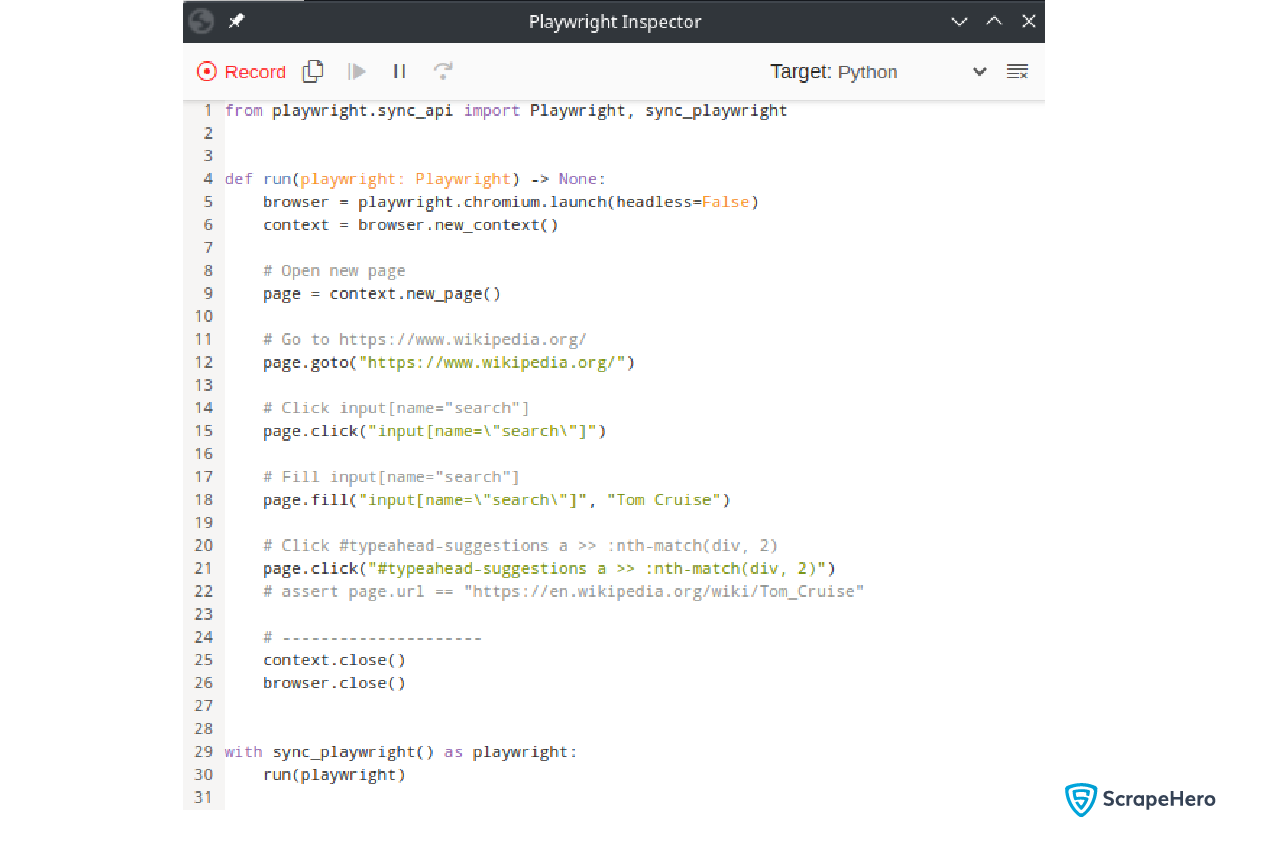
Currently, the code is in Python, and if you need to convert it to another programming language, you can click on the Target button and select the required language. Convert the same code to JavaScript.
Copy the above Python code to a file, scraper.py, and modify it as per your use case.
Add an additional function to write raw HTML data to a file:
Python
def write_to_file(filename: str, data: str):
   # Saves raw html to name.html files.
   page_content = page.content()
   with open(filename, 'w') as f:
       f.write(page_content)
JavaScript
// Saves raw html to name.html files.
async function writeToFile(filename, data) {
 fs.writeFile(filename, data, (err) => {
   if (err) throw err;
 });
}
Add a new variable at the beginning to store the celebrity names.
Python
celebrity_names = ["Tom Cruise", "Johnny Depp", "Tom Holland", "Scarlett Johansson"]
Javascript
let celebrityNames = [
   "Tom Cruise",
   "Johnny Depp",
   "Tom Holland",
   "Scarlett Johansson",
 ];
Add the logic to loop through celebrity names. Then, add the code to write the HTML content and close the page after use.
Python
celebrity_names = ["Tom Cruise", "Johnny Depp", "Tom Holland", "Scarlett Johansson"]
# looping through all celebrities
for celebrity in celebrity_names:
    # Open new page
    page = context.new_page()

    # Go to https://www.wikipedia.org/
    page.goto("https://www.wikipedia.org/")

    # Click input[name="search"]
    page.click('input[name="search"]')

    # Fill input[name="search"]
    page.fill('input[name="search"]', celebrity)

    # Click #typeahead-suggestions a >> :nth-match(div, 2)
    page.click("#typeahead-suggestions a >> :nth-match(div, 2)")

    # file names should be like tom_cruise.html
    filename = "_".join(celebrity.lower().split()) + ".html"

    # write the html to a file
    write_to_file(filename, page.content())

    # close the page
    page.close()
JavaScript
// looping through all celebrities
for (const celebrity of celebrityNames) {
 // Open new page
 const page = await context.newPage();

 // Go to https://www.wikipedia.org/
 await page.goto("https://www.wikipedia.org/");

 // Click input[name="search"]
 await page.click('input[name="search"]');

 // Fill input[name="search"]
 await page.fill('input[name="search"]', celebrity);

 // Click #typeahead-suggestions a >> :nth-match(div, 2)
 await page.click("#typeahead-suggestions a >> :nth-match(div, 2)");

 // file names should be like tom_cruise.html
 let filename = celebrity.toLowerCase().split(" ").join("_") + ".html";

 // write the html to a file
 await writeToFile(filename, await page.content());

 await page.close();
}
Get the complete code of the Wikipedia Scraper:
Python Implementation
JavaScript Implementation
Run the scraper using the following command:
Python
$ python3 wikipedia_scraper.py
JavaScript
$ node wikipedia_scraper.js
Amazon Scraper using Playwright Codegen
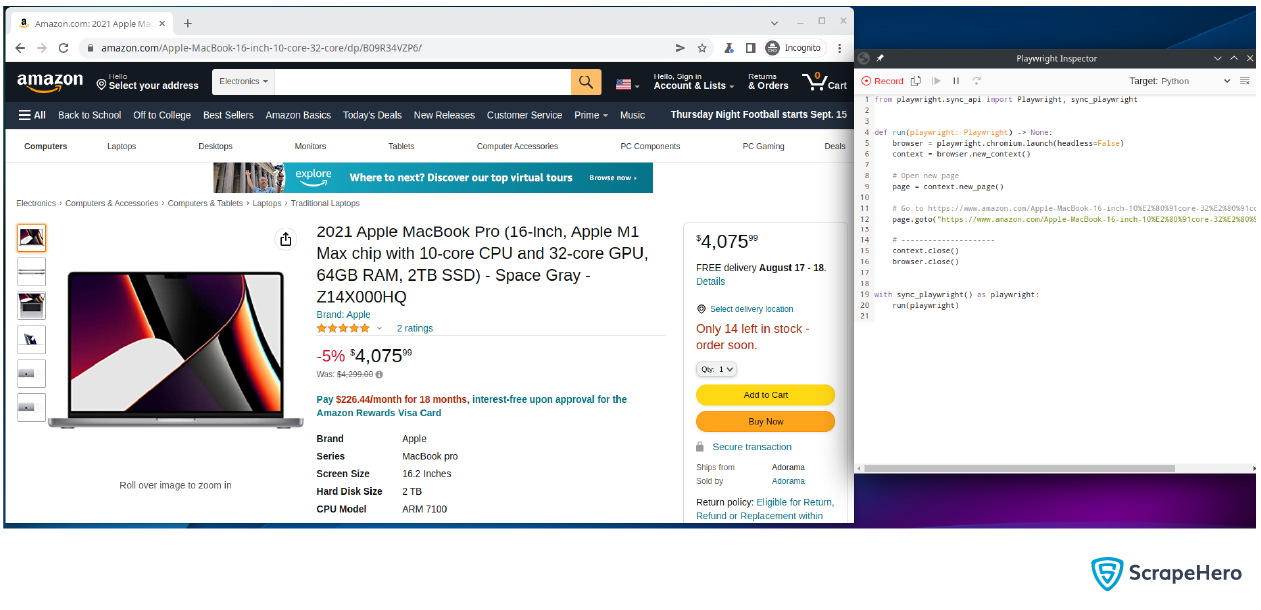
Let’s build an Amazon scraper using Playwright Codegen that collects the price of a MacBook Pro for a specific zip code in New York City. A sample web page is taken to illustrate this.
Let’s start building an Amazon scraper using Playwright Codegen with these simple steps:
- Go to the product link.
- Set the zip code (10013).
- Collect the current price and the date on which the price is collected.
The sample web page:
https://www.amazon.com/Apple-MacBook-16-inch-10%E2%80%91core-32%E2%80%91core/dp/B09R34VZP6/
Start Codegen
playwright codegen https://www.amazon.com/Apple-MacBook-16-inch-10%E2%80%91core-32%E2%80%91core/dp/B09R34VZP6/
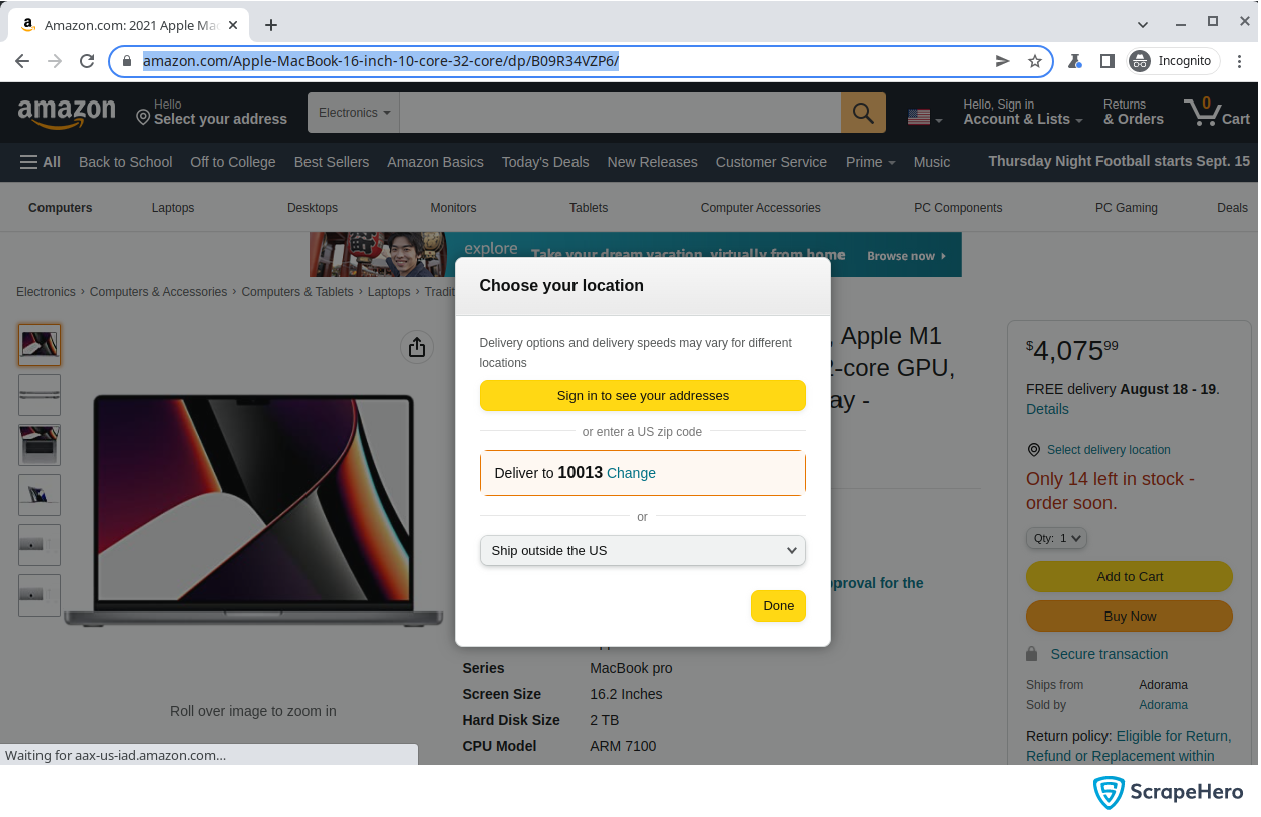
Set the zip code in the browser.
The Playwright Inspector will generate the code for setting the zip code. Copy it to a file.
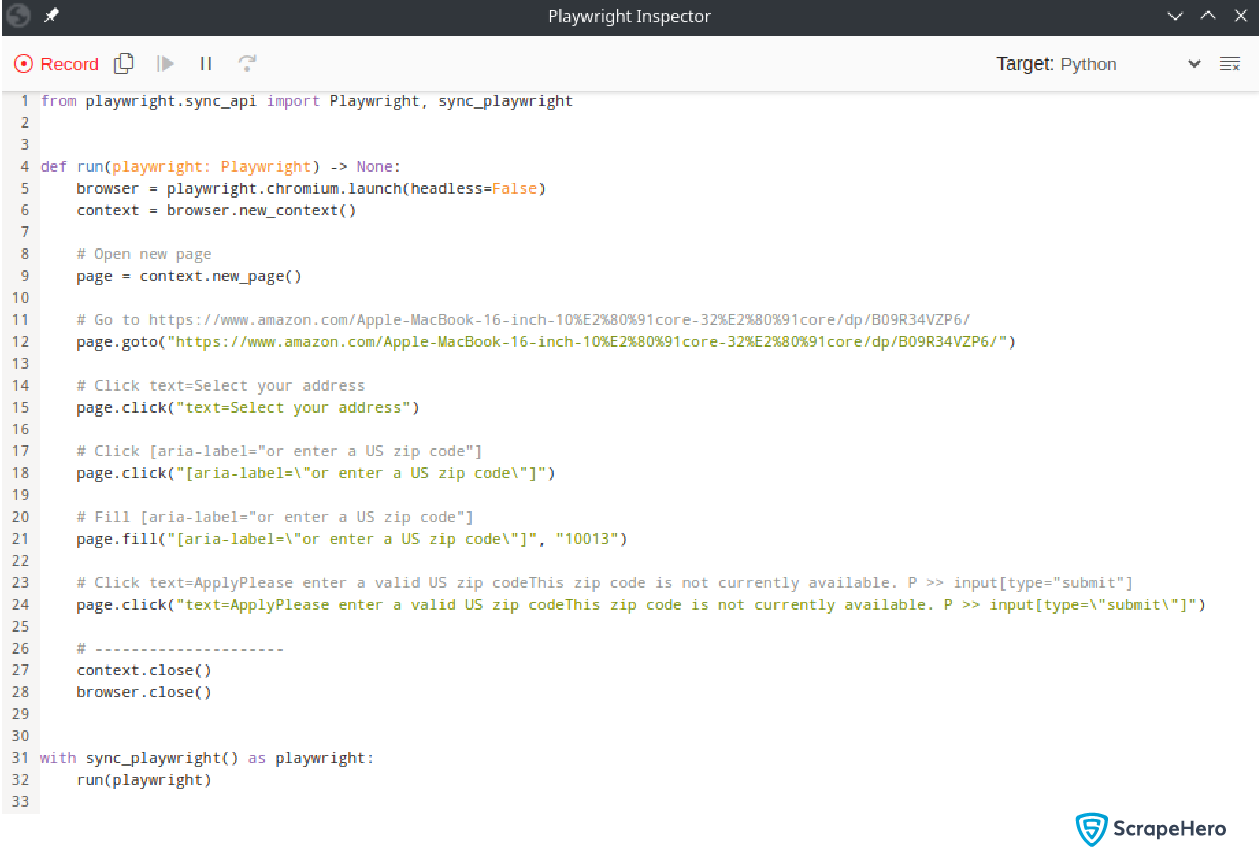
You can see that the function run does not have the code to click the button Done. This is because while recording the interactions, Codegen failed to detect them. You have to add this step manually.
Use the Explore feature on Playwright Inspector to get the selector for the button and add the following lines after clicking the Apply button.
Python
# wait for the zip code to change
page.wait_for_selector("#GLUXZipConfirmationValue")
# Click the Done button
page.click('button:has-text("Done")')
# reload the page
page.reload()
JavaScript
// wait for zipcode to change
await page.waitForSelector("#GLUXZipConfirmationValue");

// Click the Done button
await page.click('button:has-text("Done")');

// reload the page
await page.reload();
Add the following code to extract the price:
Python
price = page.inner_text('#corePrice_feature_div .a-price .a-offscreen')
JavaScript
let price = await page.innerText(
  "#corePrice_feature_div .a-price .a-offscreen"
);
Note that the selectors may have slight differences depending on your region.
Get the complete code of the Amazon Scraper:
Wrapping Up
Playwright Codegen can accelerate the initial creation of automation tests. It is a powerful asset as it offers language flexibility, enhances test maintenance, and improves test readability. This article has covered the basics of web scraping with Playwright Codegen and building a Wikipedia scraper and an Amazon scraper using it.
Even though Codegen is apt for small-scale web scraping purposes, enterprises require the services of a large-scale, fully managed web scraping service provider like ScrapeHero, who can handle their needs. Let’s connect for your price and product monitoring, location intelligence, real-time, and custom API needs.
Frequently Asked Questions
Can you use Playwright for web scraping?
Playwright is a powerful testing library that can be used for web scraping with Python, JavaScript/TypeScript, .NET, C# and Java. Web scraping with Playwright Codegen is a popular choice because of the developer-friendly APIs, excellent documentation, and automatic waiting features of Playwright.
What is Codegen in Playwright?
Playwright Codegen is a tool that enables users to generate code automatically by recording their interactions with a website. Scripts in programming languages like JavaScript, Python, or TypeScript can be created with Codegen.
Can the generated code using Codegen be customized?
Yes. Some generated scrapers using Playwright Codegen may need some modifications. According to your specific requirements, like adding loops, conditionals, or custom functions, you can modify the generated code.
Does Codegen support all browsers?
Codegen can support all the browsers that Playwright itself supports, such as Chromium, Firefox, and WebKit.
Are there any limitations to Playwright Codegen?
Codegen is a powerful tool and can be used for web scraping with Playwright. Even though Wikipedia Scraper and Amazon Scraper using Playwright Codegen can be built and used, they cannot be considered one-size-fits-all solutions. It doesn’t capture all the nuances of a web application and may require manual coding at times.
We can help with your data or automation needs
Turn the Internet into meaningful, structured and usable data