Negative Google Reviews can sit unnoticed for days. It damages your brand reputation, driving customers to competitors, and costing you revenue. But manually checking reviews is unscalable; you can, however, automate Google reviews monitoring with n8n (an open-source workflow automation platform).
This tutorial shows you how.
Read on to learn Google Reviews scraping with n8n and ScrapeHero Google Reviews API. The system will
- Periodically check for new reviews
- Analyze customer sentiment using AI
- Prioritize critical feedback
- Deliver a professional HTML email report.
What You’ll Learn
- How to fetch Google Reviews in n8n with ScrapeHero’s Google Reviews API and a Place ID.
- How to keep only recent reviews that contain written text.
- How to use an AI model to rate each review’s sentiment, priority, category, and recommended action.
- How to filter for High and Critical priority reviews so only urgent feedback triggers an alert.
- How to build an HTML report and send it through Gmail.
- How to activate the workflow so it runs on its own.
Can n8n scrape Google Reviews directly?
No, n8n does not have a built-in Google reviews scraper; it is just an automating platform. To scrape Google reviews, you need a dedicated web scraper. That is where ScrapeHero’s Google Reviews API comes in.
By signing up for a ScrapeHero Cloud account, you get access to several ready-made scrapers and APIs. One of which is the Google Reviews API.
The ScrapeHero Google Reviews API allows developers to extract detailed information about customer reviews and ratings for businesses directly from Google in real-time. You can use the HTTP Request node in n8n to natively make a request to the API. By passing a Google Place ID or a Review URL, this API returns structured data in a clean JSON format.
What You Need to Automate Google Reviews Monitoring with n8n
To set up an n8n Google Reviews integration with ScrapeHero, you will need:
- A ScrapeHero account: Sign up here to get access to the Google Reviews Scraper API for n8n.
- n8n installed: You can self-host n8n or use n8n Cloud. This tutorial works with both.
- A Google Sheet: Containing the target Business Names and Place IDs to monitor.
- Google Cloud Project: With the Google Sheets API and Gmail API enabled (for OAuth authentication)
- LLM API Key: An API key for your preferred AI provider (such as NVIDIA Nemotron, OpenAI, or Qwen) to handle sentiment analysis and draft review responses.
Architecture Overview
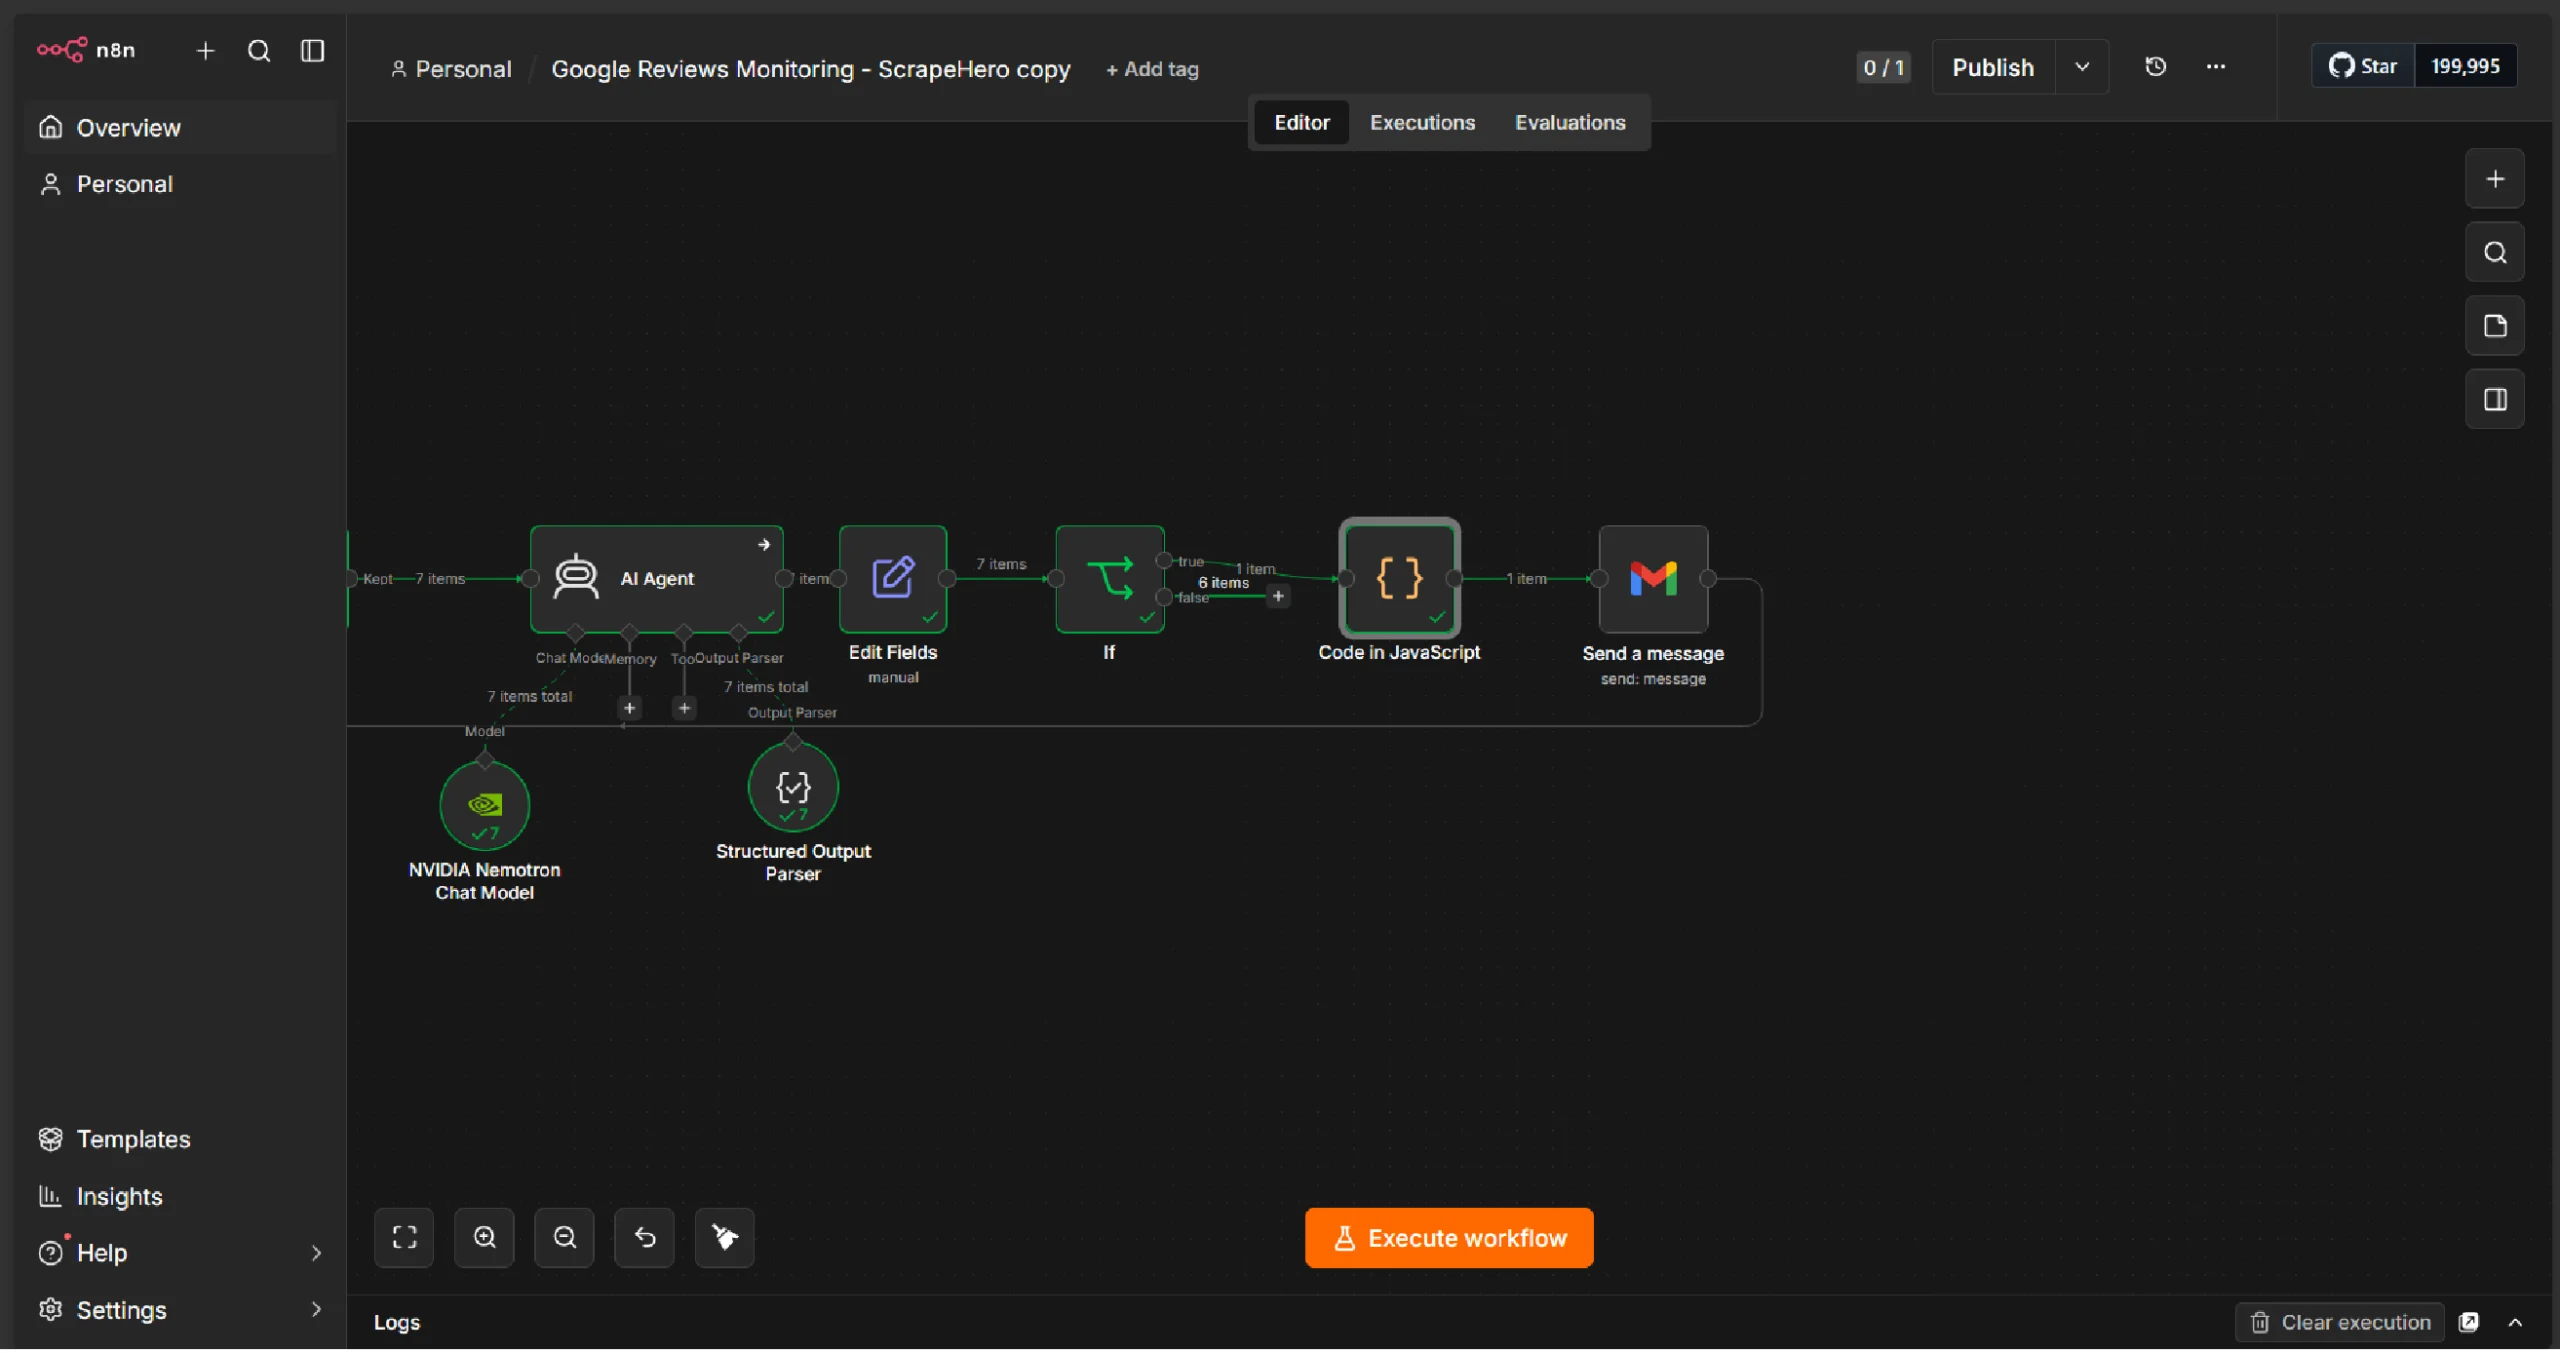
The workflow to automate Google reviews monitoring with n8n follows this pipeline:
- Trigger: A schedule triggers the workflow at defined intervals.
- Read Business List: Business names and Google Place IDs are pulled from a Google Sheet.
- Fetch Reviews: The ScrapeHero Google Reviews API retrieves the latest reviews for each business.
- Filter Recent Reviews: Only reviews posted within a configured time window are kept.
- AI Analysis: Each review is analyzed for sentiment, priority, category, and recommended action.
- Priority Filter: Only high-priority reviews proceed.
- Generate Report: A professional HTML email is assembled.
- Send Alert: The report is emailed to the relevant team.
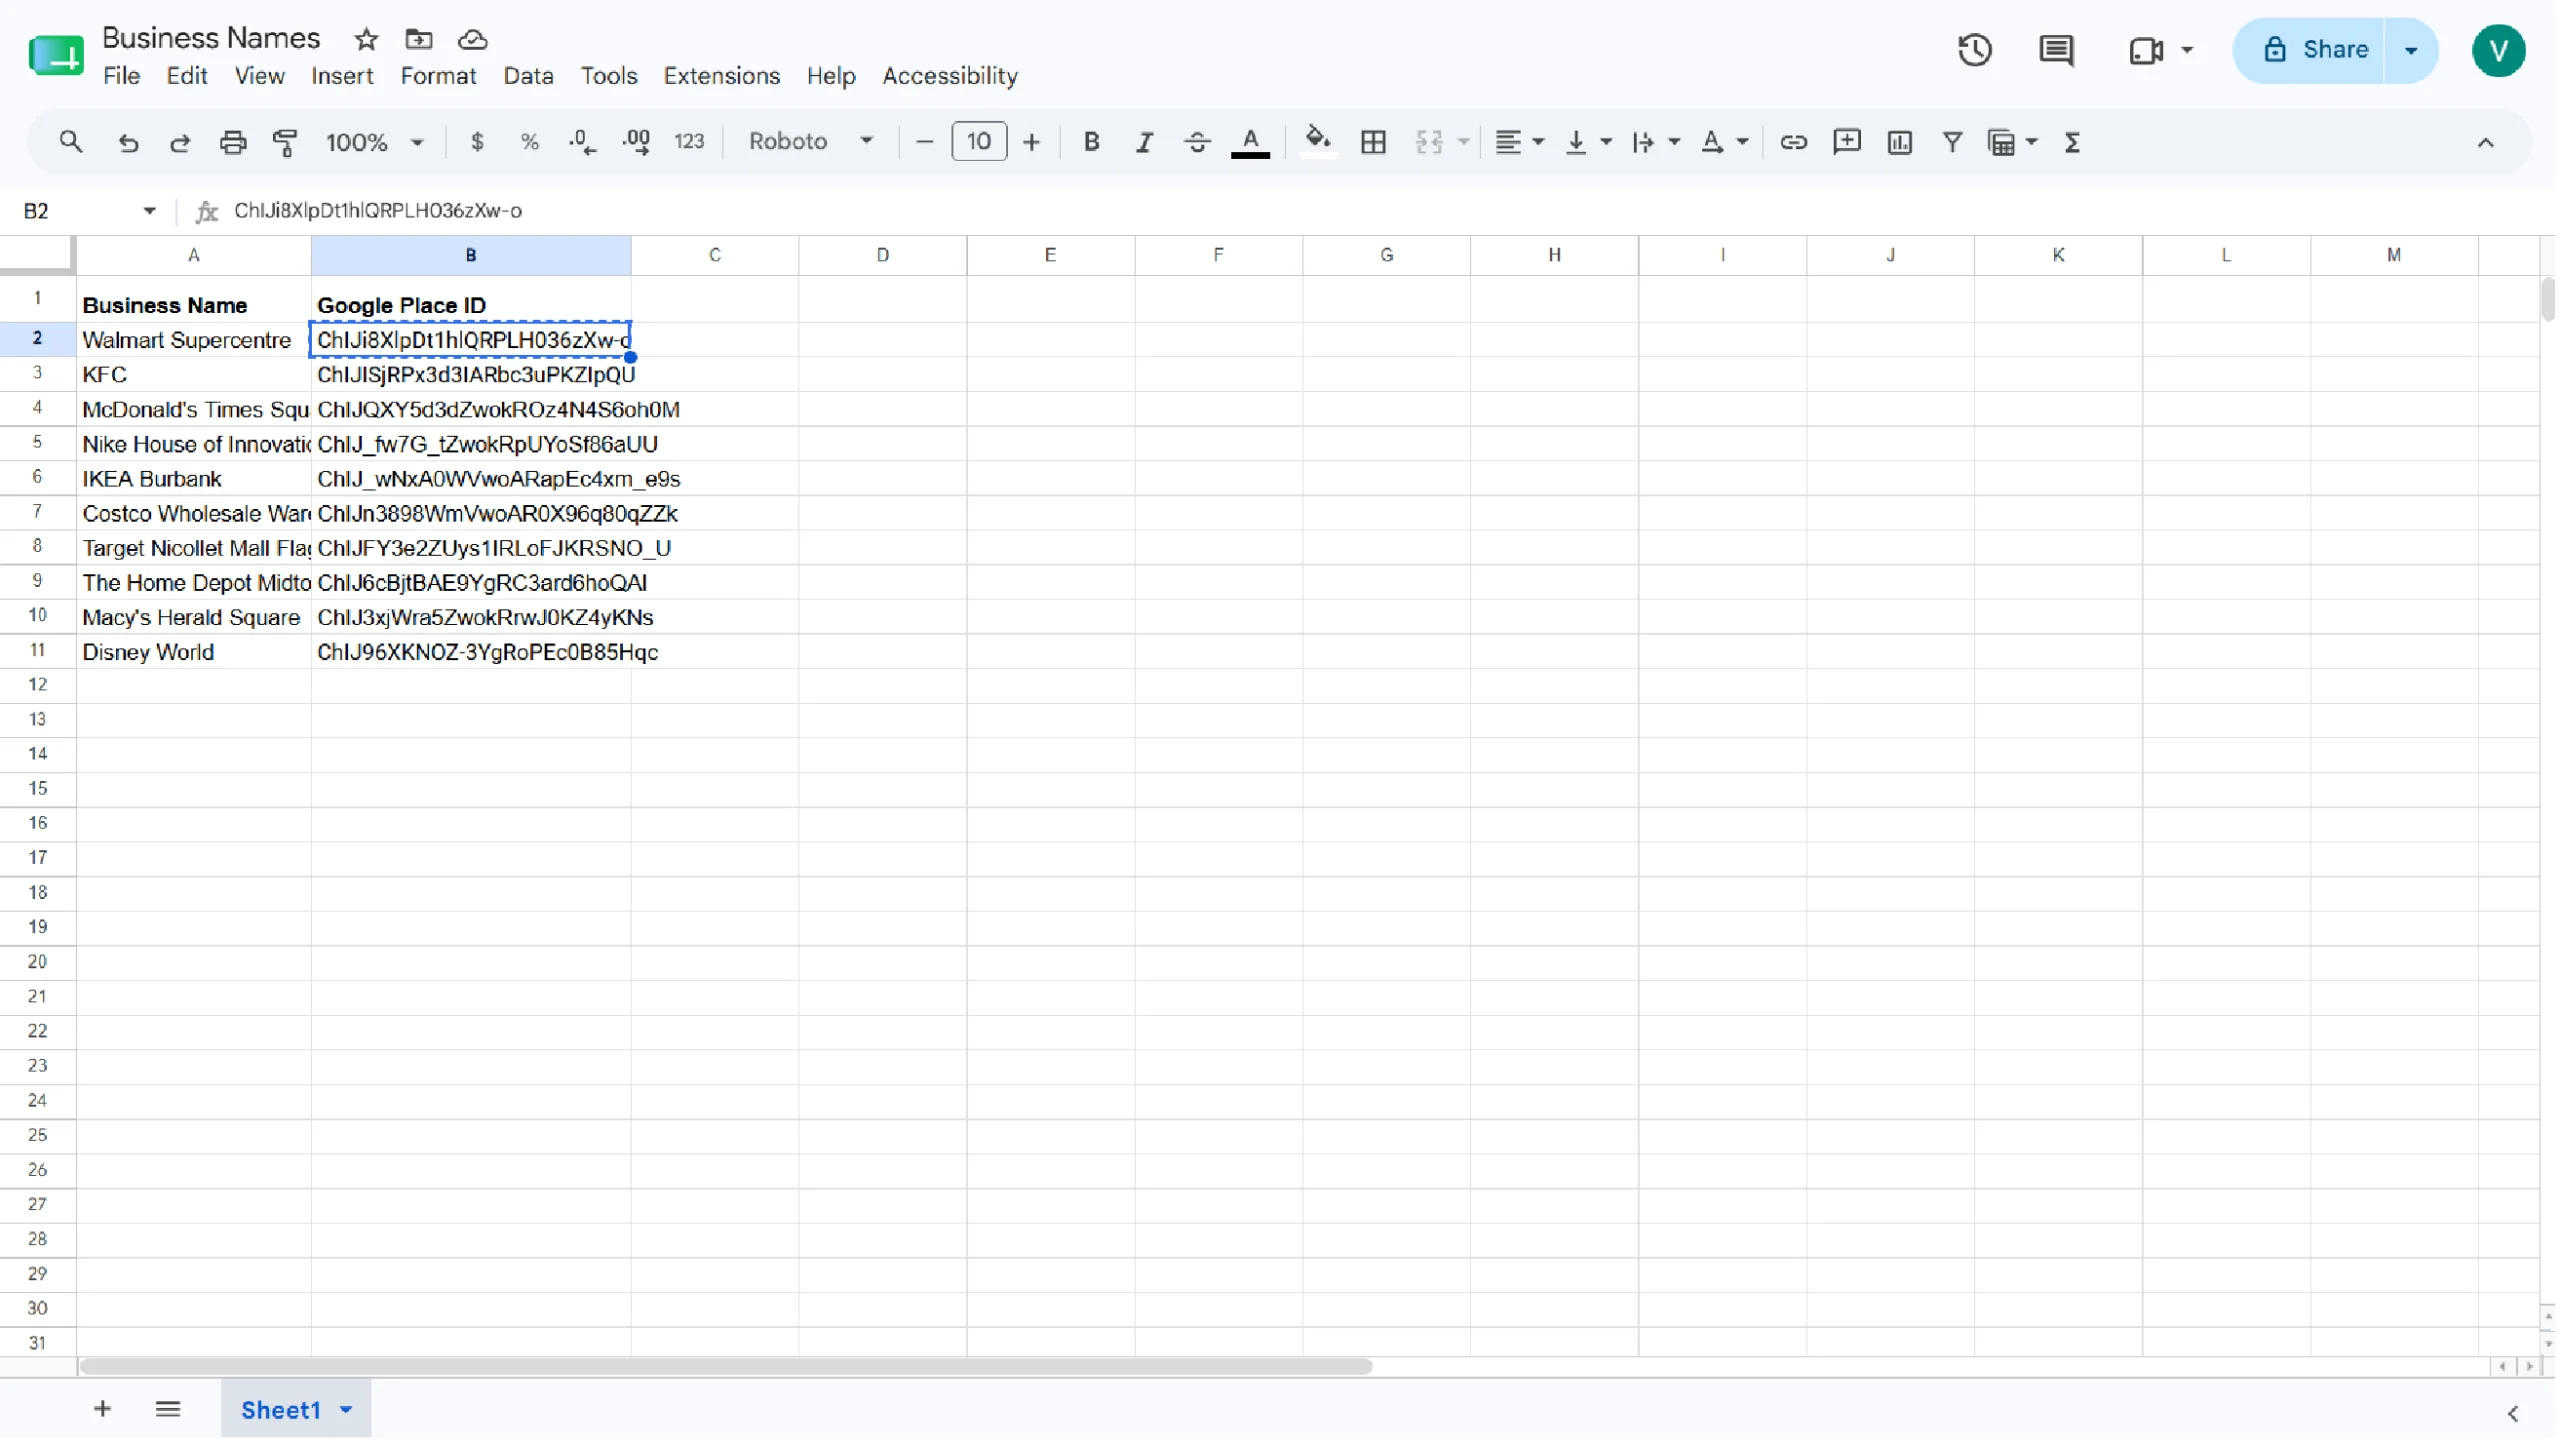
Step 1: Set Up Your Google Sheet
The workflow uses a Google Sheet as a lightweight configuration layer. This makes it easy for non-technical team members to add or remove businesses without touching the workflow.
Create a new Google Sheet with the following columns:
| Column | Description | Example |
|---|---|---|
| Business Name | The name of the business location | Walmart Supercentre |
| Google Place ID | The unique Place ID from Google Maps | ChIJi8XlpDt1hlQRPLH036zXw-o |
Tip: You can find a business’s Google Place ID using the Google Place ID Finder. Search for the business, and copy the Place ID.
Add one row per business location you want to monitor.
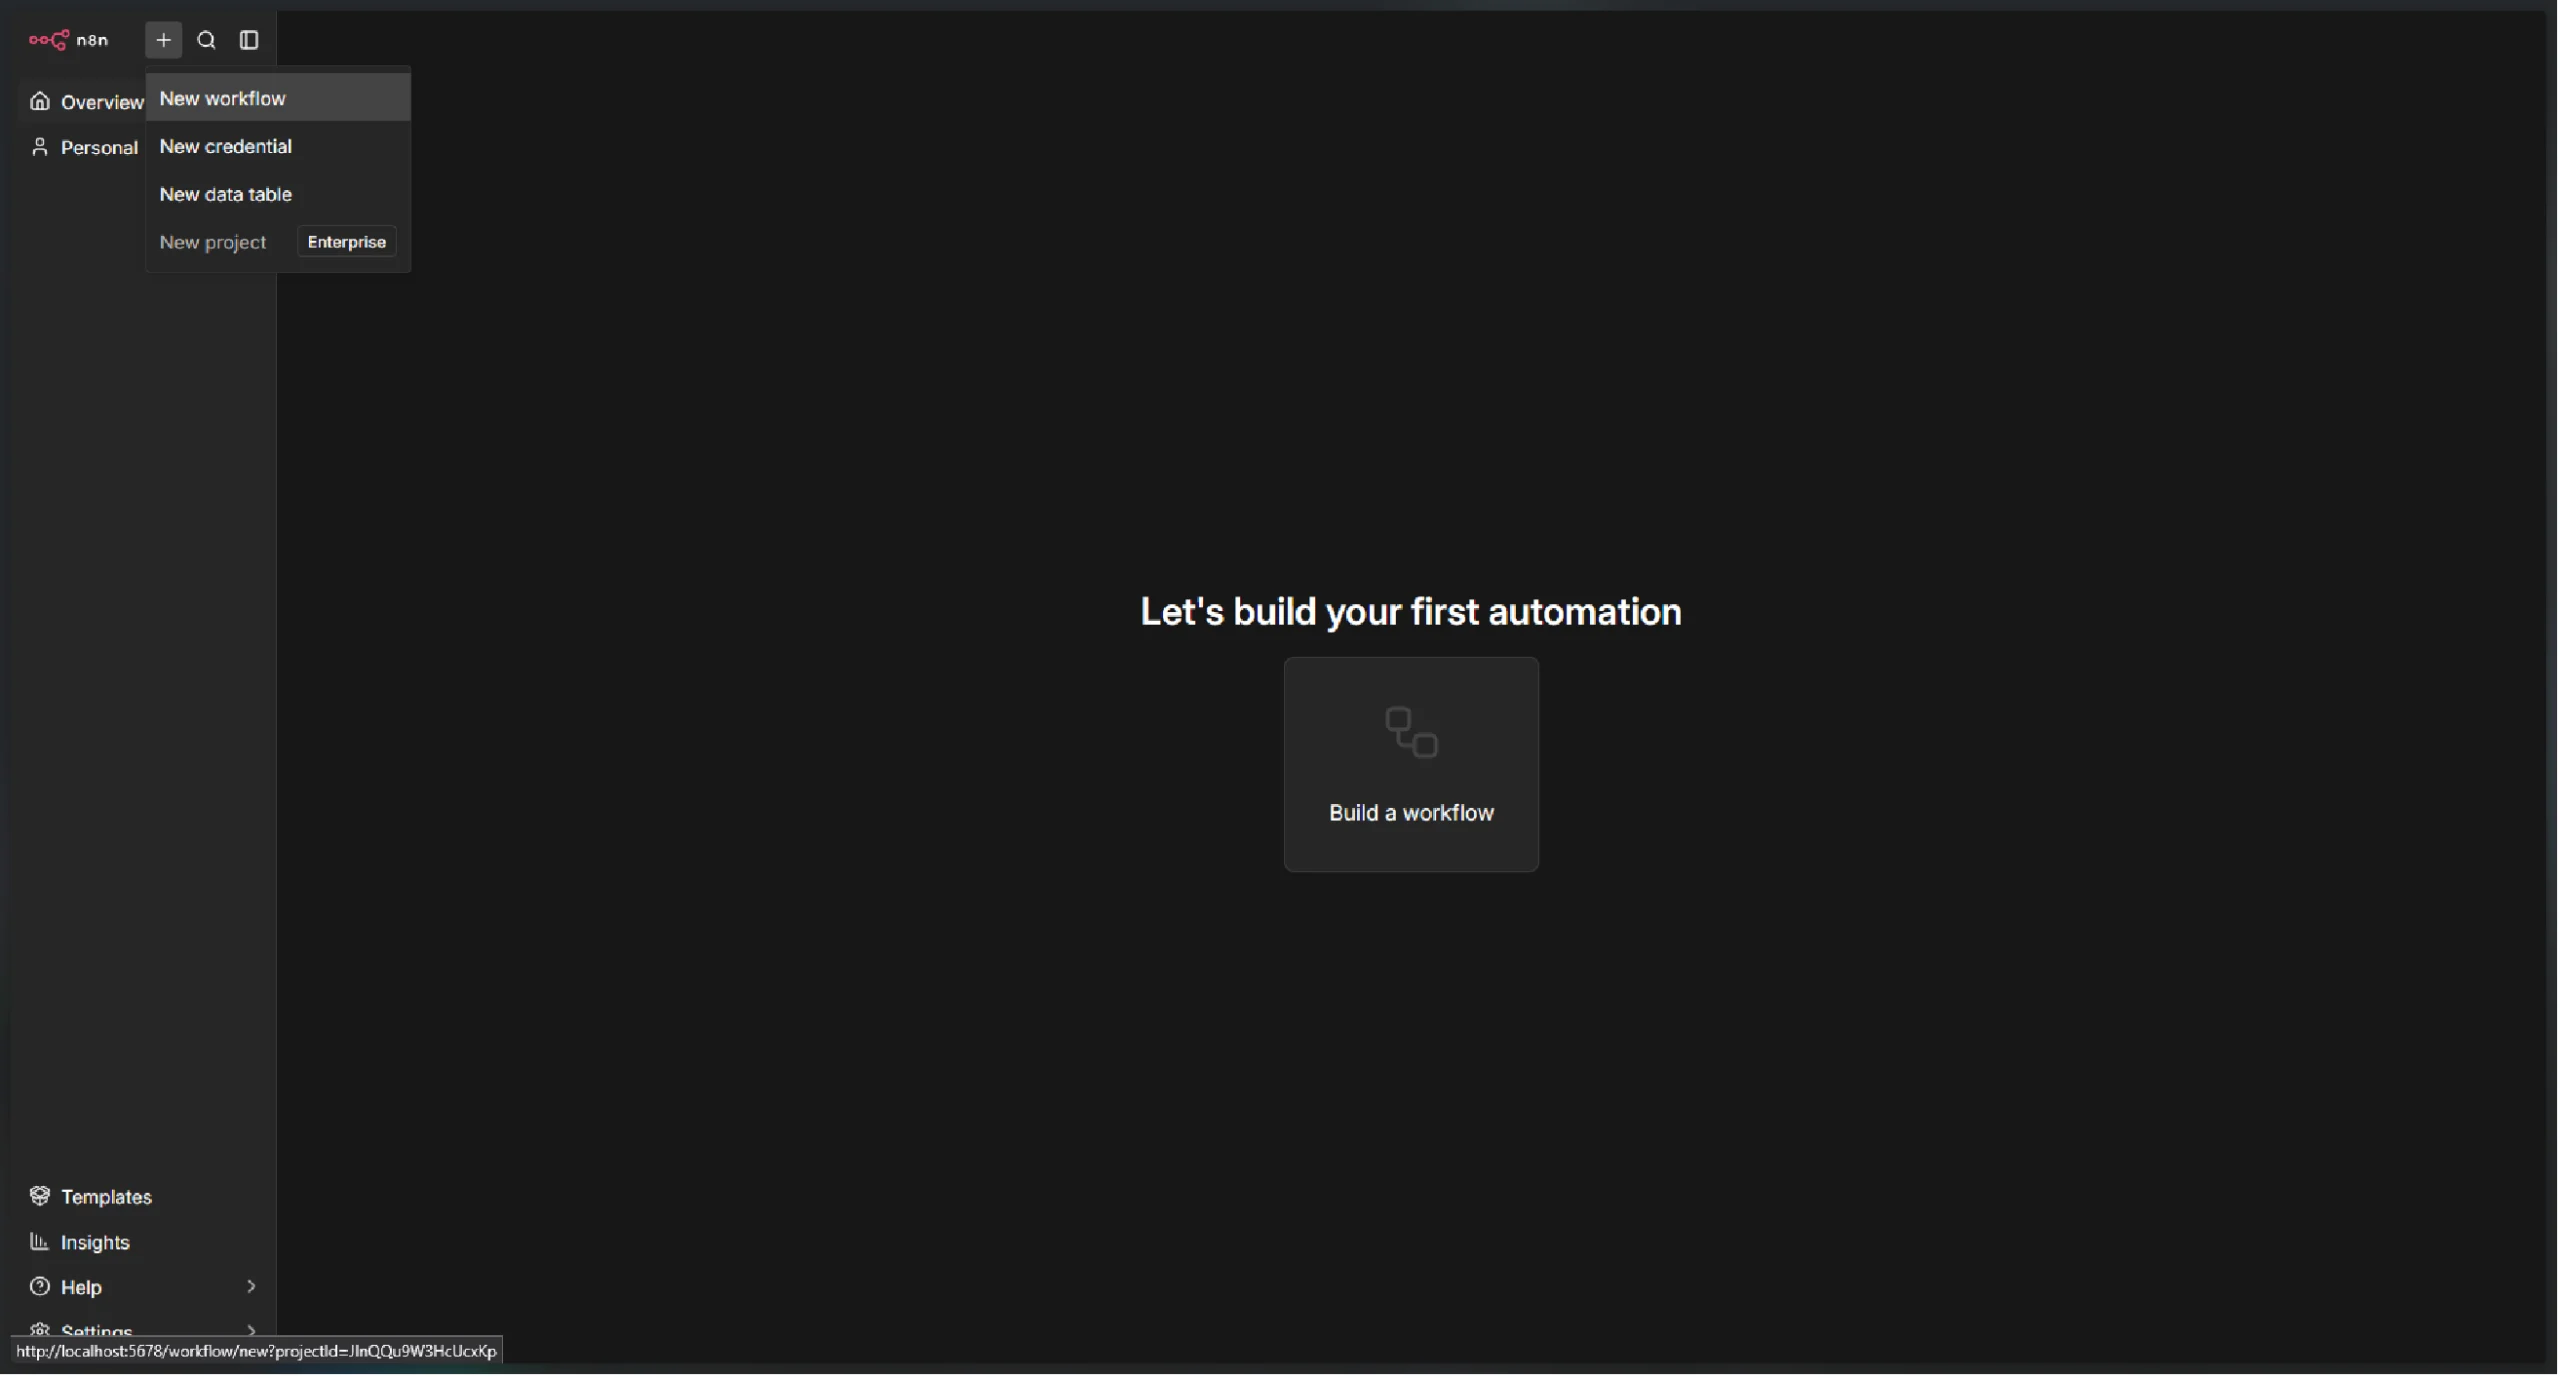
Step 2: Create a New n8n Workflow
Open your n8n instance and create a new workflow.
- Click “Add workflow” from the n8n dashboard.
- Give it a descriptive name, such as Google Reviews Monitoring – ScrapeHero.
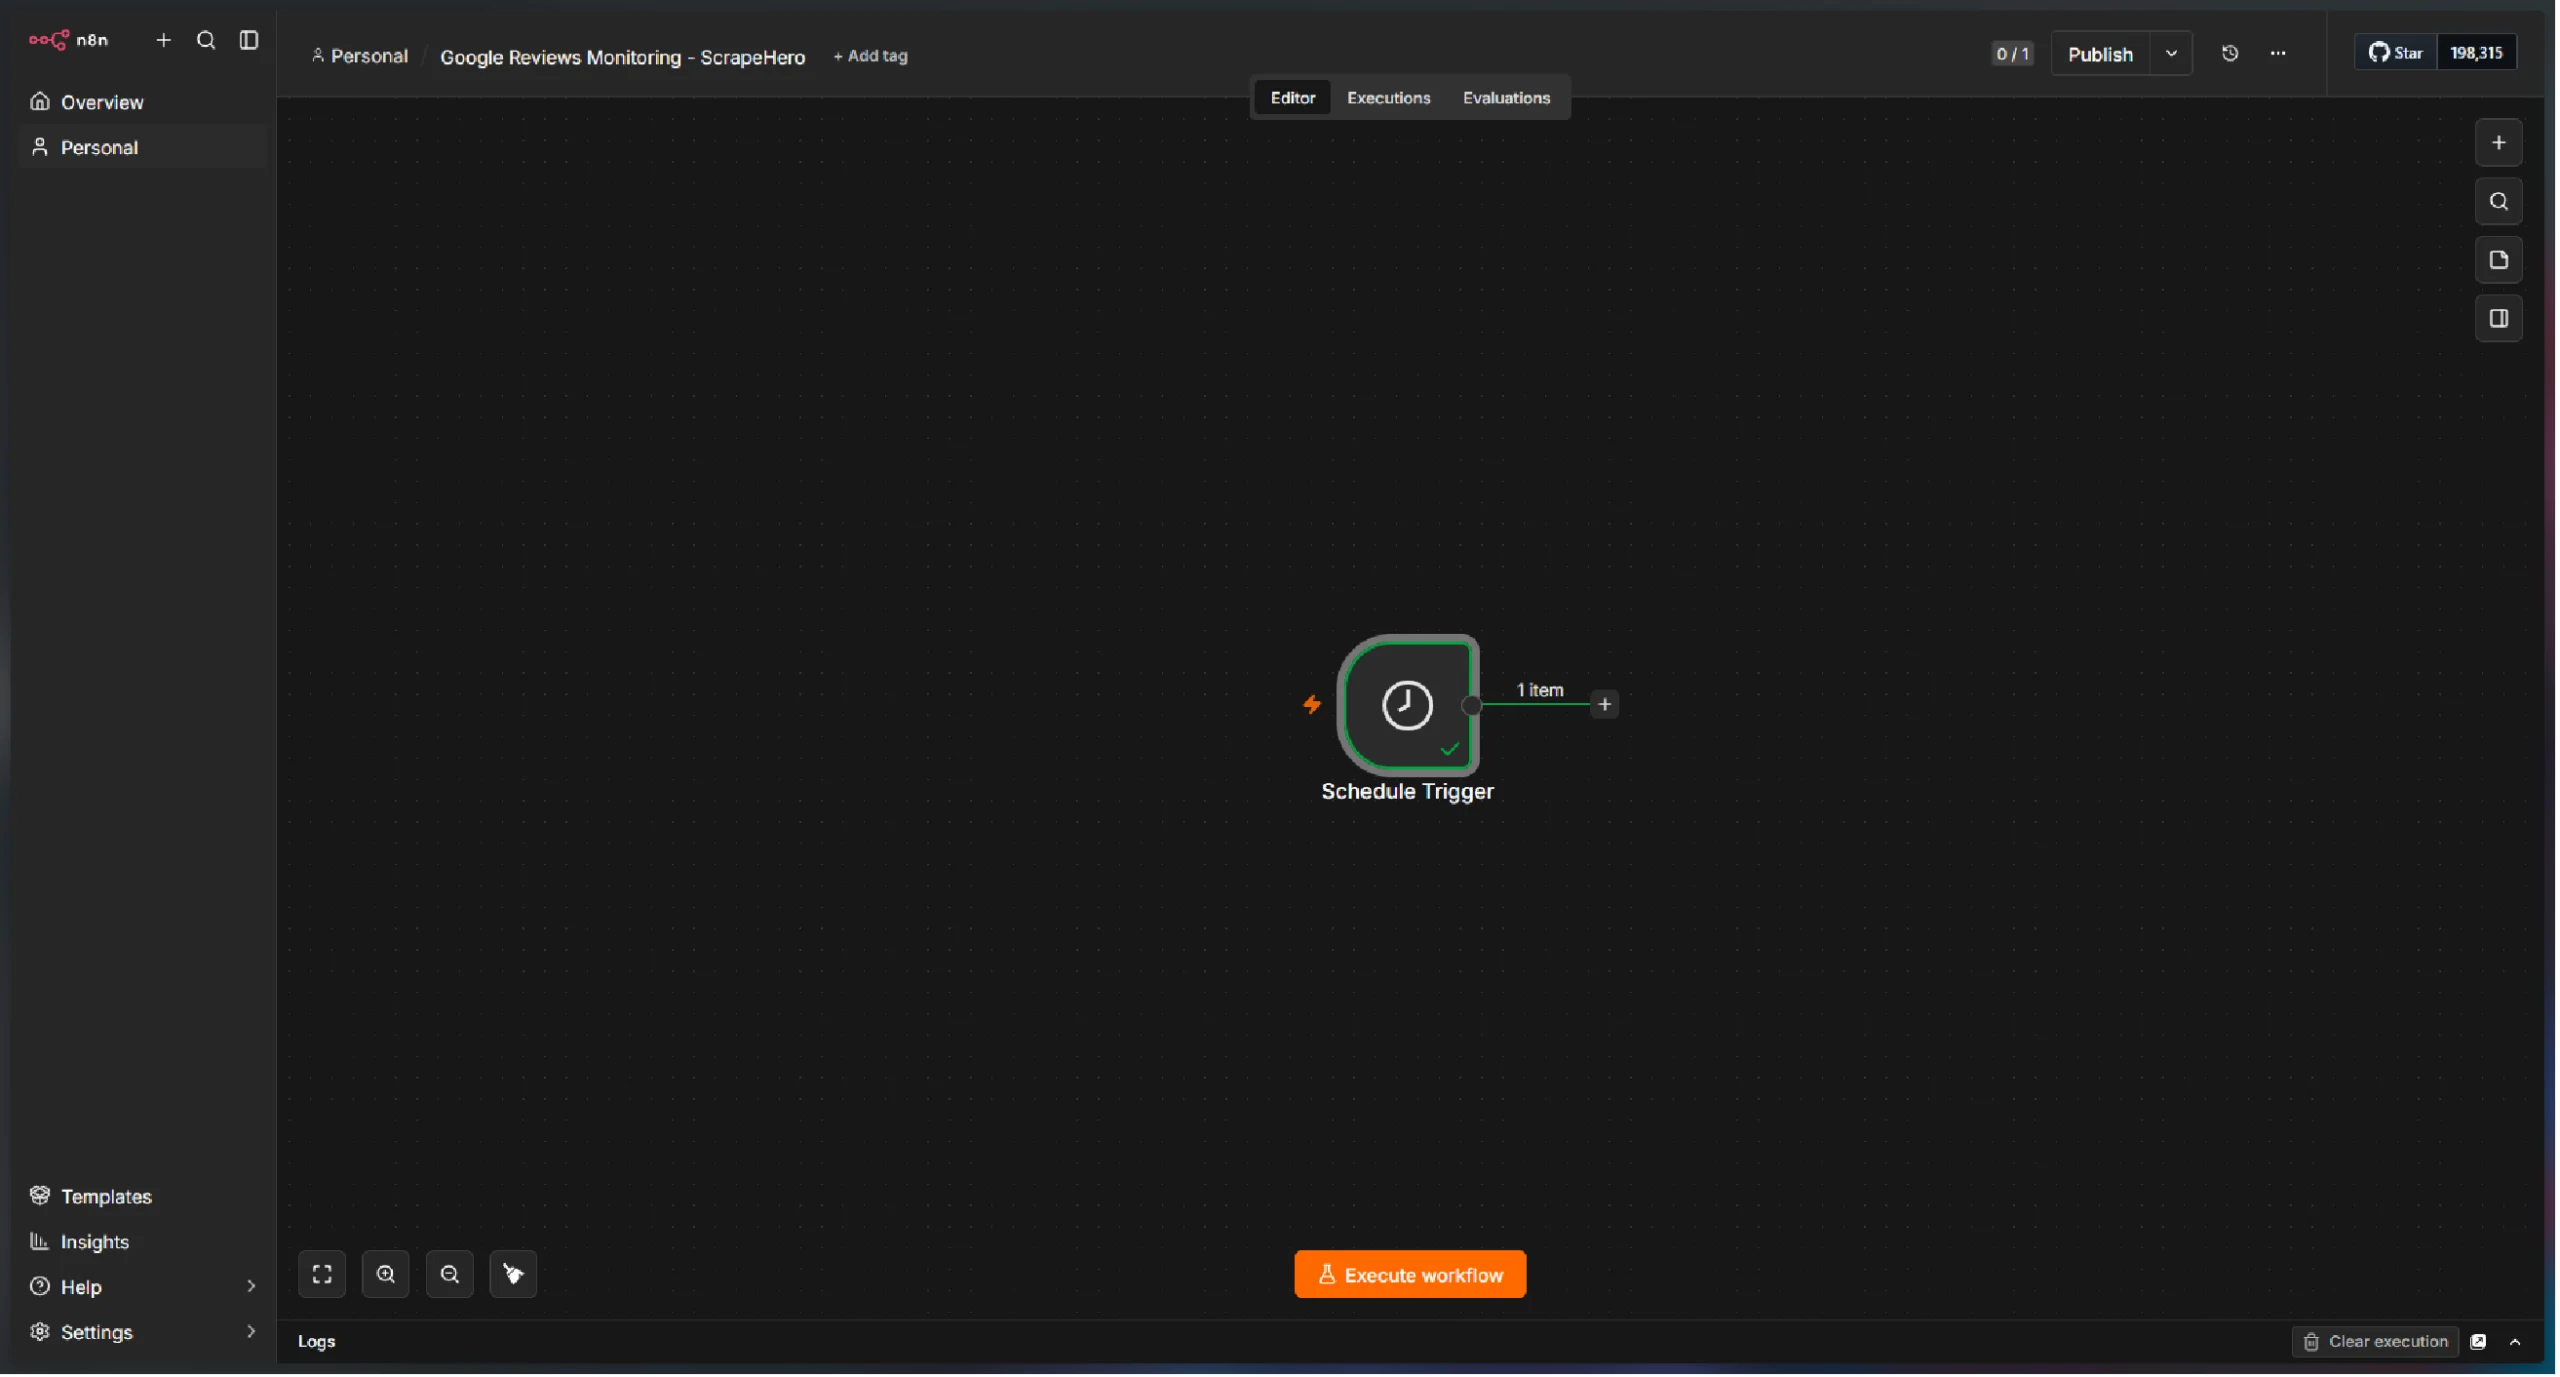
Step 3: Add the Schedule Trigger
The workflow needs to run at regular intervals to check for new reviews.
- Add a Schedule Trigger node to your workflow.
- Configure it to run at your desired frequency—for example, daily or weekly.
Step 4: Connect Google Sheets
Next, add a Google Sheets node to read your business list.
1. Add a Google Sheets node and connect it to the Schedule Trigger.
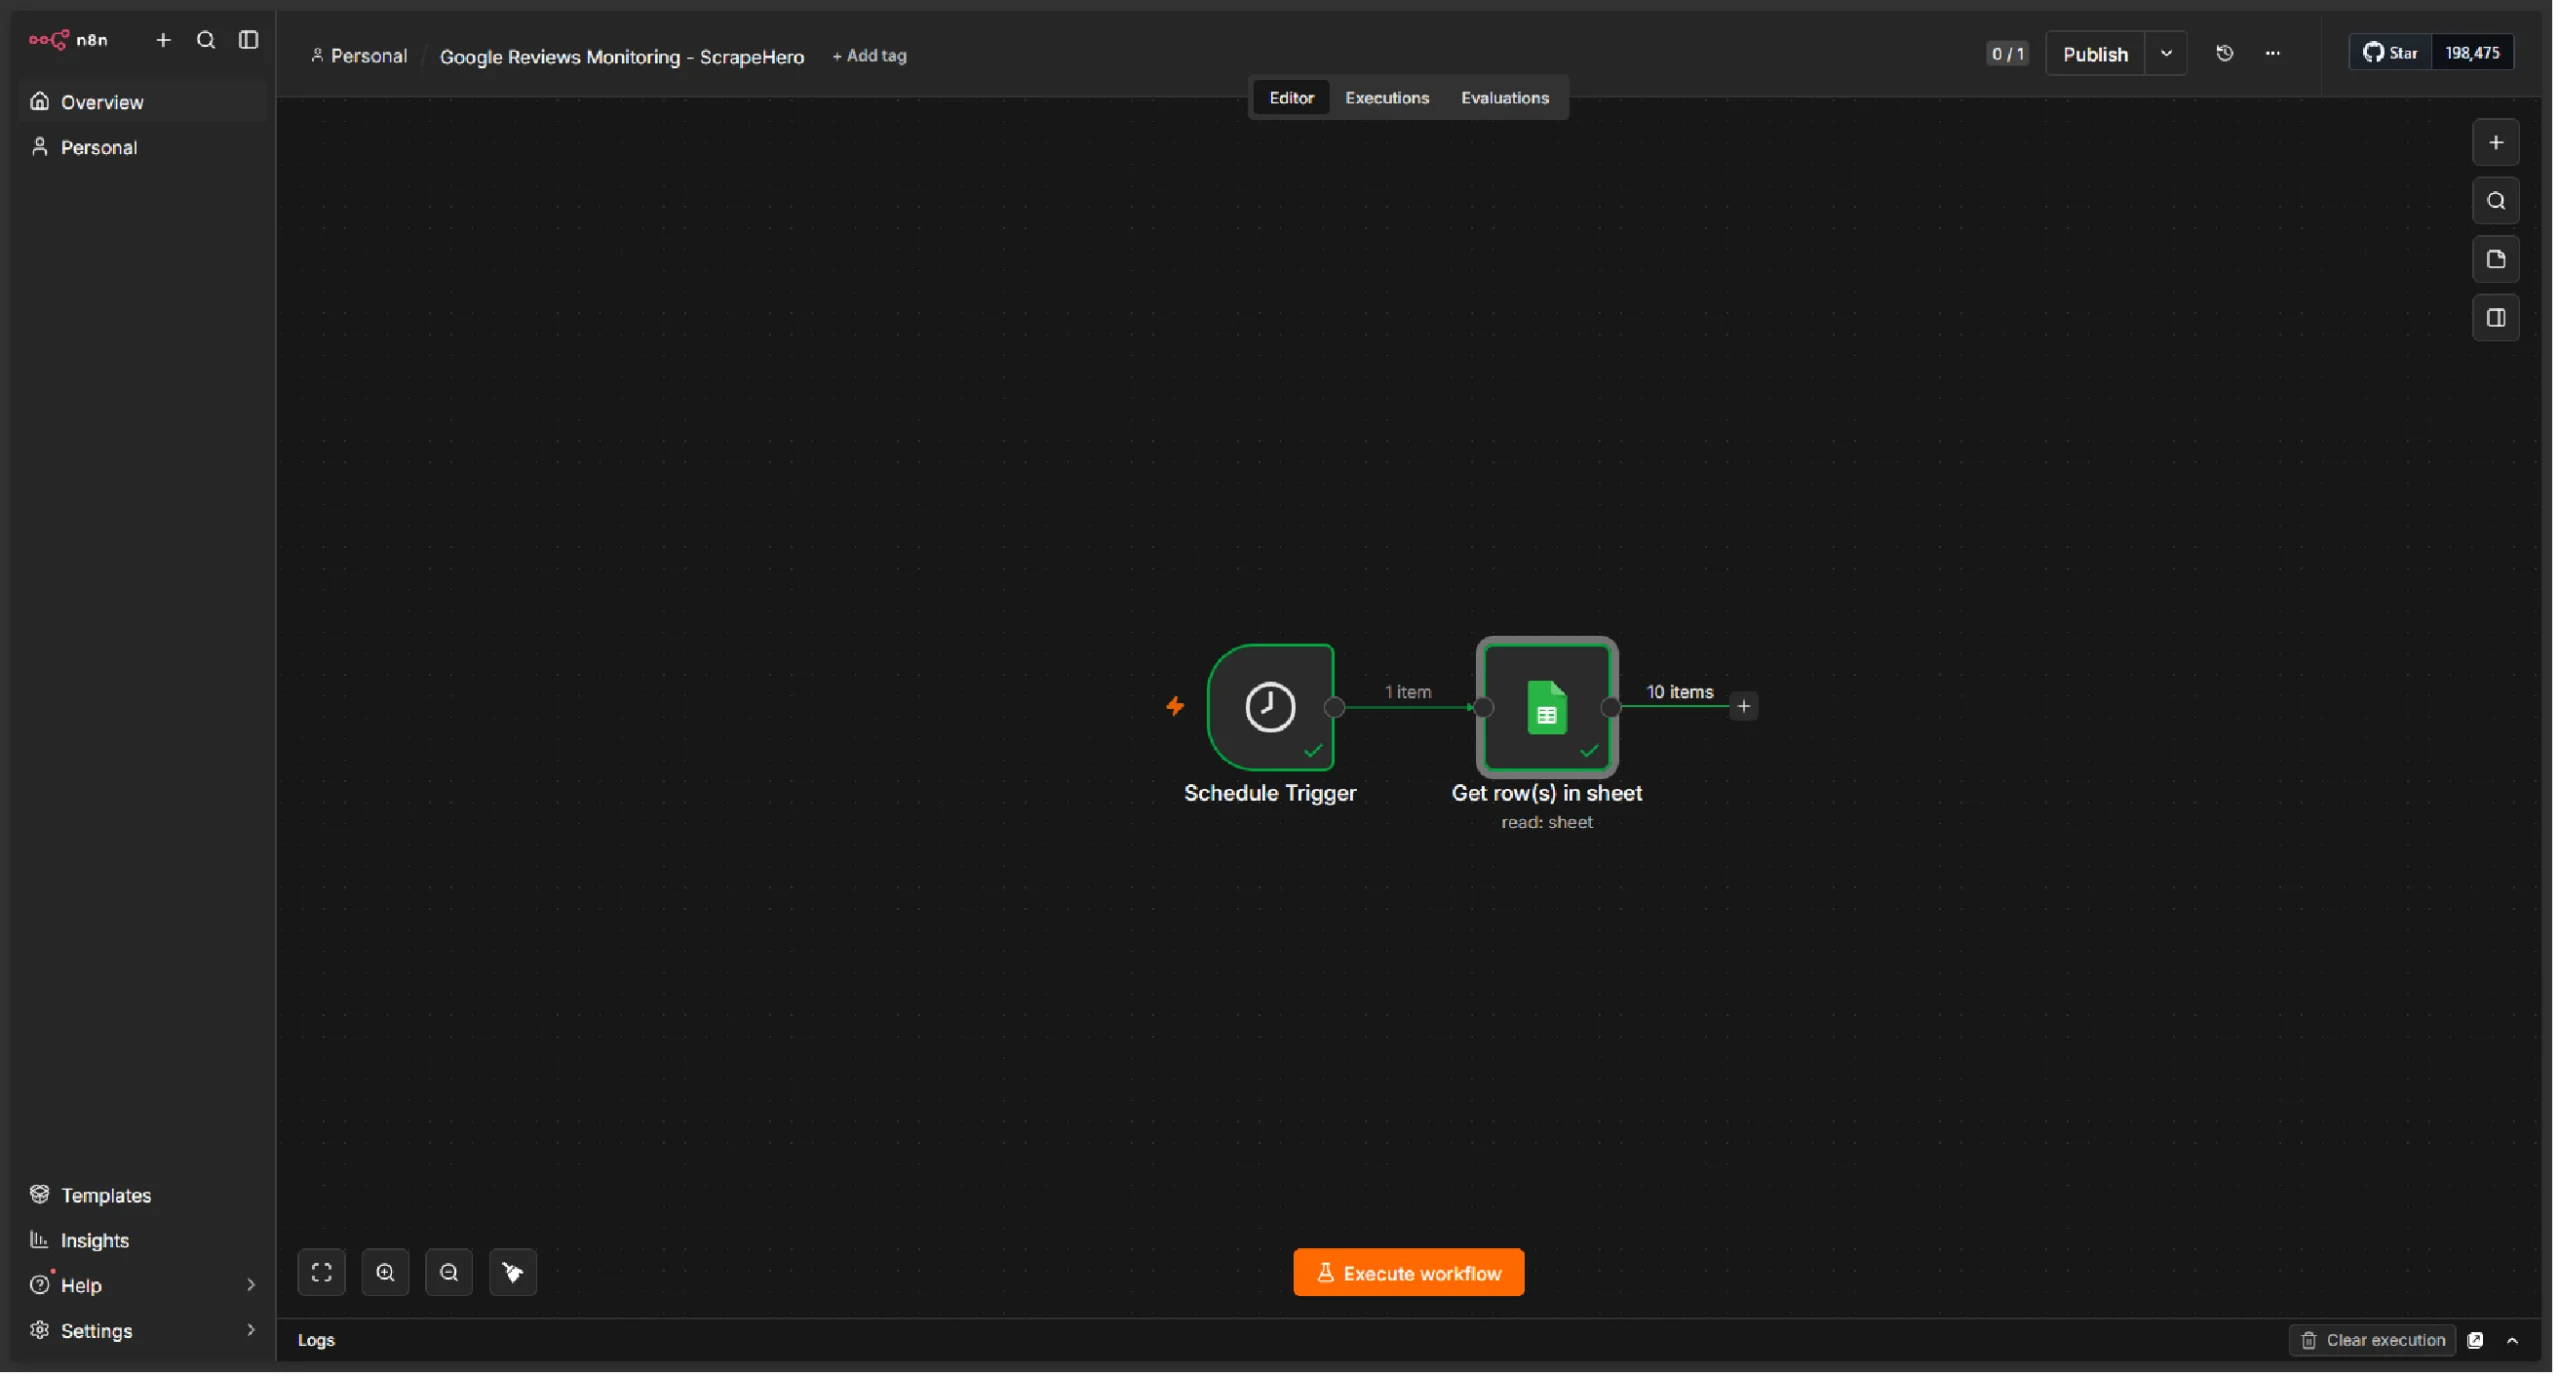
2. Setup credentials for your Google account.
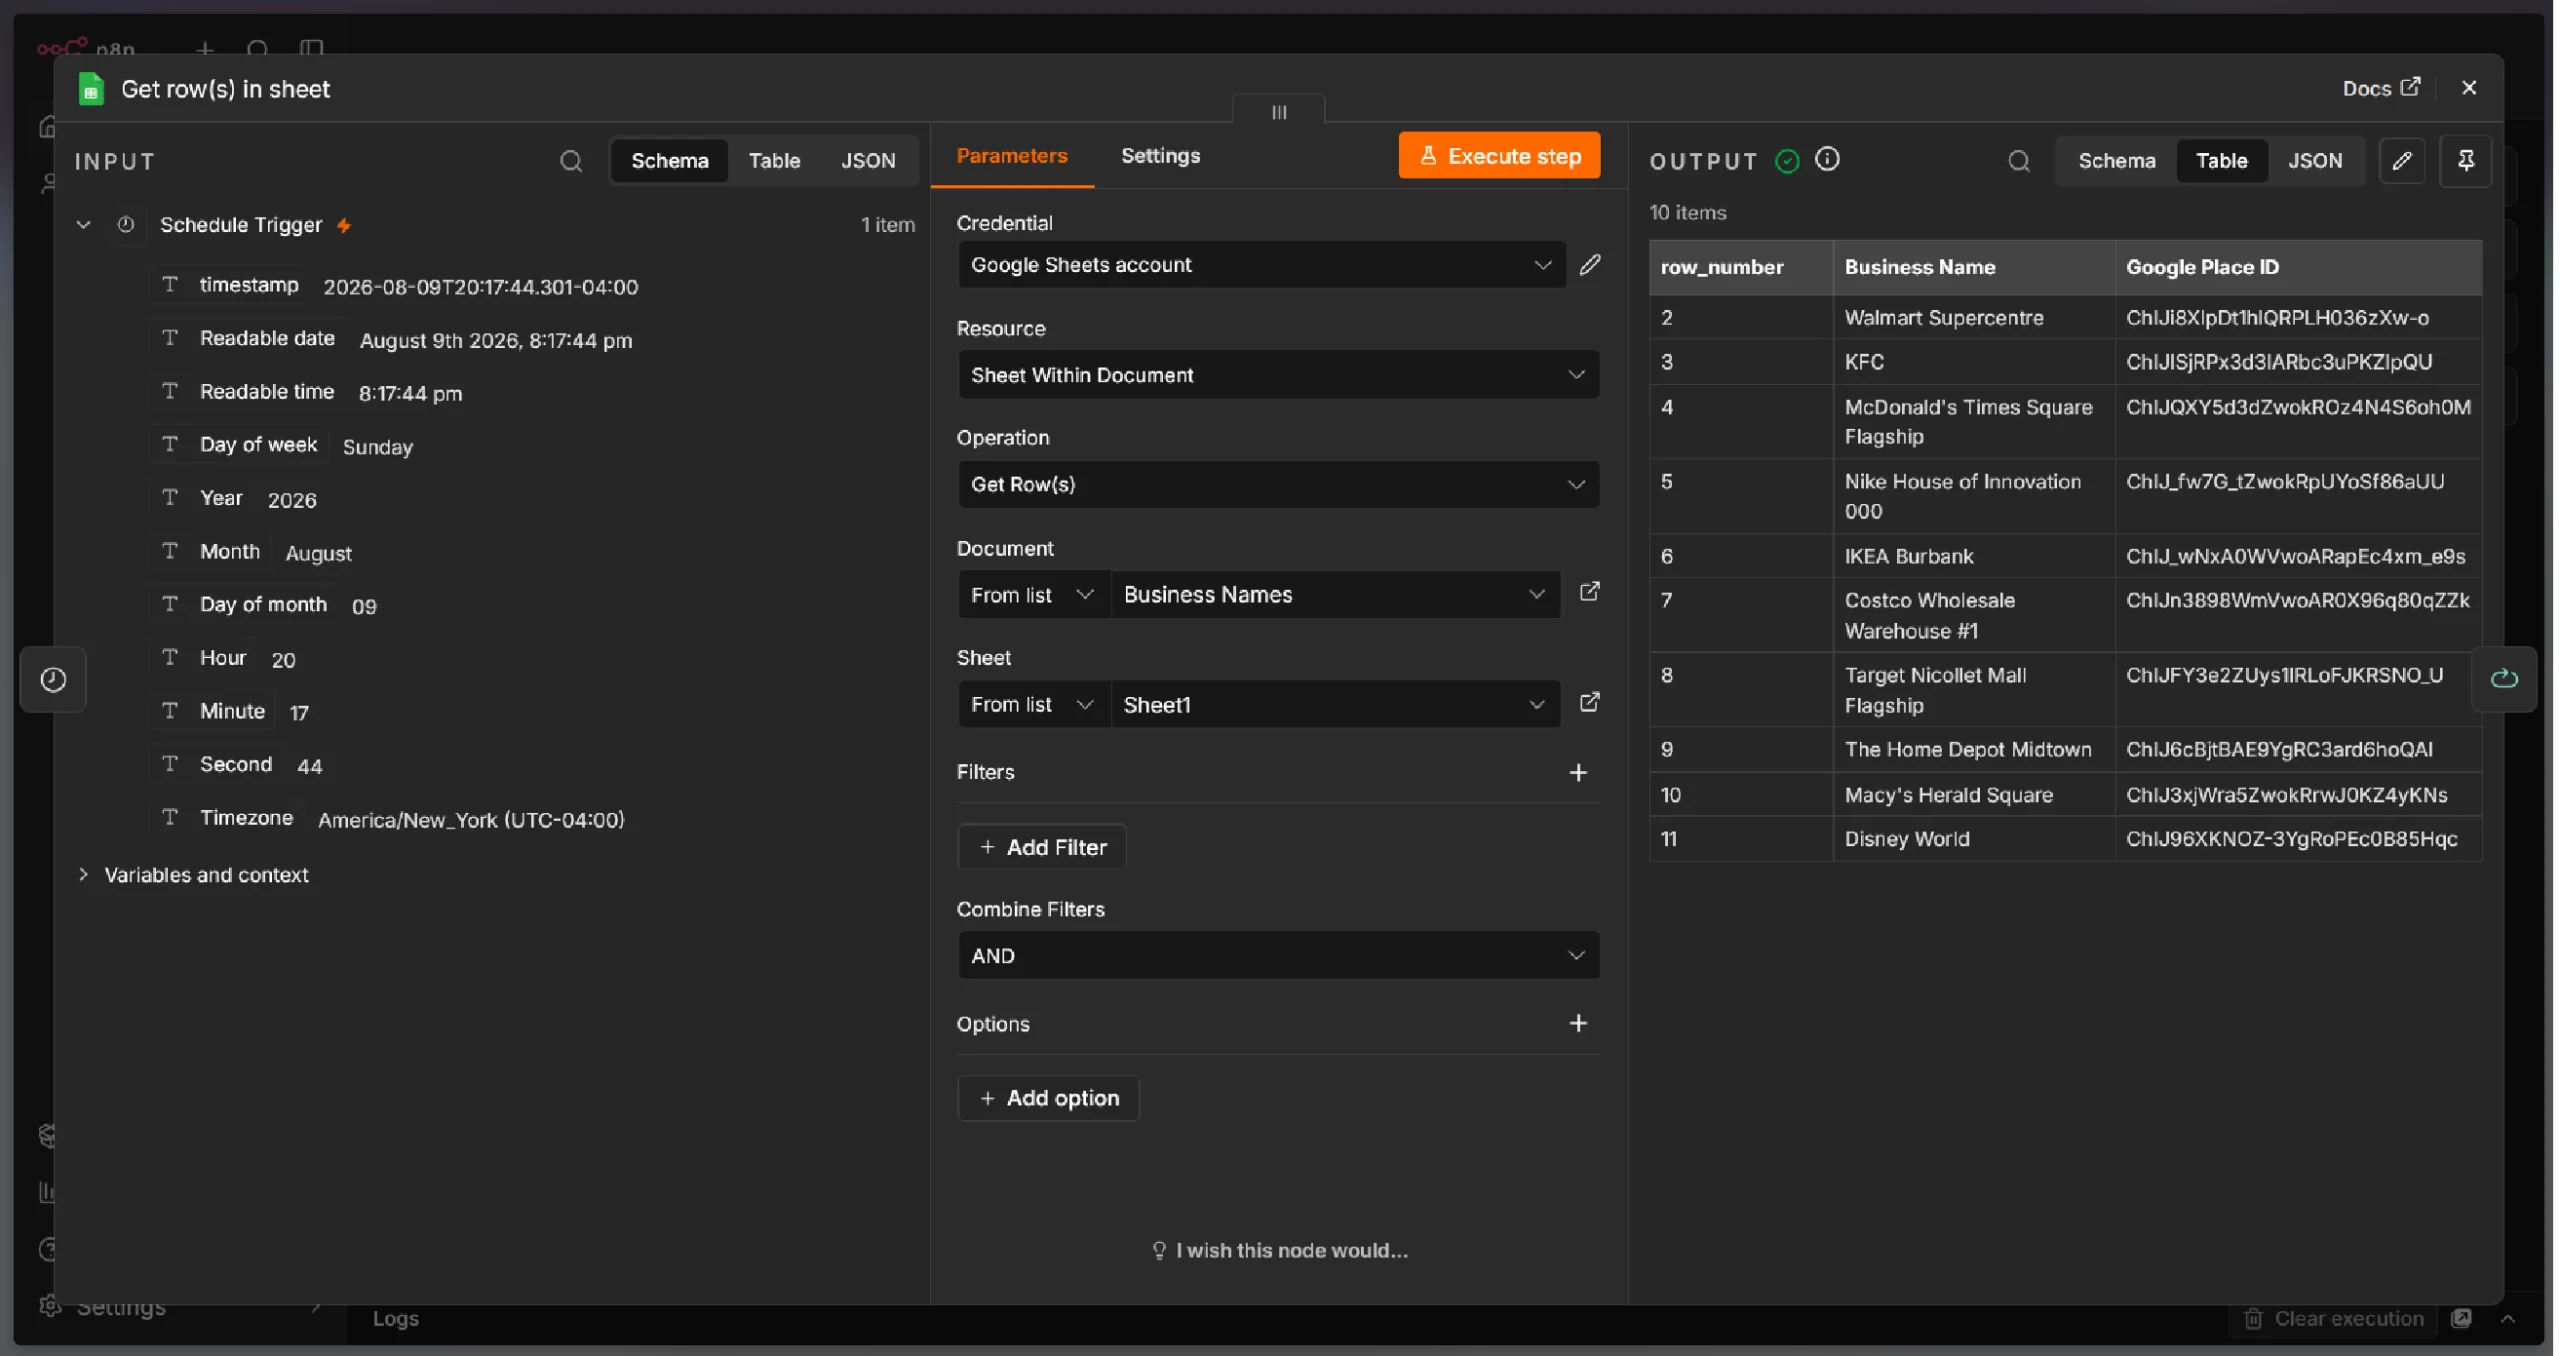
3. Select the spreadsheet and worksheet containing your business list.
4. Configure the node to read all rows.
The output will be a list of items, each containing a Business Name and Google Place ID.
Step 5: Fetch Google Reviews with the ScrapeHero API
This is where the ScrapeHero Google Reviews API does the heavy lifting. For each business in your spreadsheet, the workflow will call the API to retrieve the latest reviews.
1. Add a “Loop Over Items” node and set the Batch Size as 1 so that node passes only one business name.
2. Add an HTTP Request node and connect it to the node.
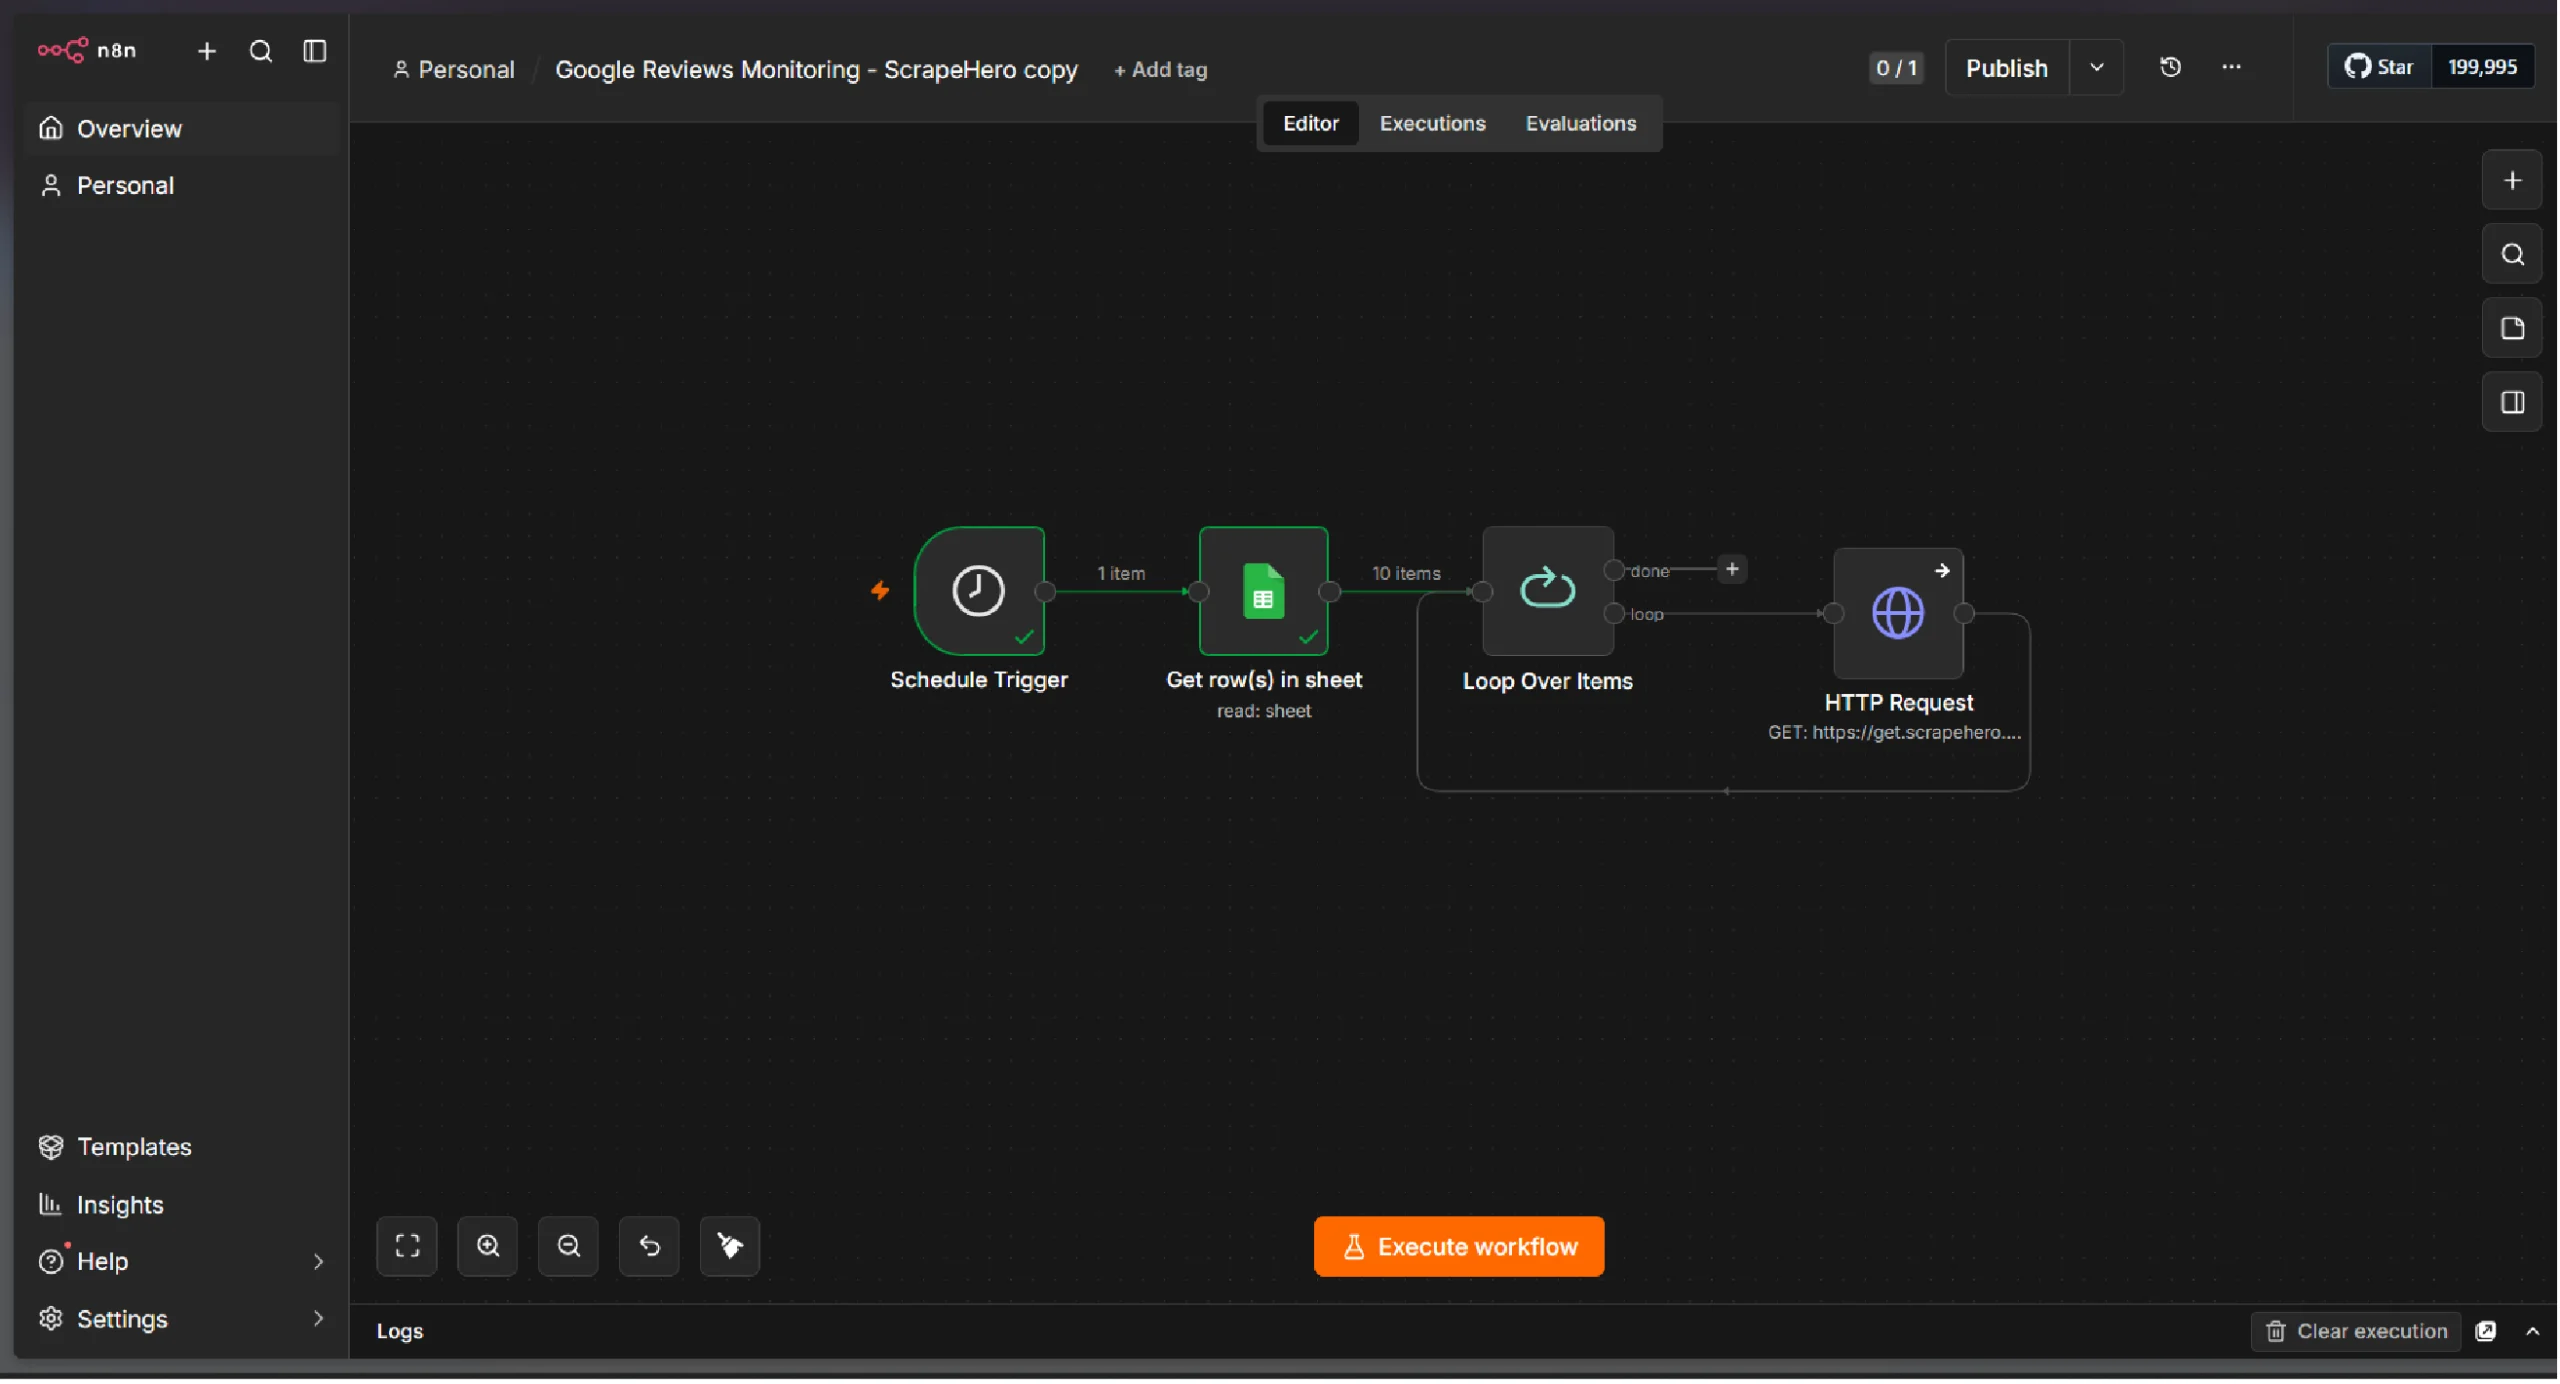
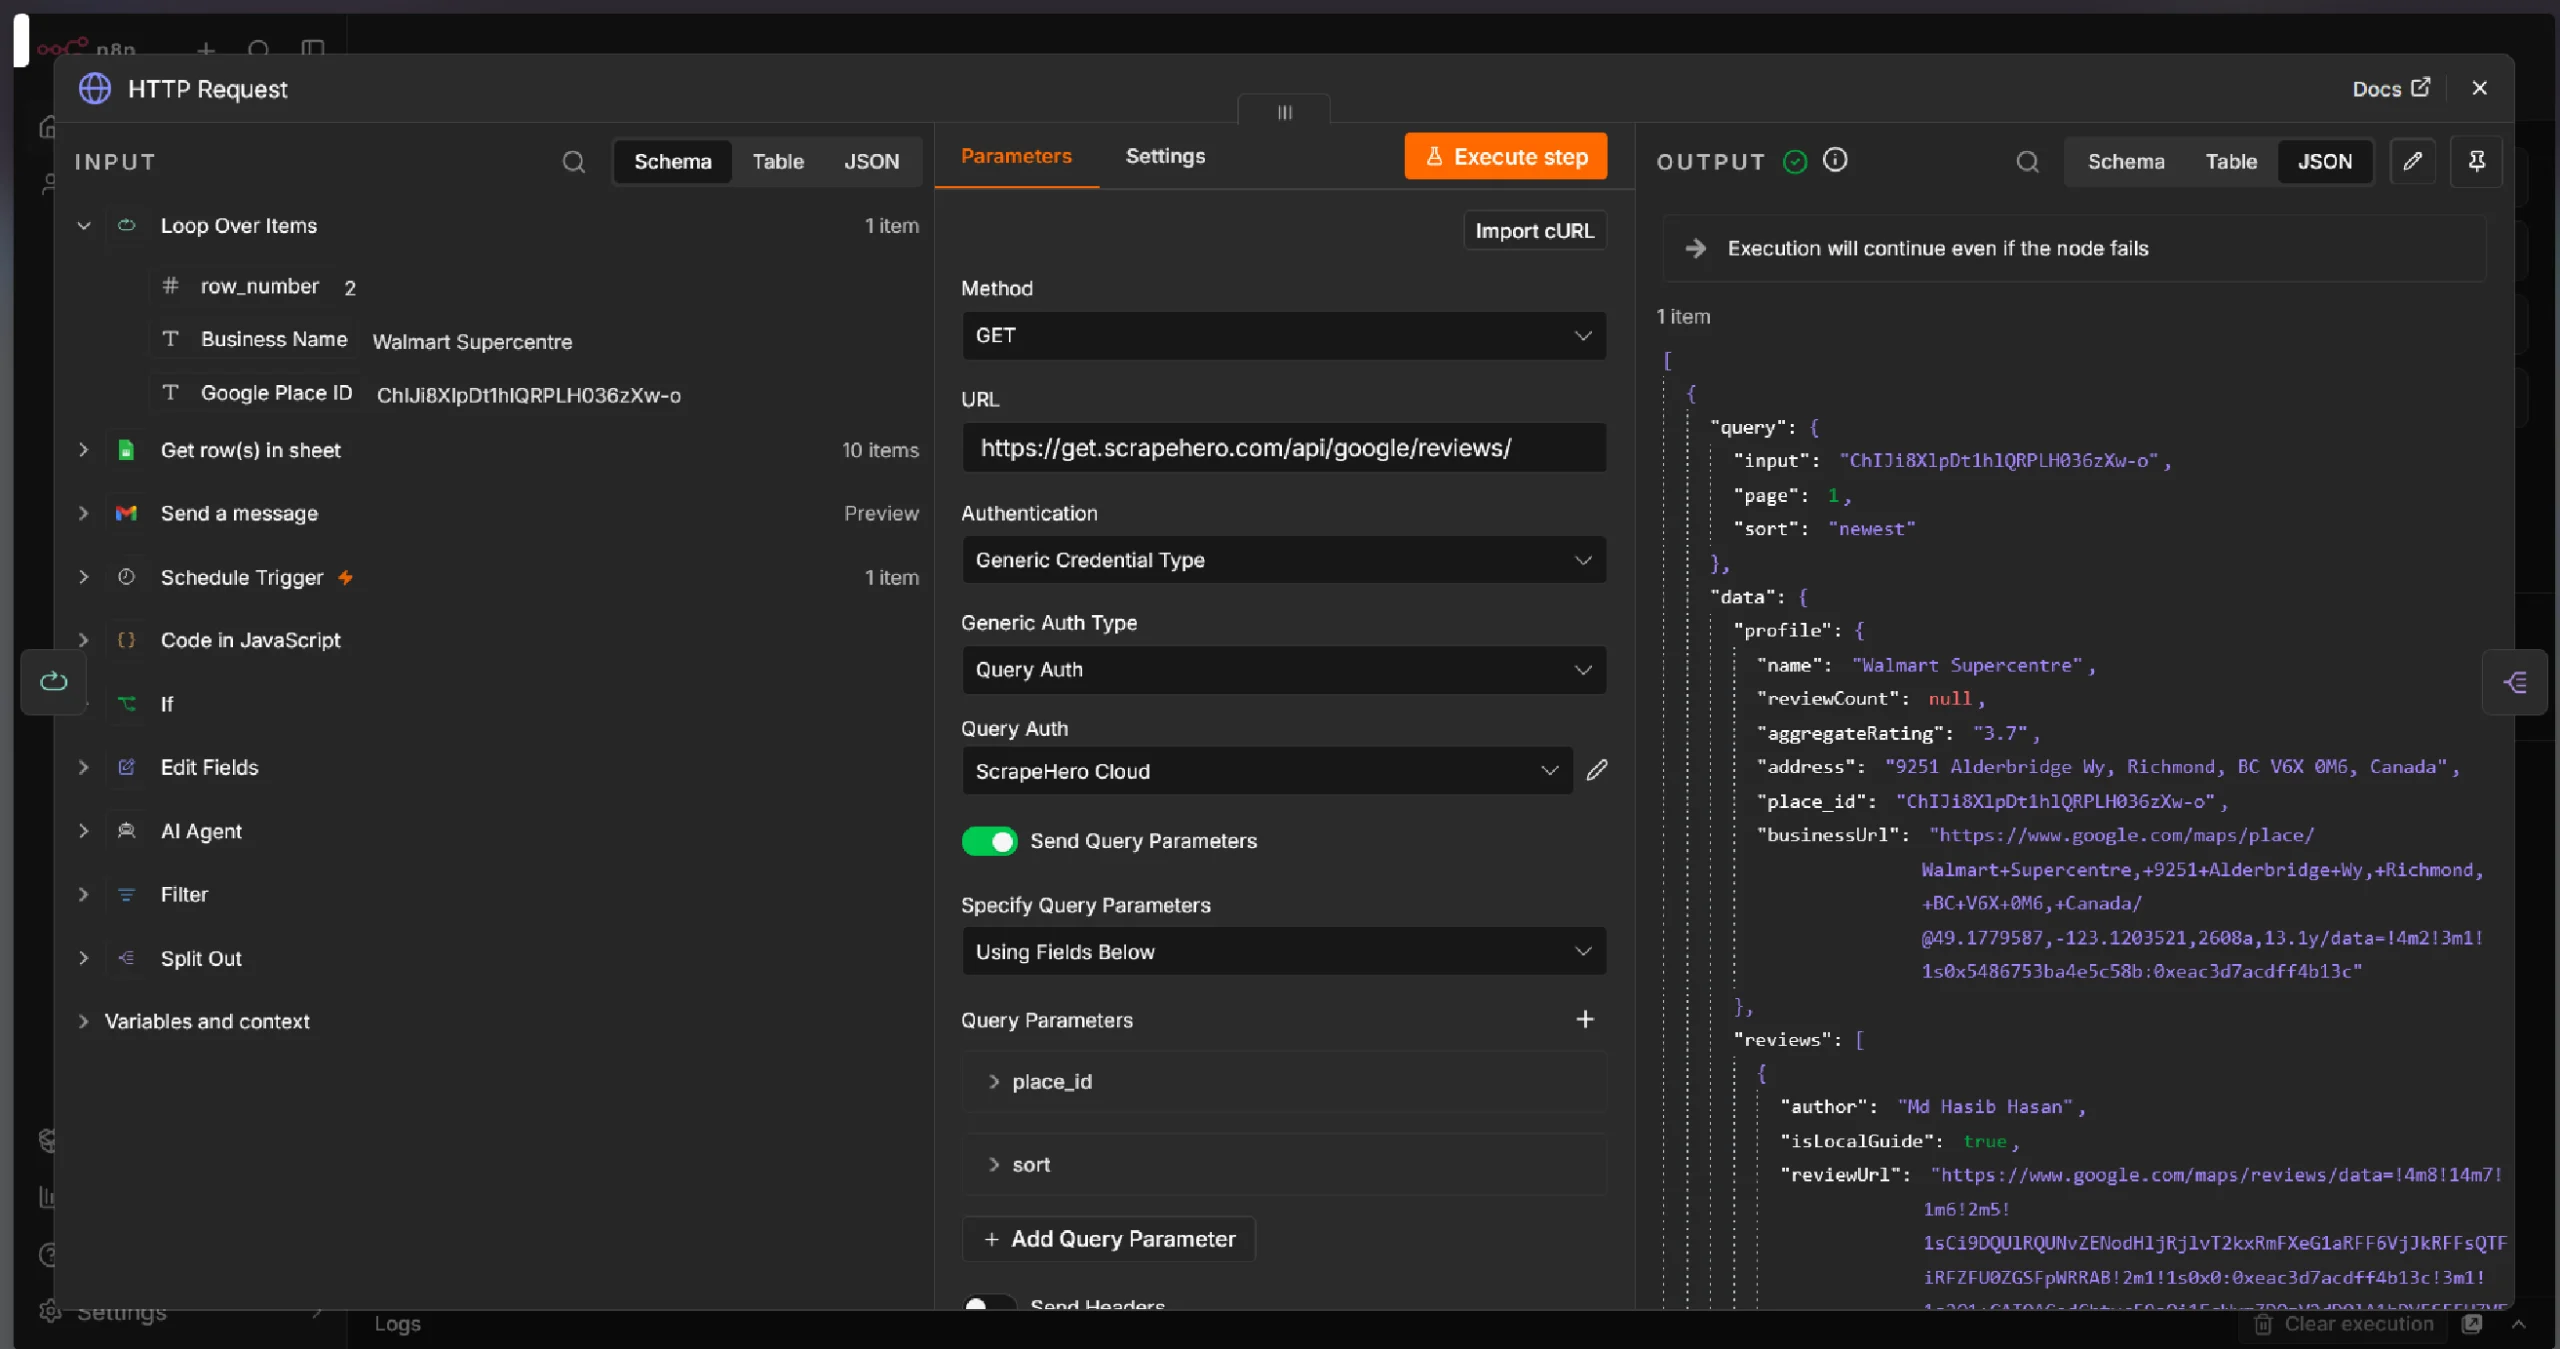
3. Set the method to GET.
4. Set the URL to the ScrapeHero Google Reviews API endpoint: https://get.scrapehero.com/api/google/reviews/
5. Setup credentials and use the following values:
- Authentication: Generic Credential Type
- Generic Auth Type: Query Auth
- Query Auth: <name of the credentials you set up>
6. Add the following query parameters:
| Parameter | Value |
|---|---|
| place_id | {{ $json[‘Google Place ID’] }} |
| sort | newest |
7. Under Settings, change “On Error” value to “Continue.” This ensures that the workflow will continue for other place IDs.
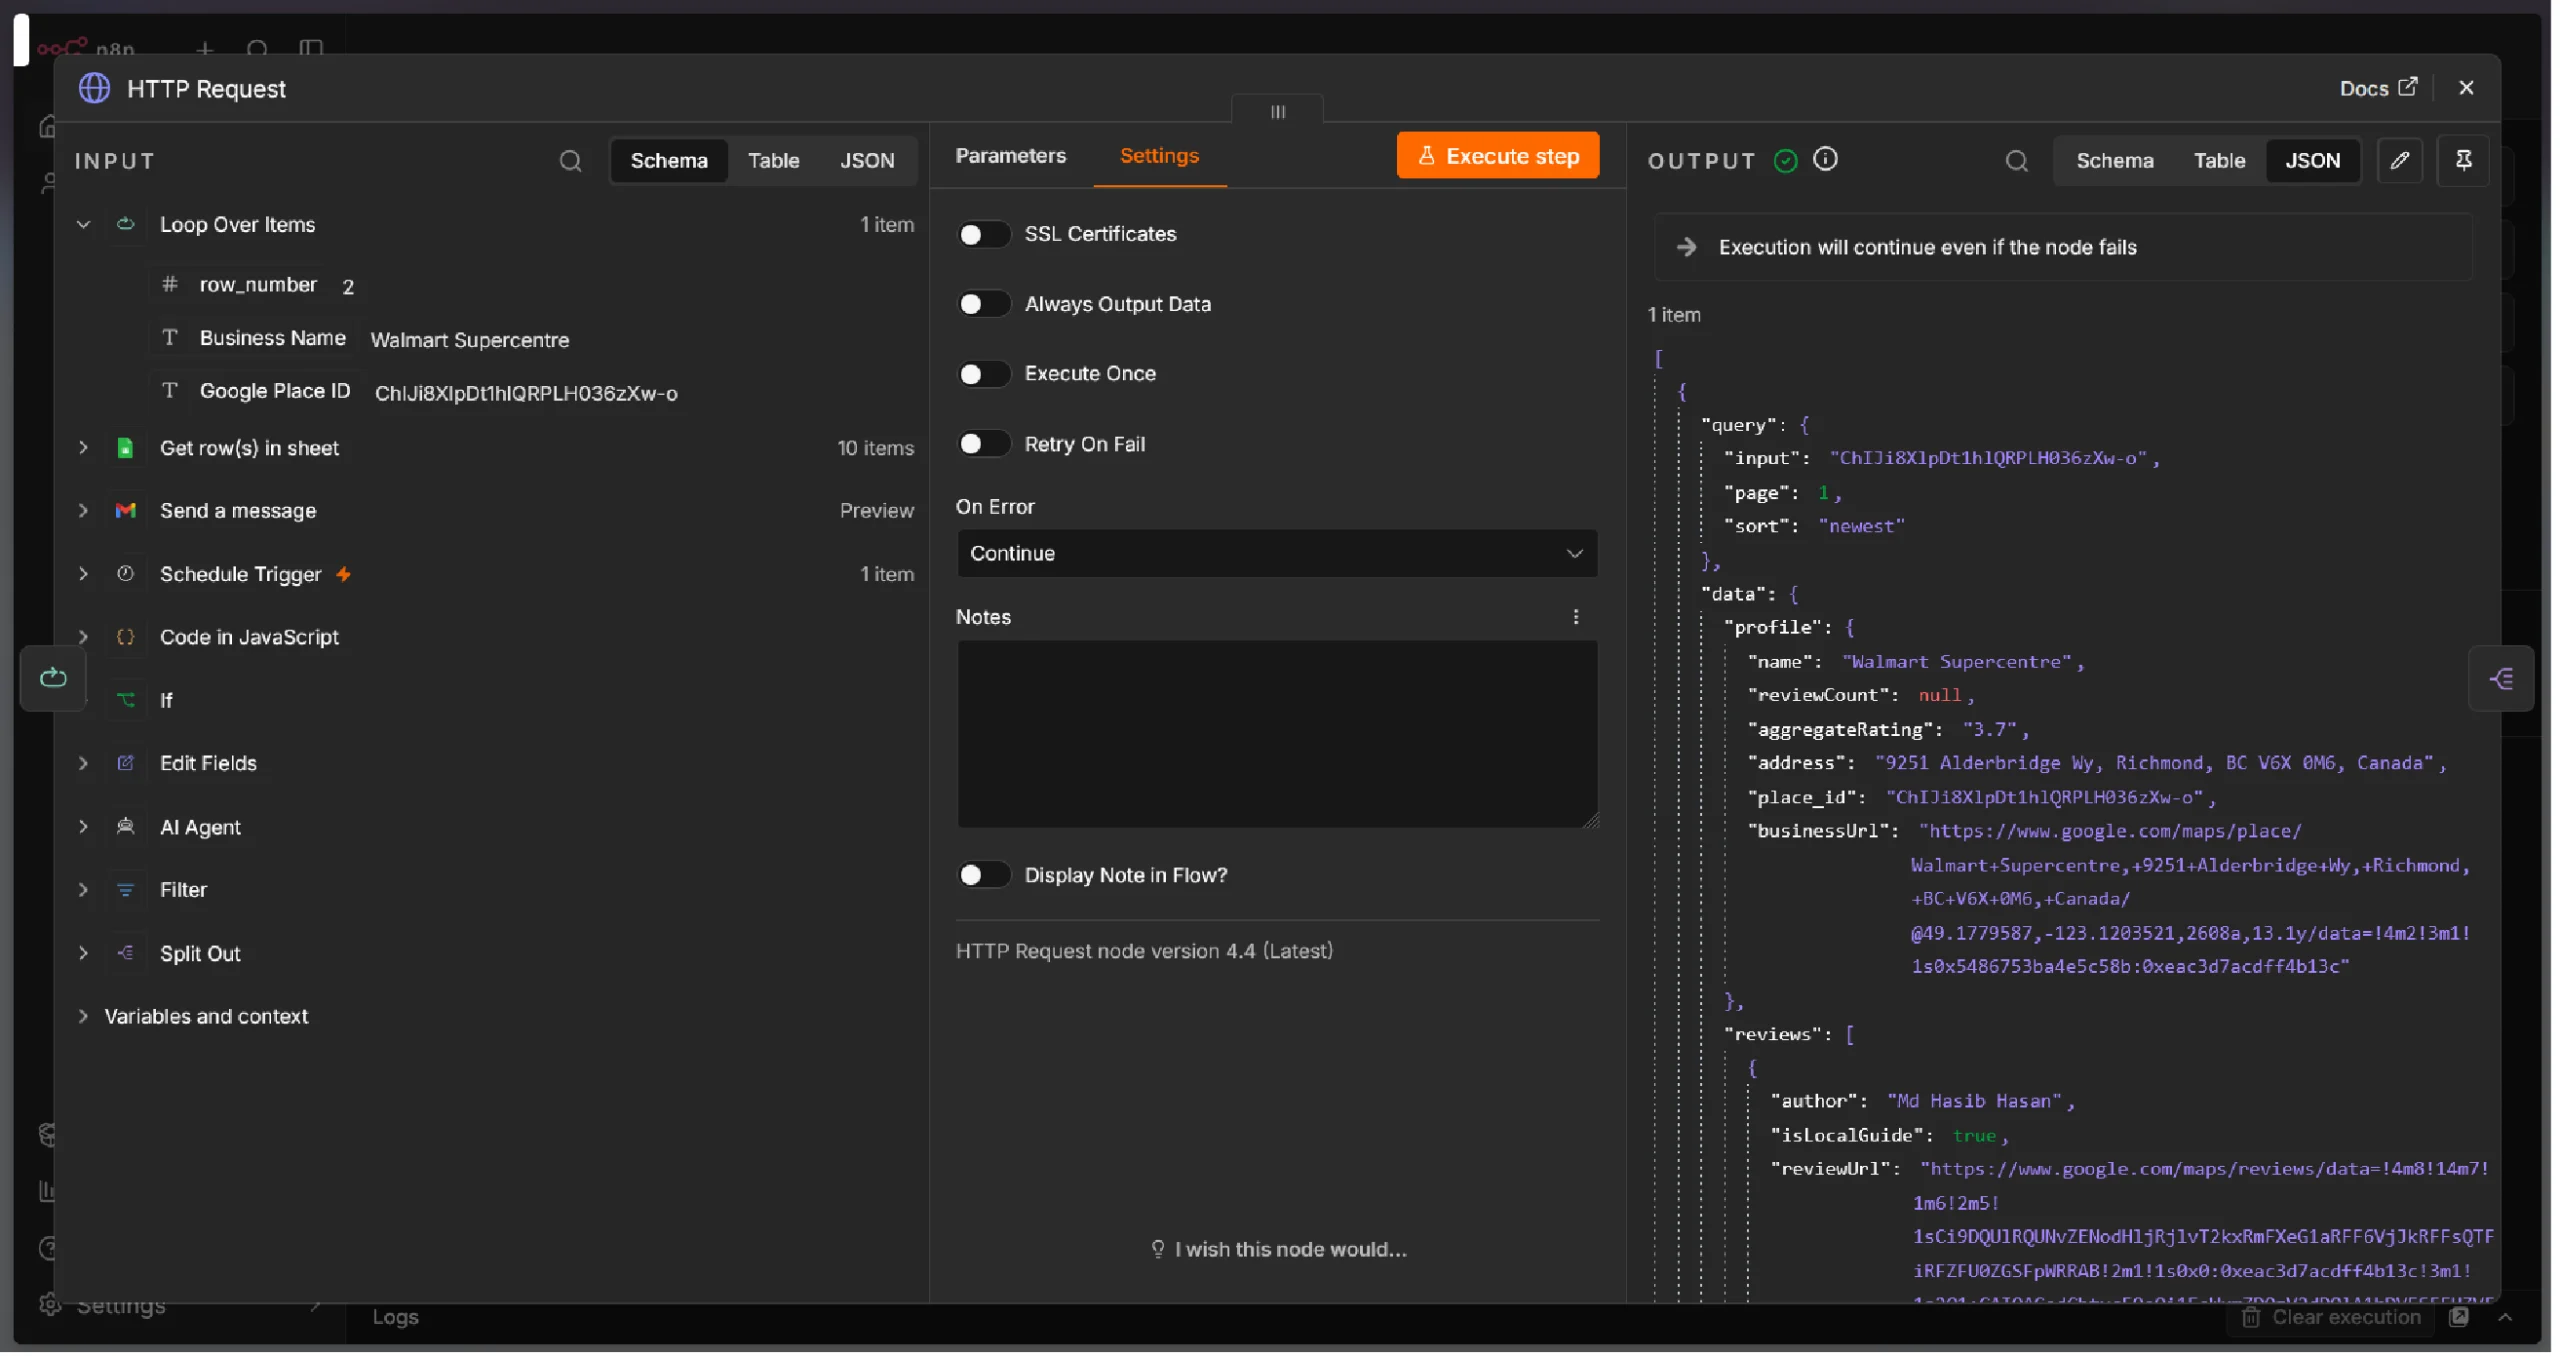
The ScrapeHero API returns structured data including:
- Business profile (name, address, overall rating)
- Total review count
- Individual reviews — each with the reviewer’s name, rating, review text, review URL, and publication date.
The ScrapeHero Google Reviews API provides clean, structured review data without the hassle of building and maintaining custom scrapers. It handles Google’s anti-scraping measures, CAPTCHAs, and dynamic rendering — so you get reliable data every time.
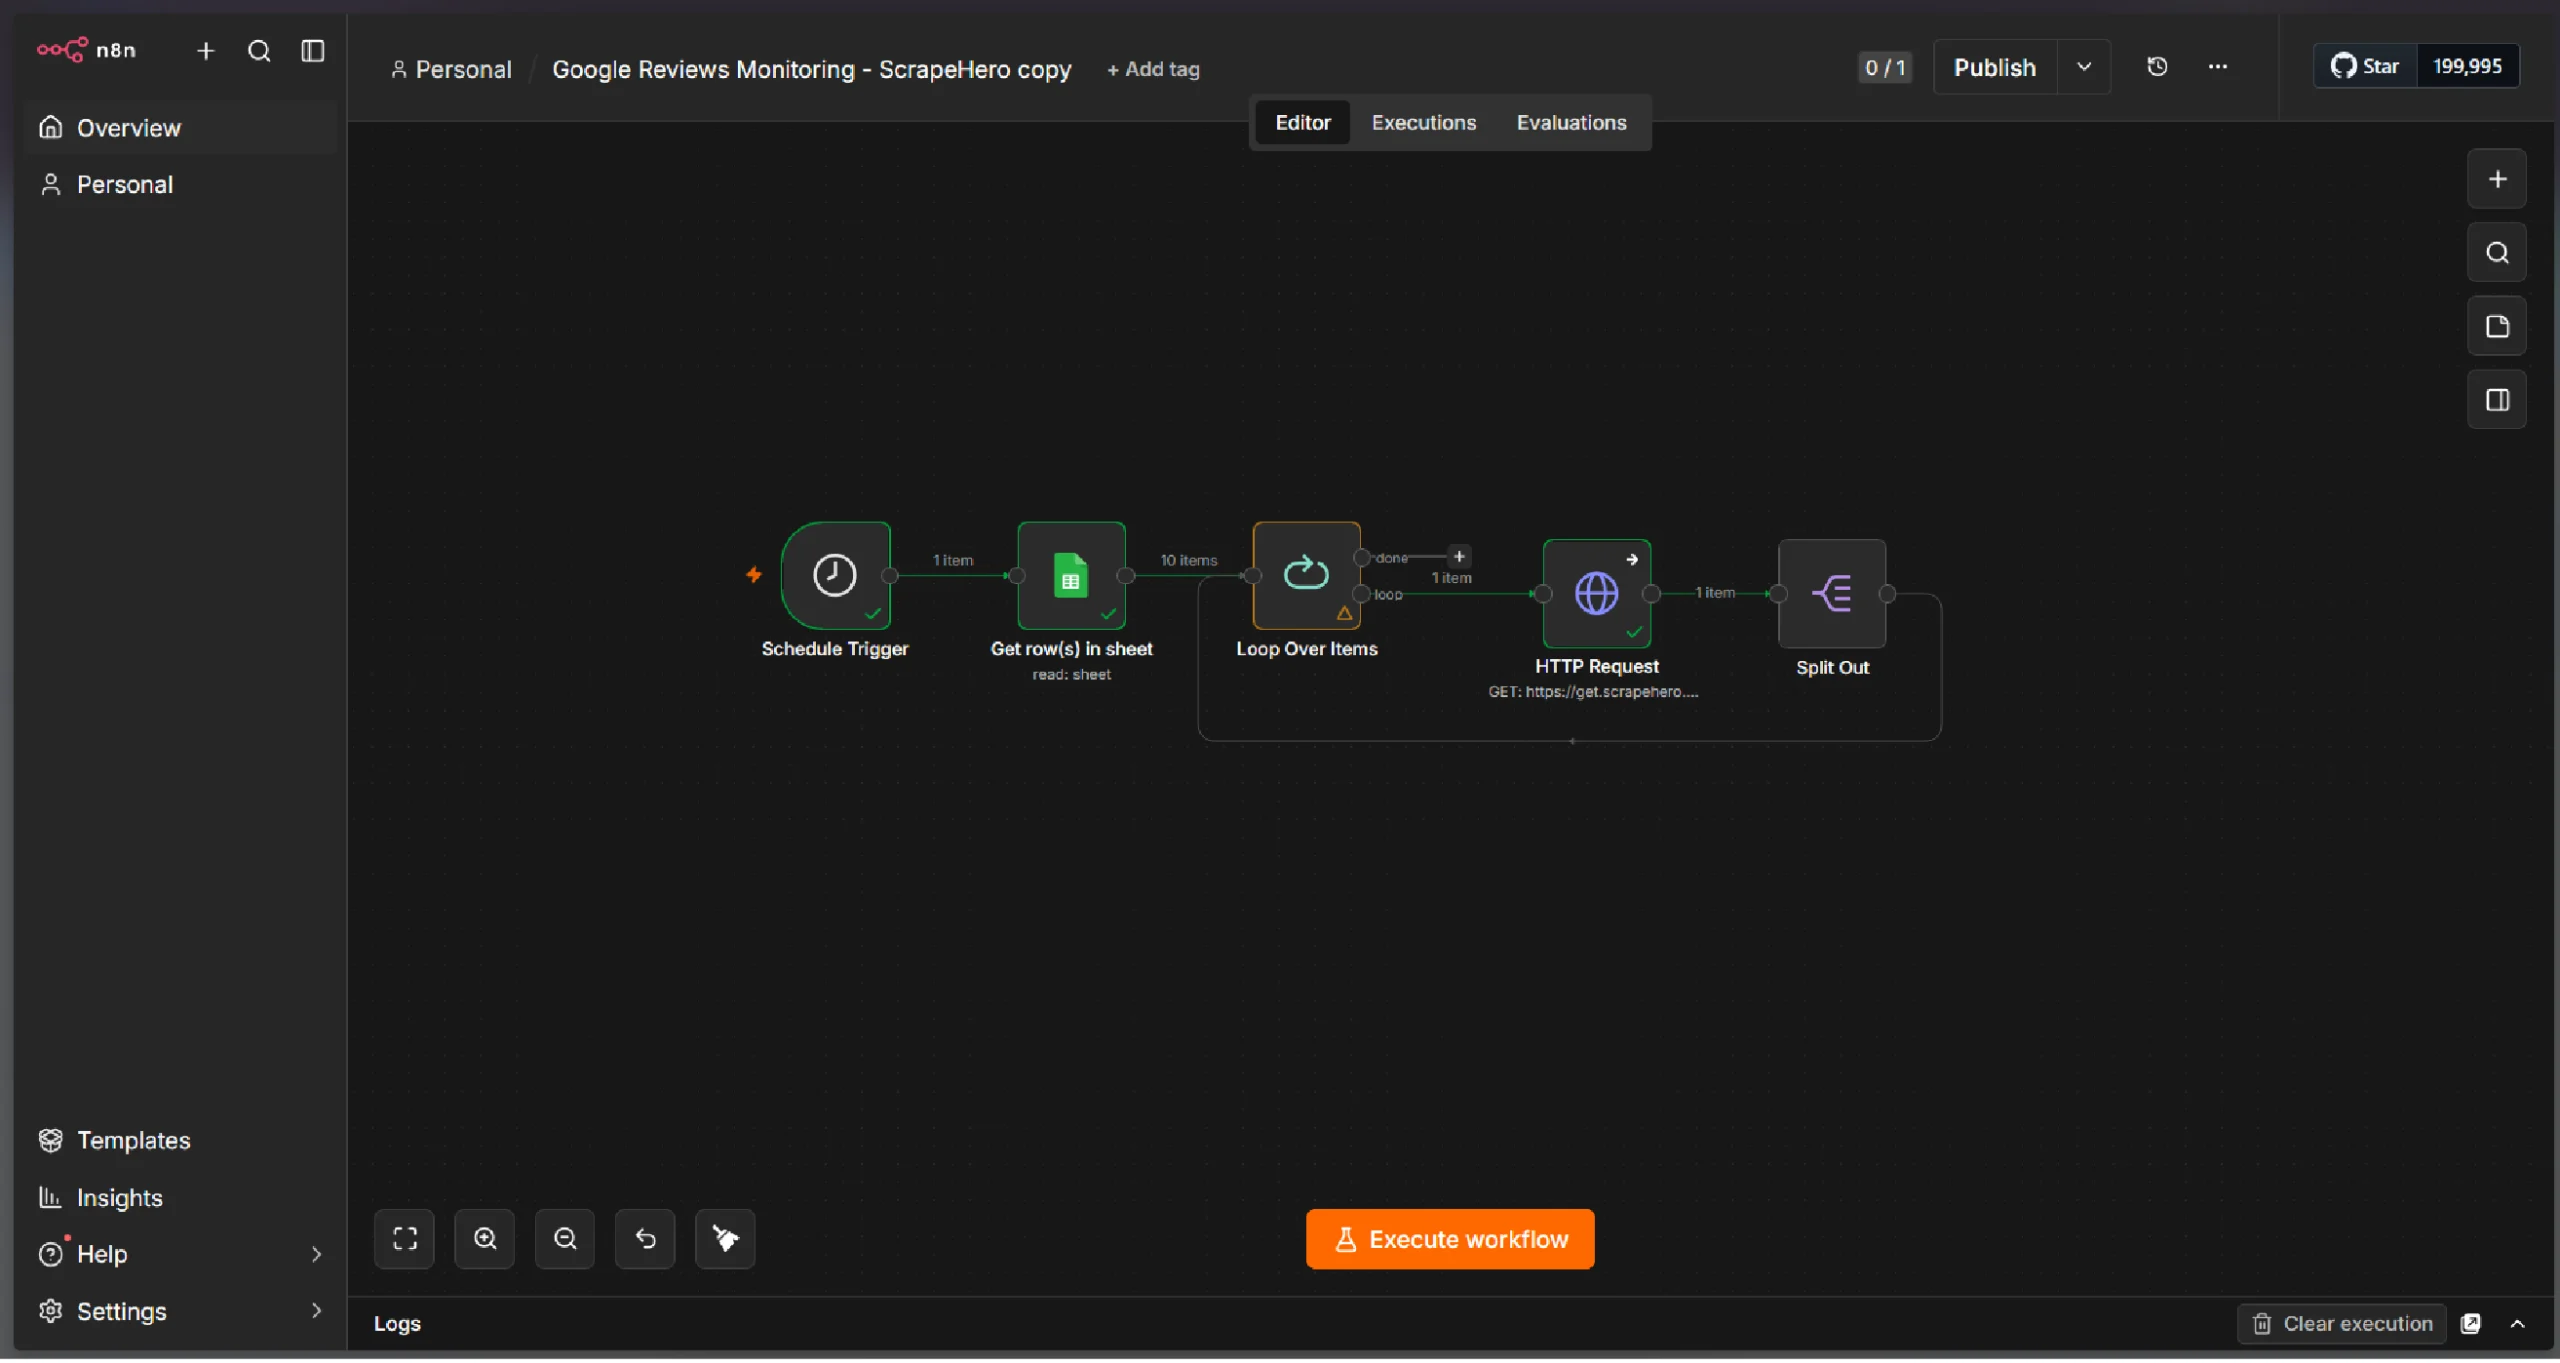
Step 6: Split Individual Reviews
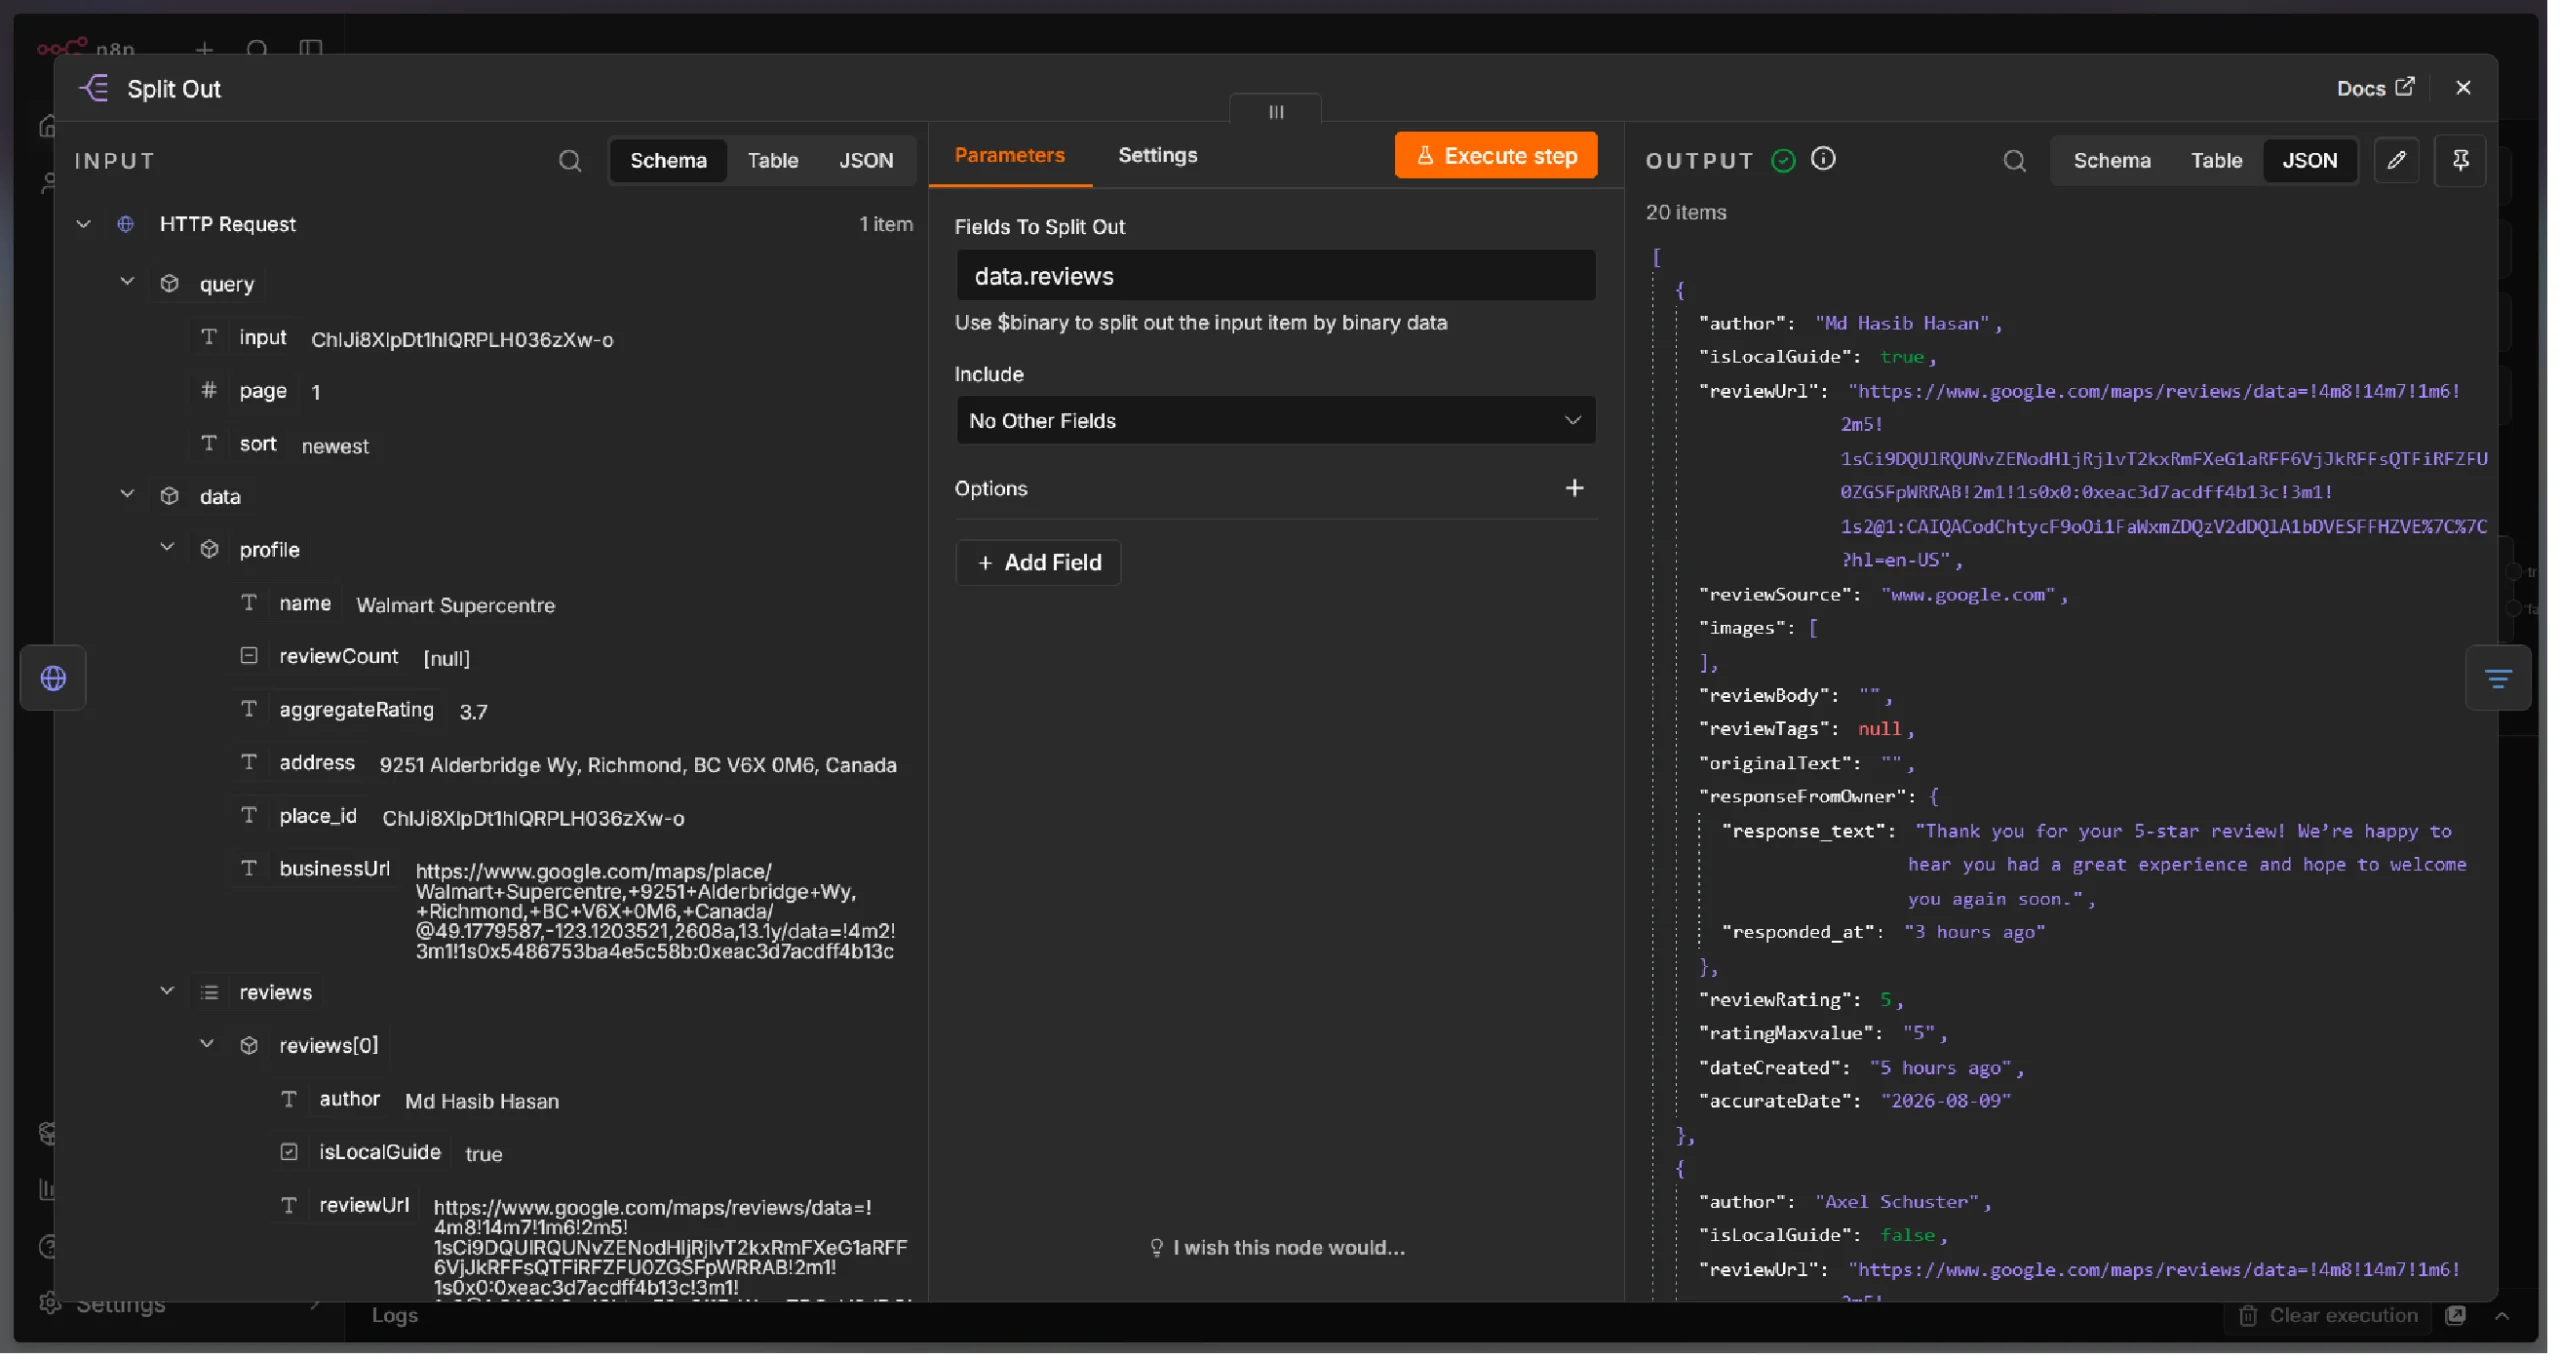
The API returns a JSON response as a single JSON item, but each review needs to be analyzed separately. Therefore, separate each review using a Split Out node.
1. Add a Split Out node and point it to the HTTP request node.
2. Select the reviews field. This field contains an array of reviews as the value, which the node will separate into individual reviews.
Step 7: Filter Recent Reviews With Original Text
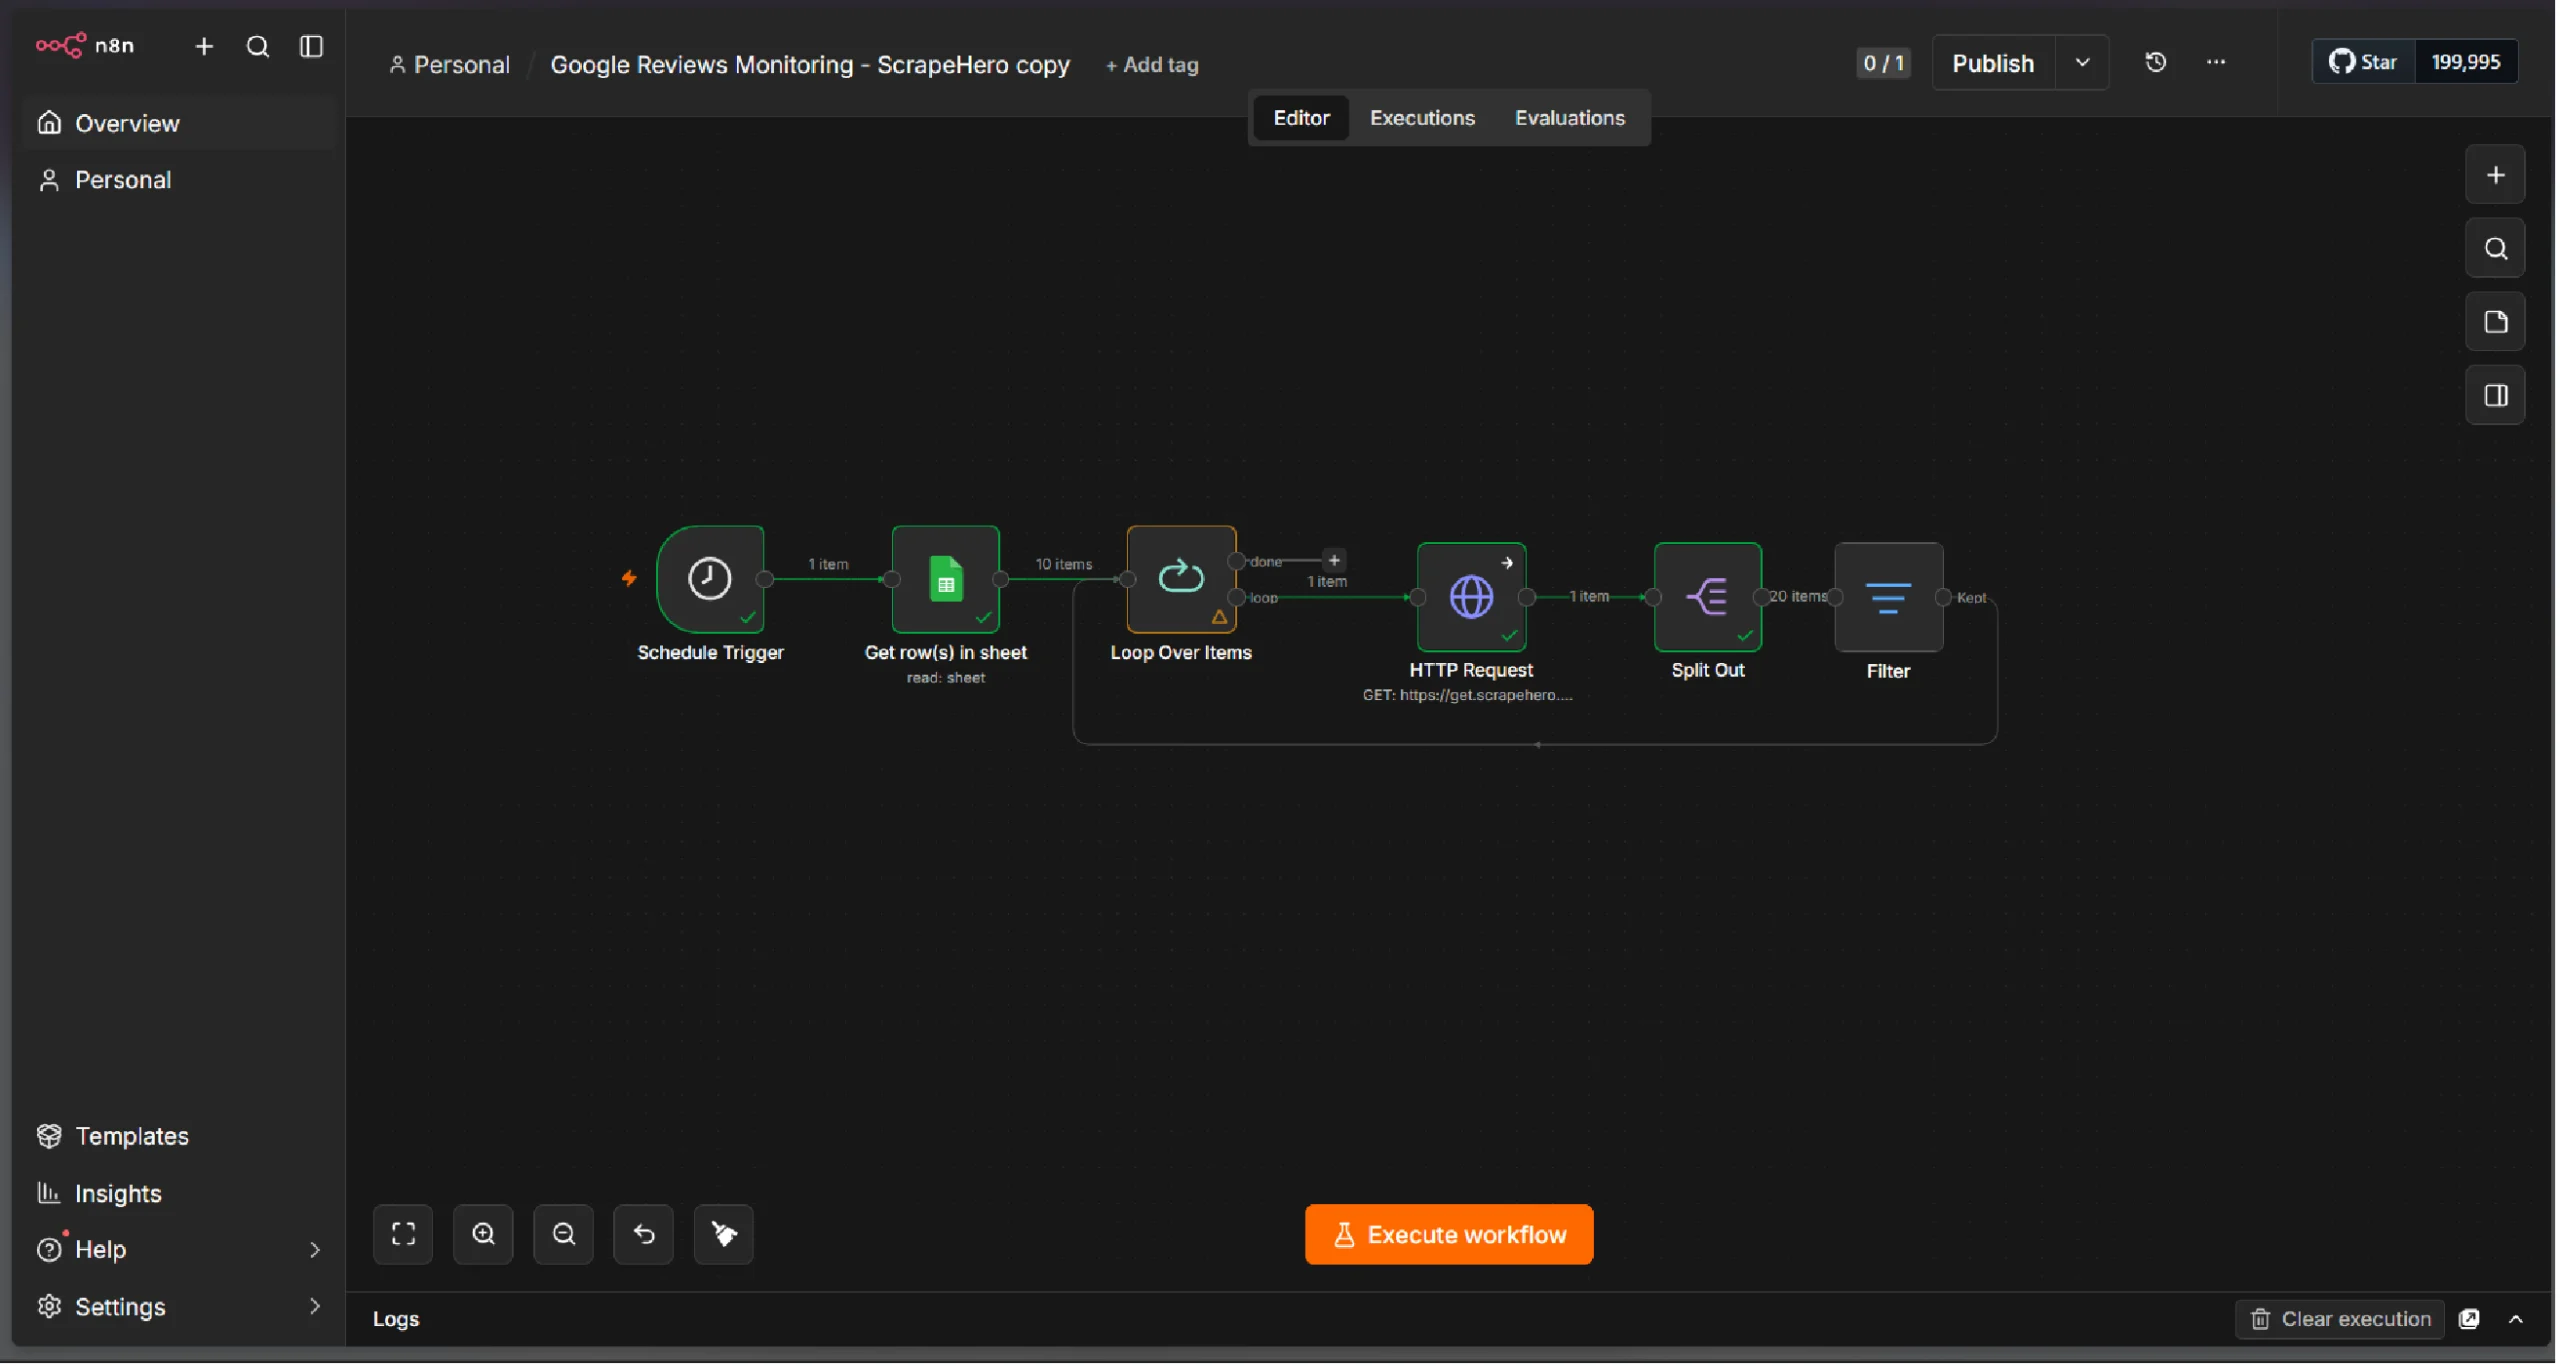
To avoid reprocessing historical reviews, add a filter to keep only reviews published within a specific time window. The window depends on the frequency of the schedule.
Also, filter for reviews that contain original text since that is required for sentiment analysis and getting recommended action.
1. Add a Filter node after the Split Out node.
2. Configure a date comparison condition:
- Parse the accurateDate field from the API response.
- Compare it against the current time minus your monitoring window (e.g., last 24 hours).
3. Configure another condition:
- Extract originalText field.
- Check if it’s empty
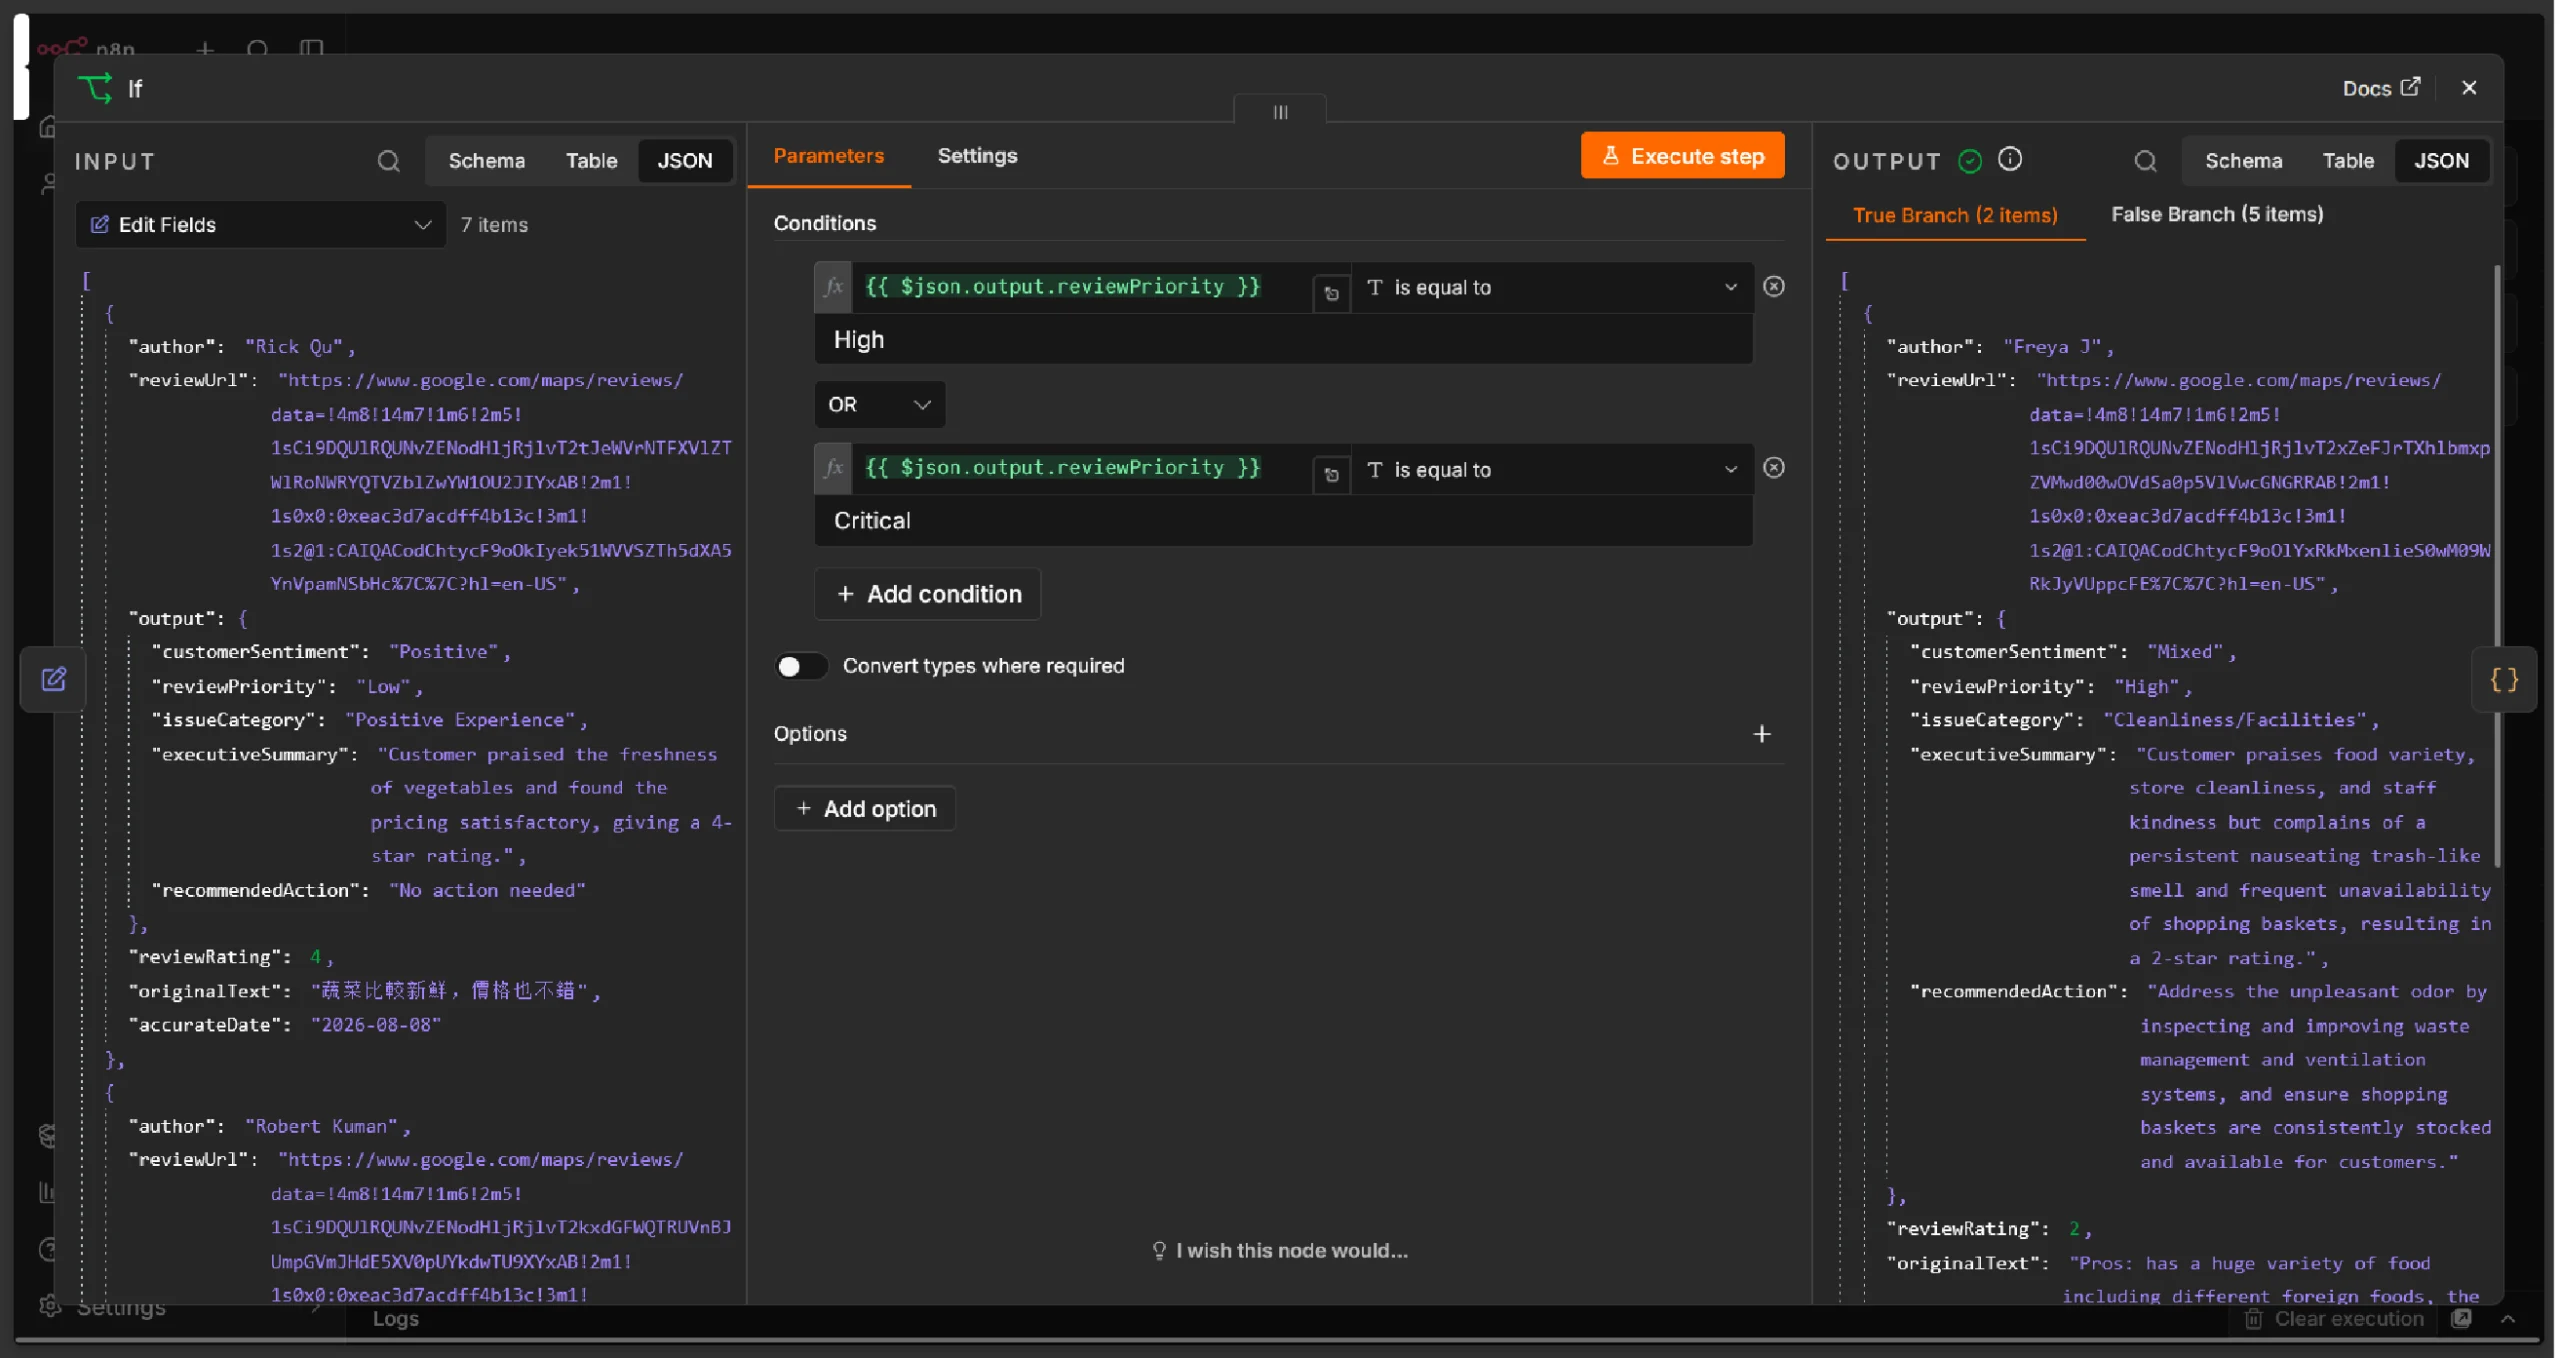
Now, only reviews with original text posted within the specific window will continue through the workflow.
Step 8: Analyze Reviews with AI
This is where the system gets intelligent. Each review is sent to an AI model for analysis.
1. Add an AI Agent node (or an HTTP Request node pointing to your LLM endpoint).
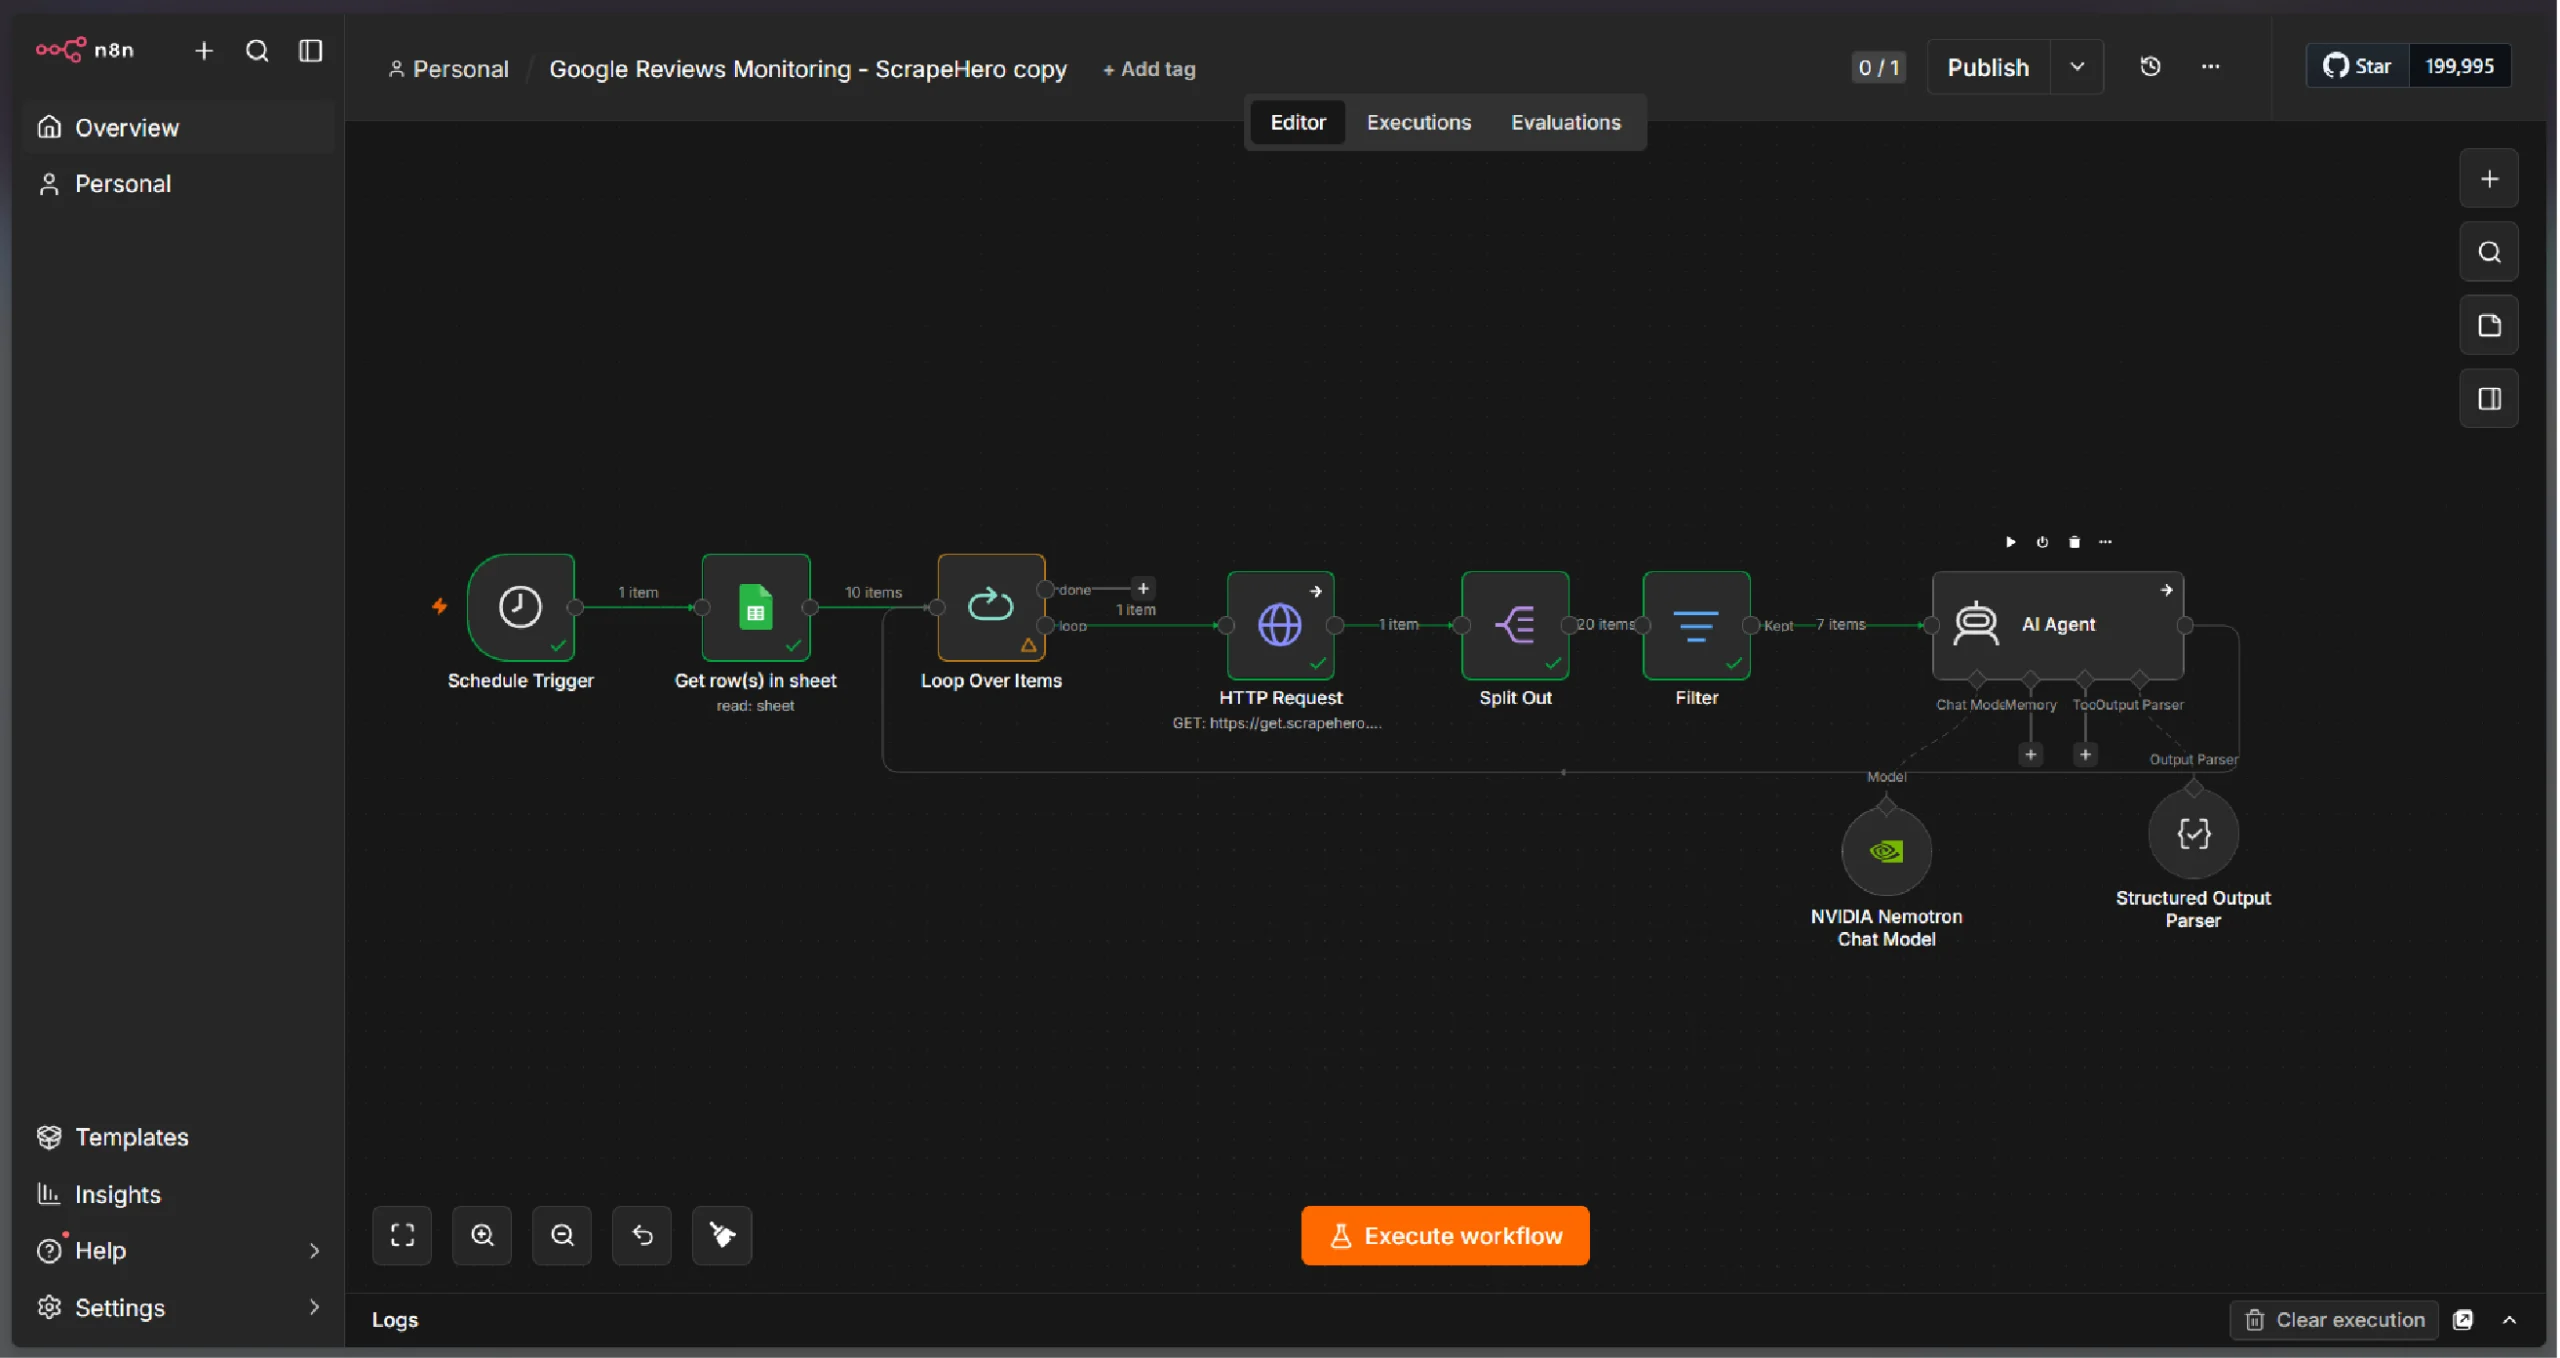
2. Configure the system prompt to instruct the AI to return structured output: Review: “{{ $json.originalText }}” Rating: {{ $json.reviewRating }} out of 5 Identify: * Customer sentiment * Review priority * Issue category * Executive summary * Recommended business action Respond ONLY with a valid JSON object matching this exact structure. Do not include any explanation, preamble, or markdown code fences — output raw JSON only. { “customerSentiment”: “Positive” | “Neutral” | “Negative” | “Mixed”, “reviewPriority”: “Low” | “Medium” | “High” | “Critical”, “issueCategory”: “Customer Service” | “Product/Stock Availability” | “Pricing/Billing” | “Cleanliness/Facilities” | “Staff Conduct” | “Wait Time” | “Positive Experience” | “Other”, “executiveSummary”: “string”, “recommendedAction”: “string” }
The above prompt passes the review text and reviewer rating as input to the AI model.
Here’s an example of what the AI output looks like for a negative review:
| Field | Value |
|---|---|
| Sentiment | Negative |
| Priority | High |
| Category | Cleanliness |
| Summary | Customer reported hygiene issues caused by flies in the dining area. |
| Suggested Action | Perform immediate pest control and improve dining area cleanliness protocols. |
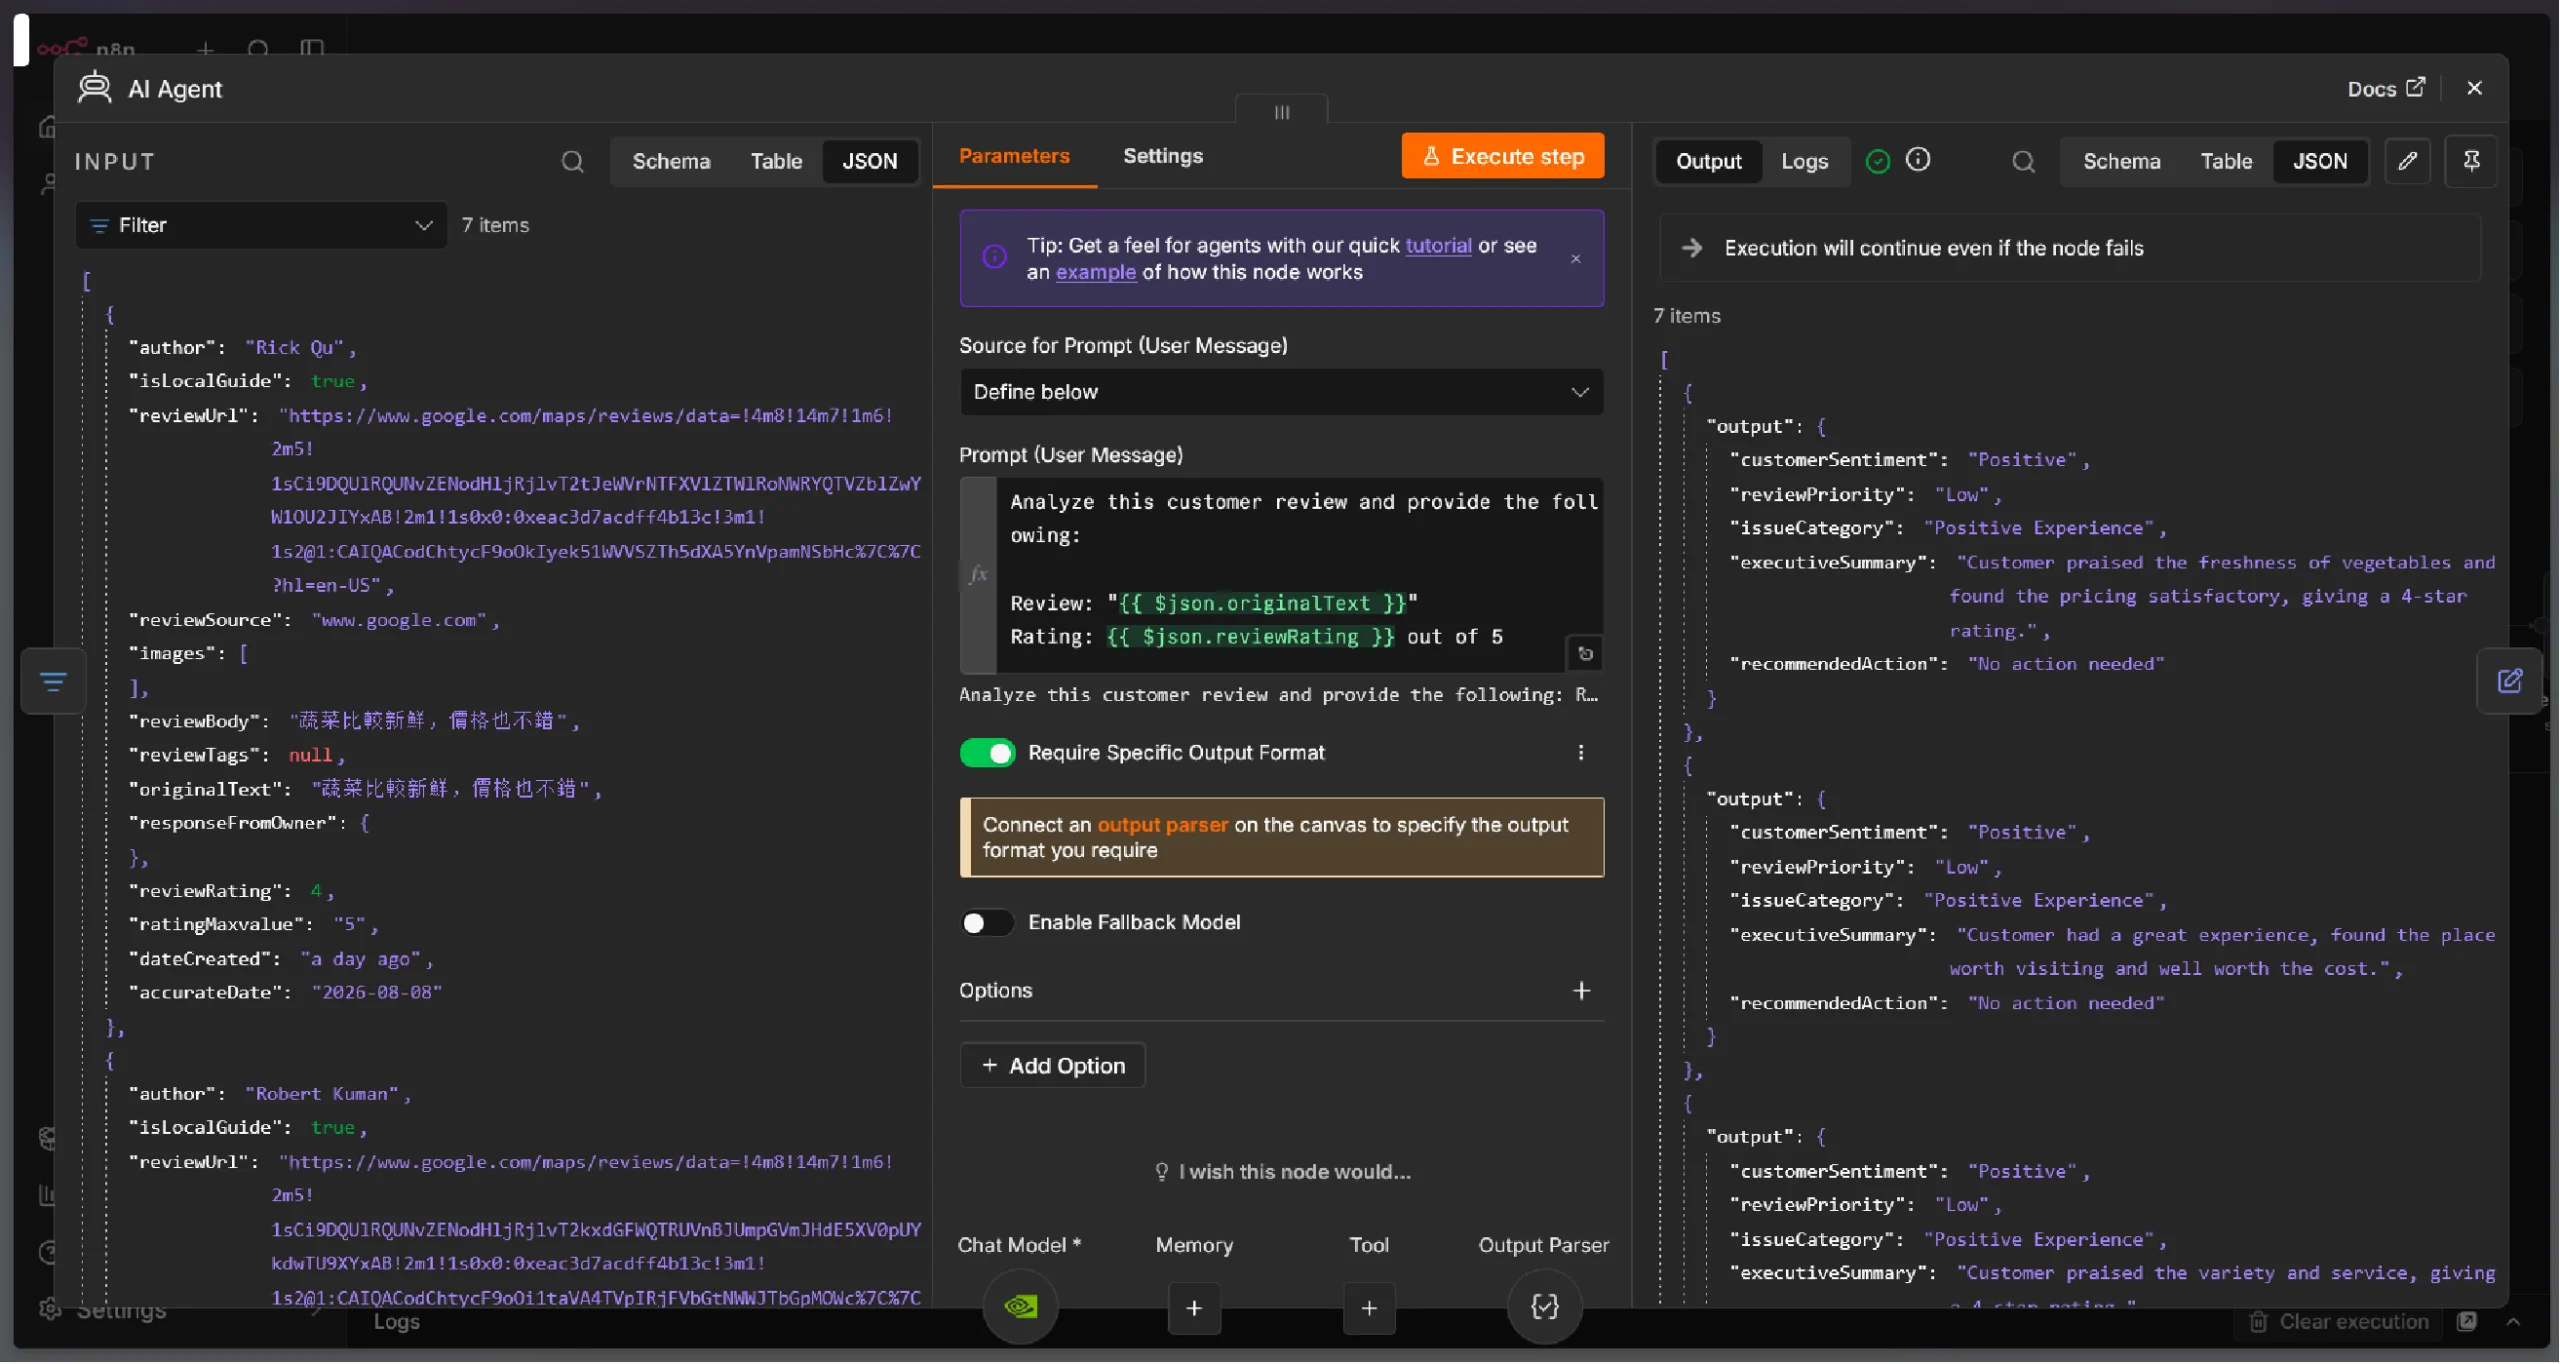
Step 9: Add Additional Fields
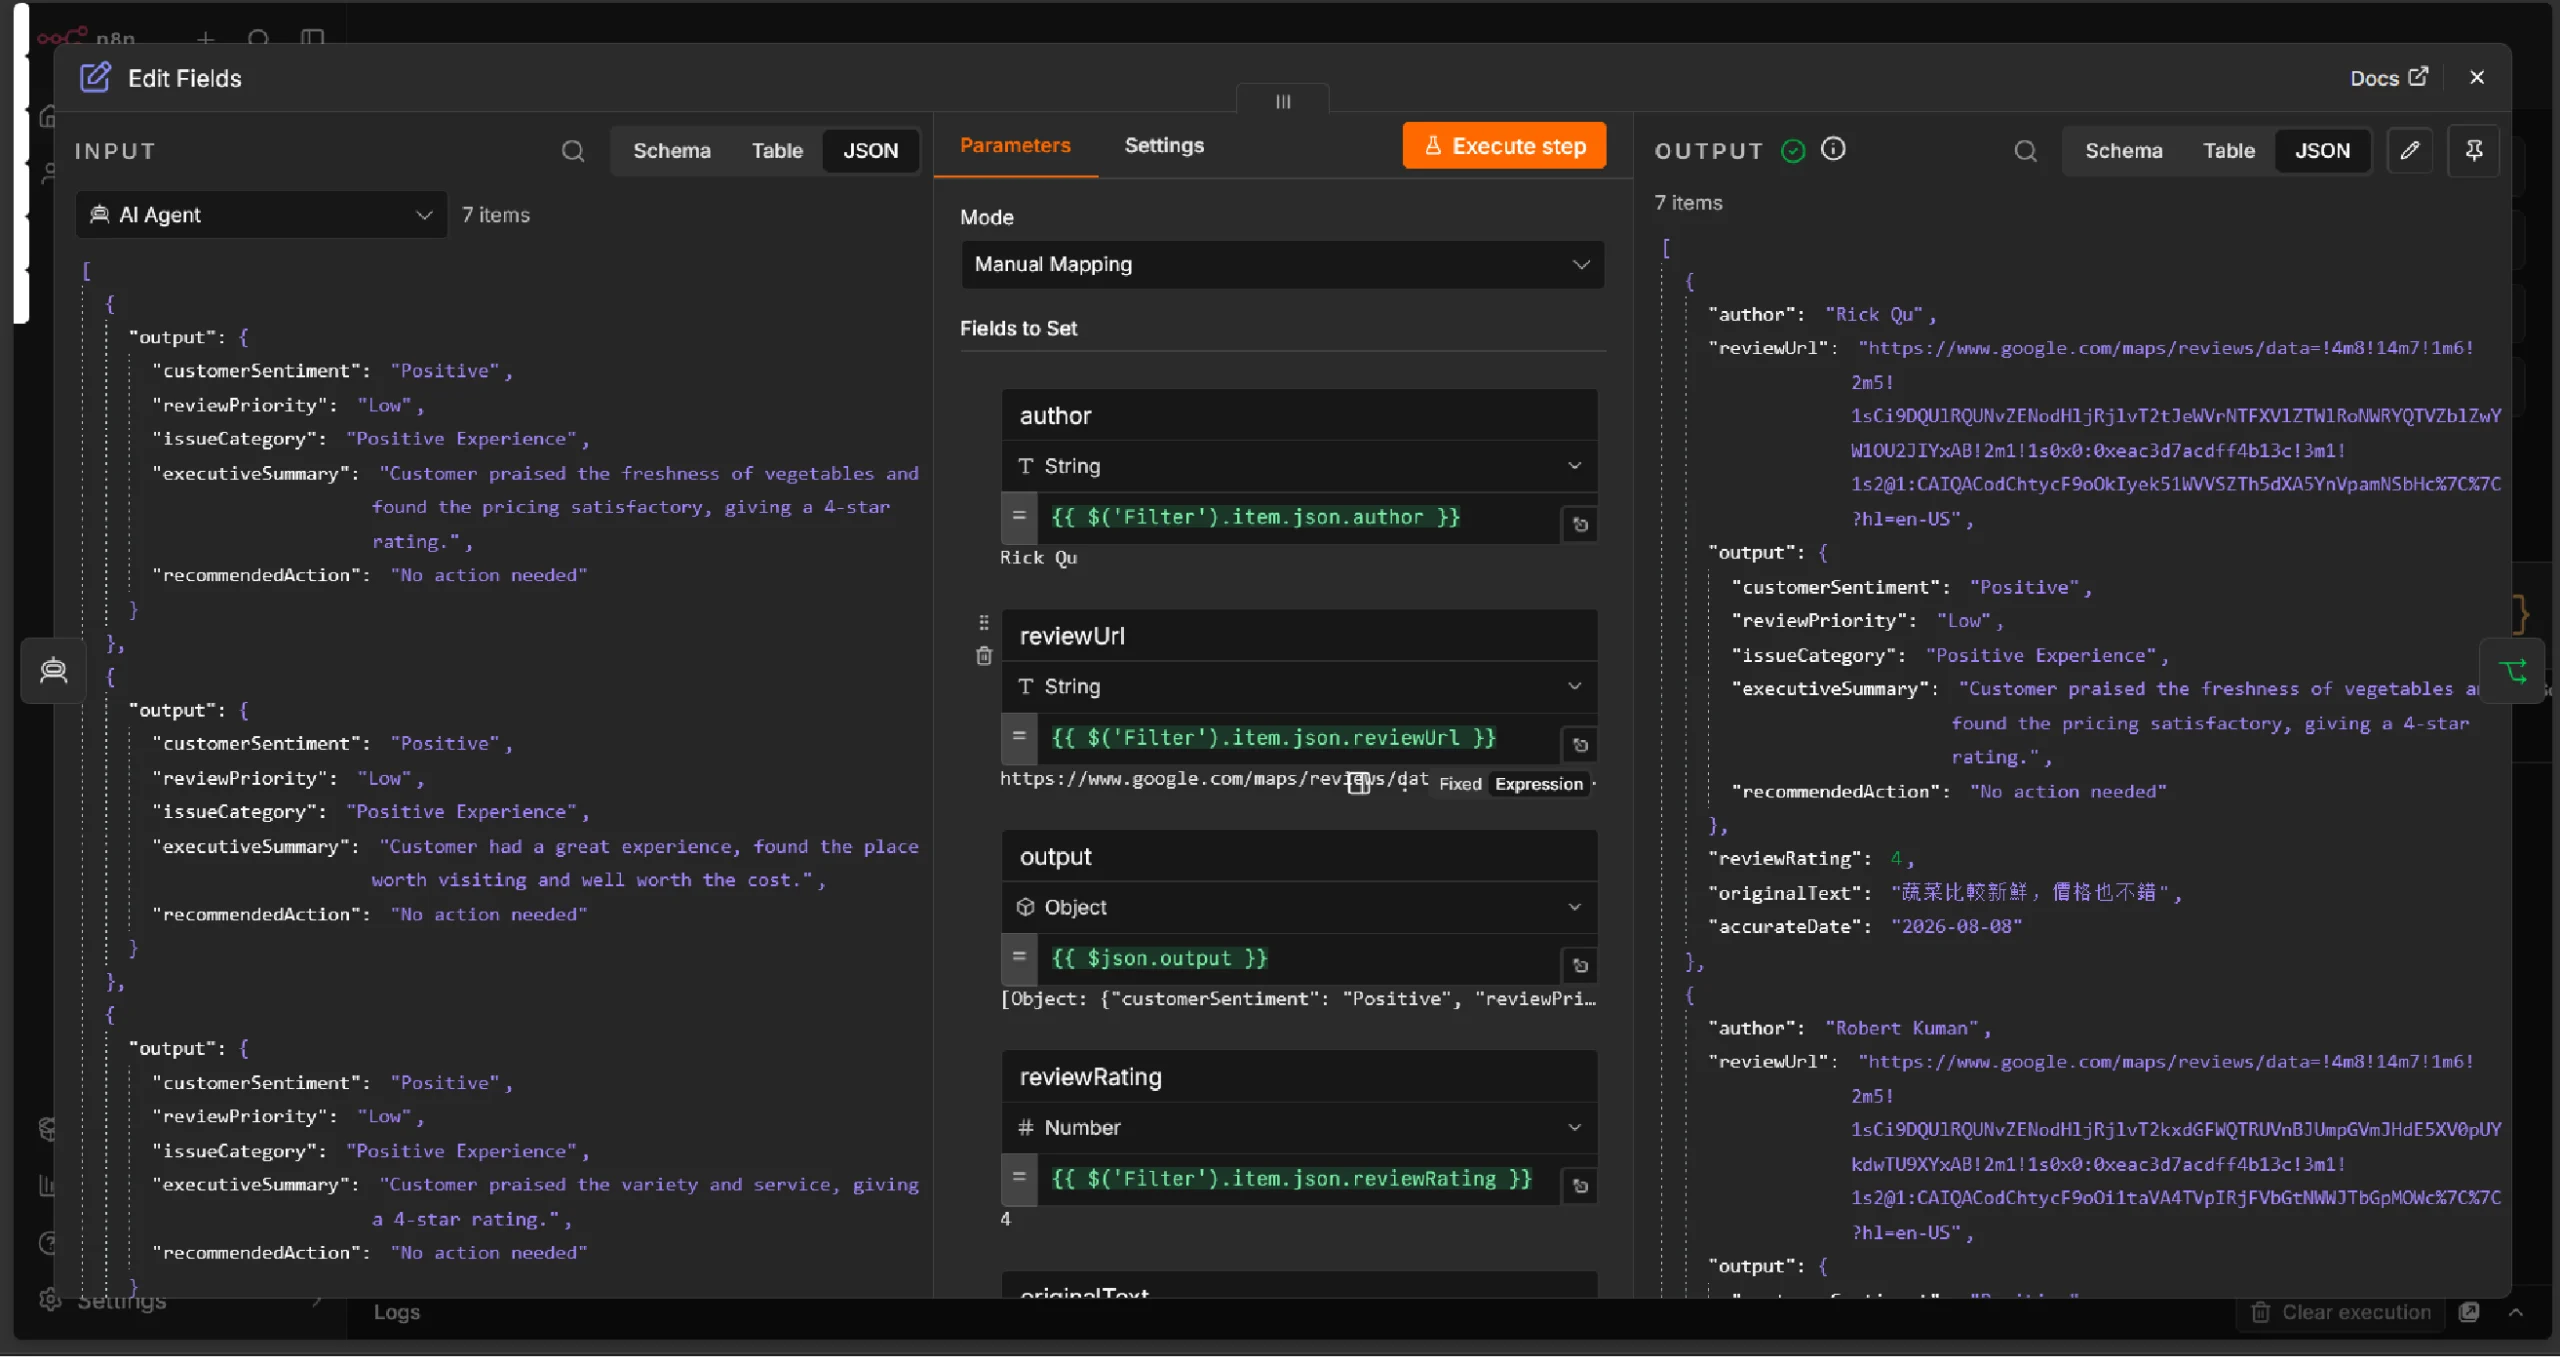
Since, the previous node only returned the analysis. You need to add the fields identifying each review:
1. Add a Set node after the AI analysis.
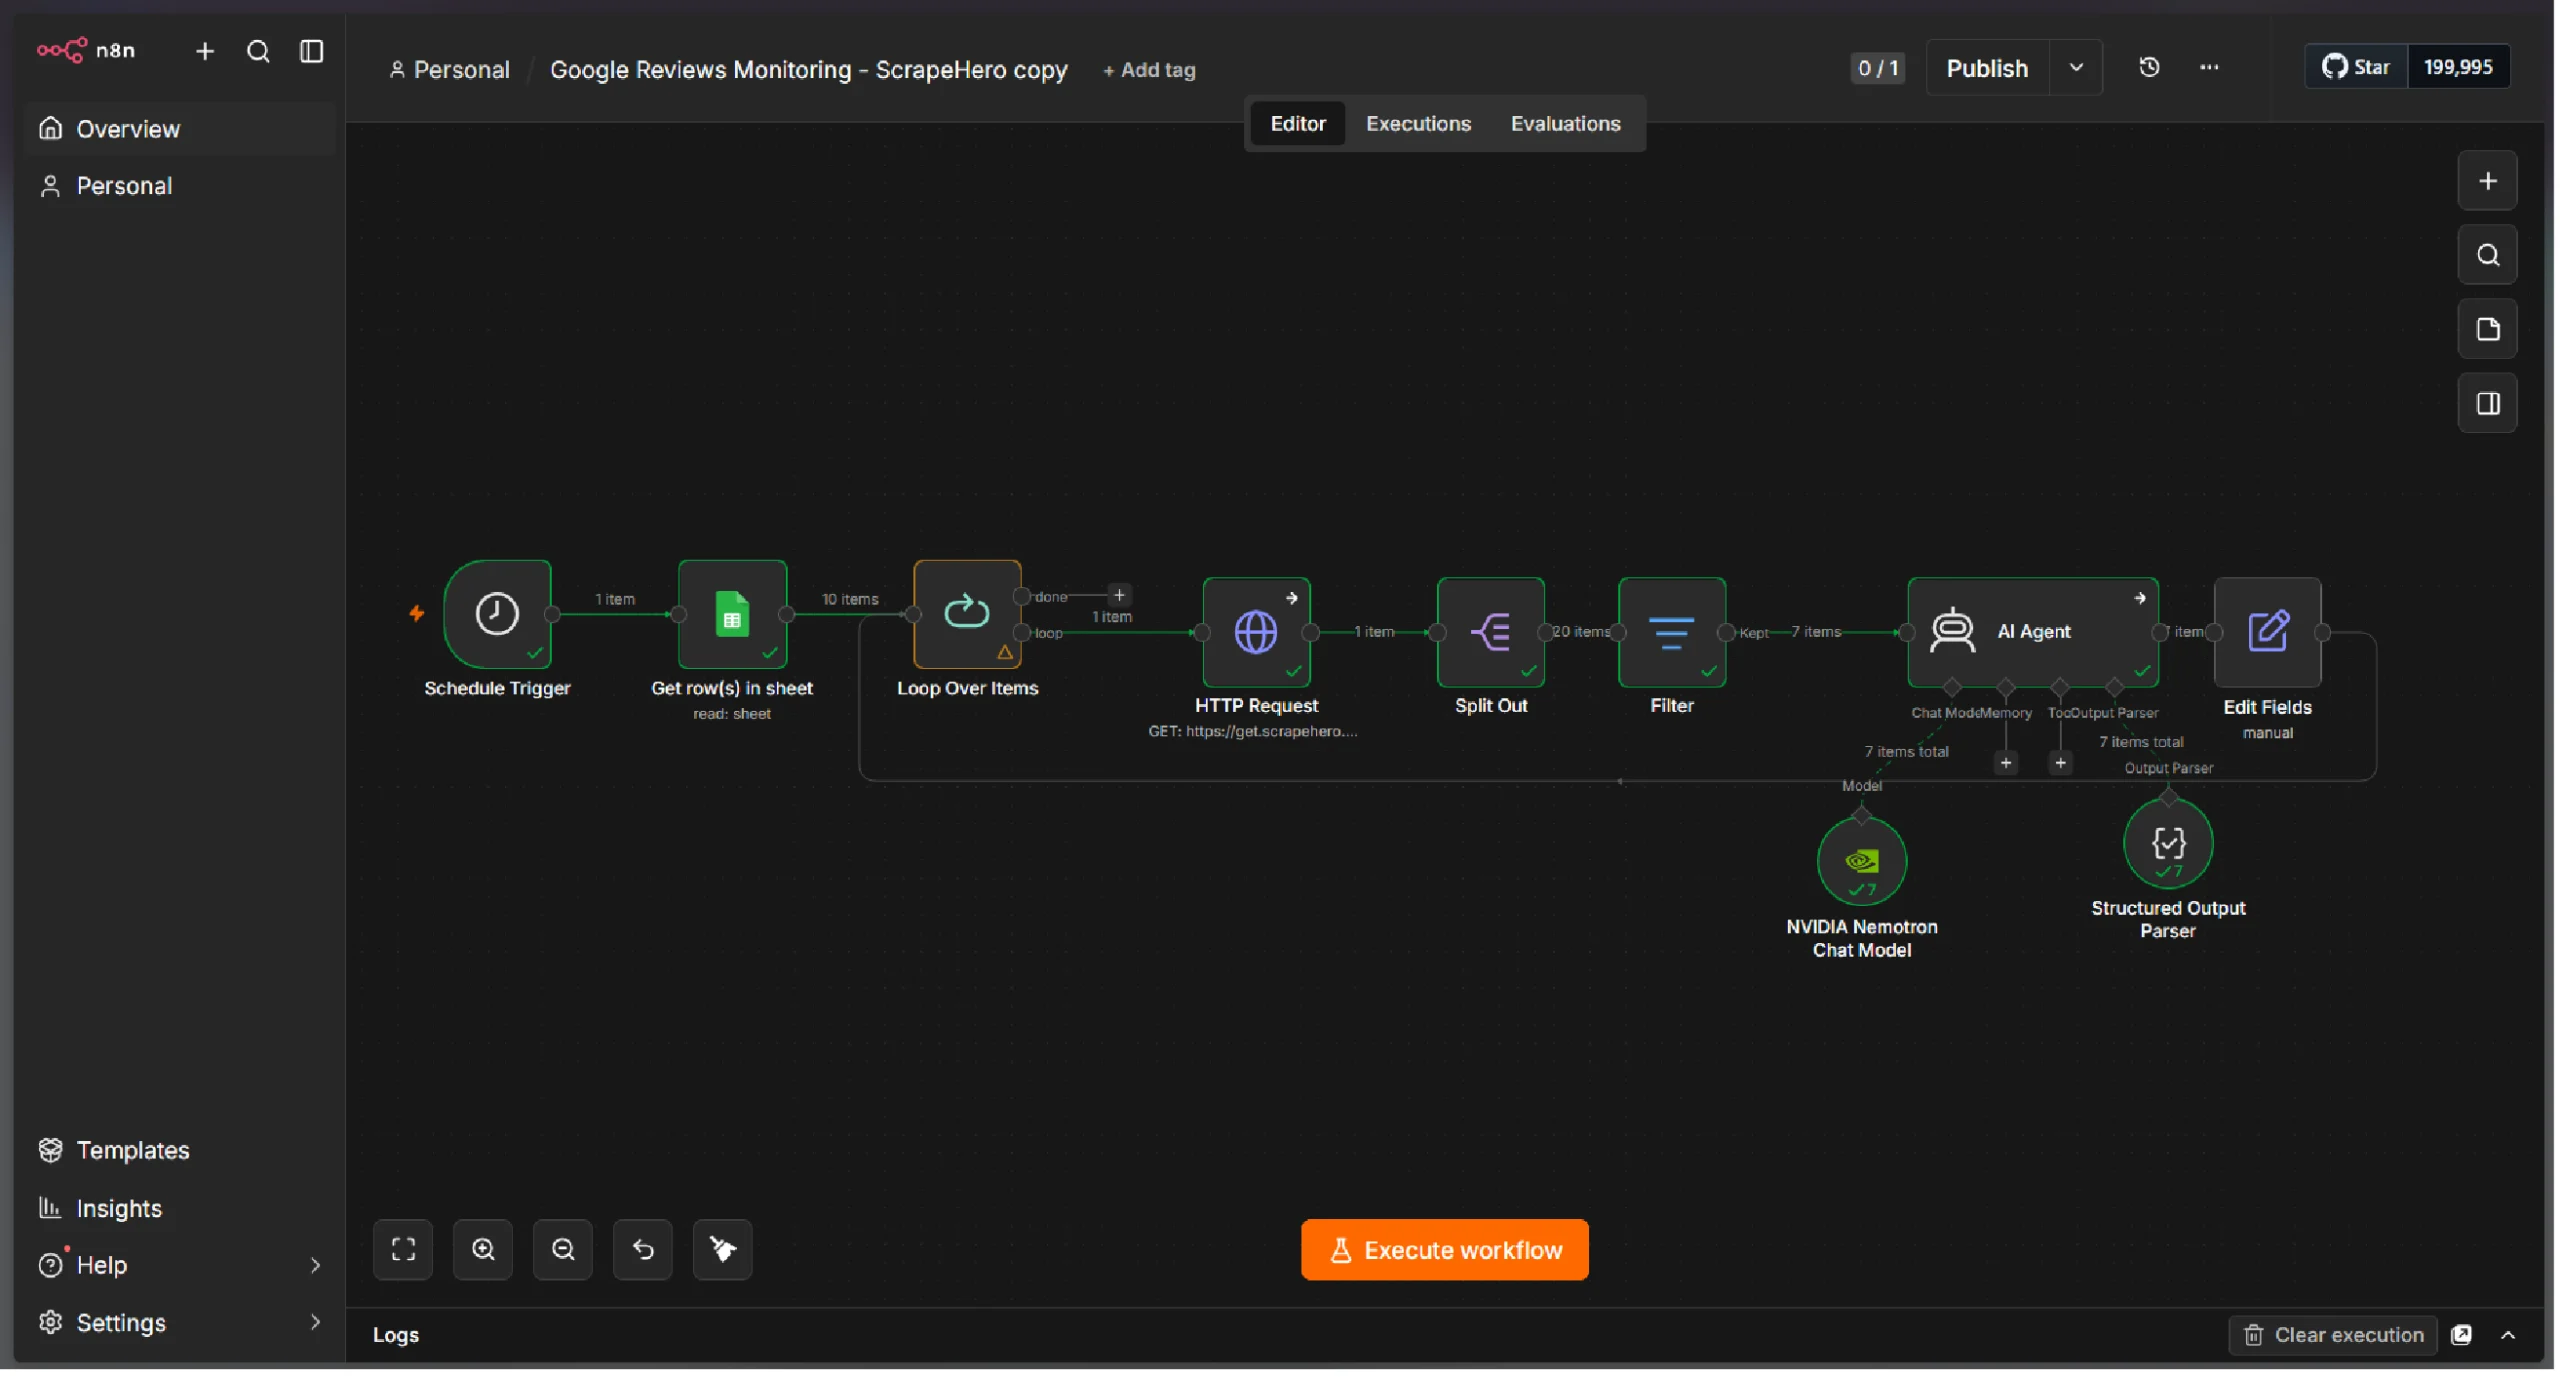
2. Add the fields Review text, Author name, Rating, and Review URL from the filter node alongside the reviews analysis output from the AI agent node.
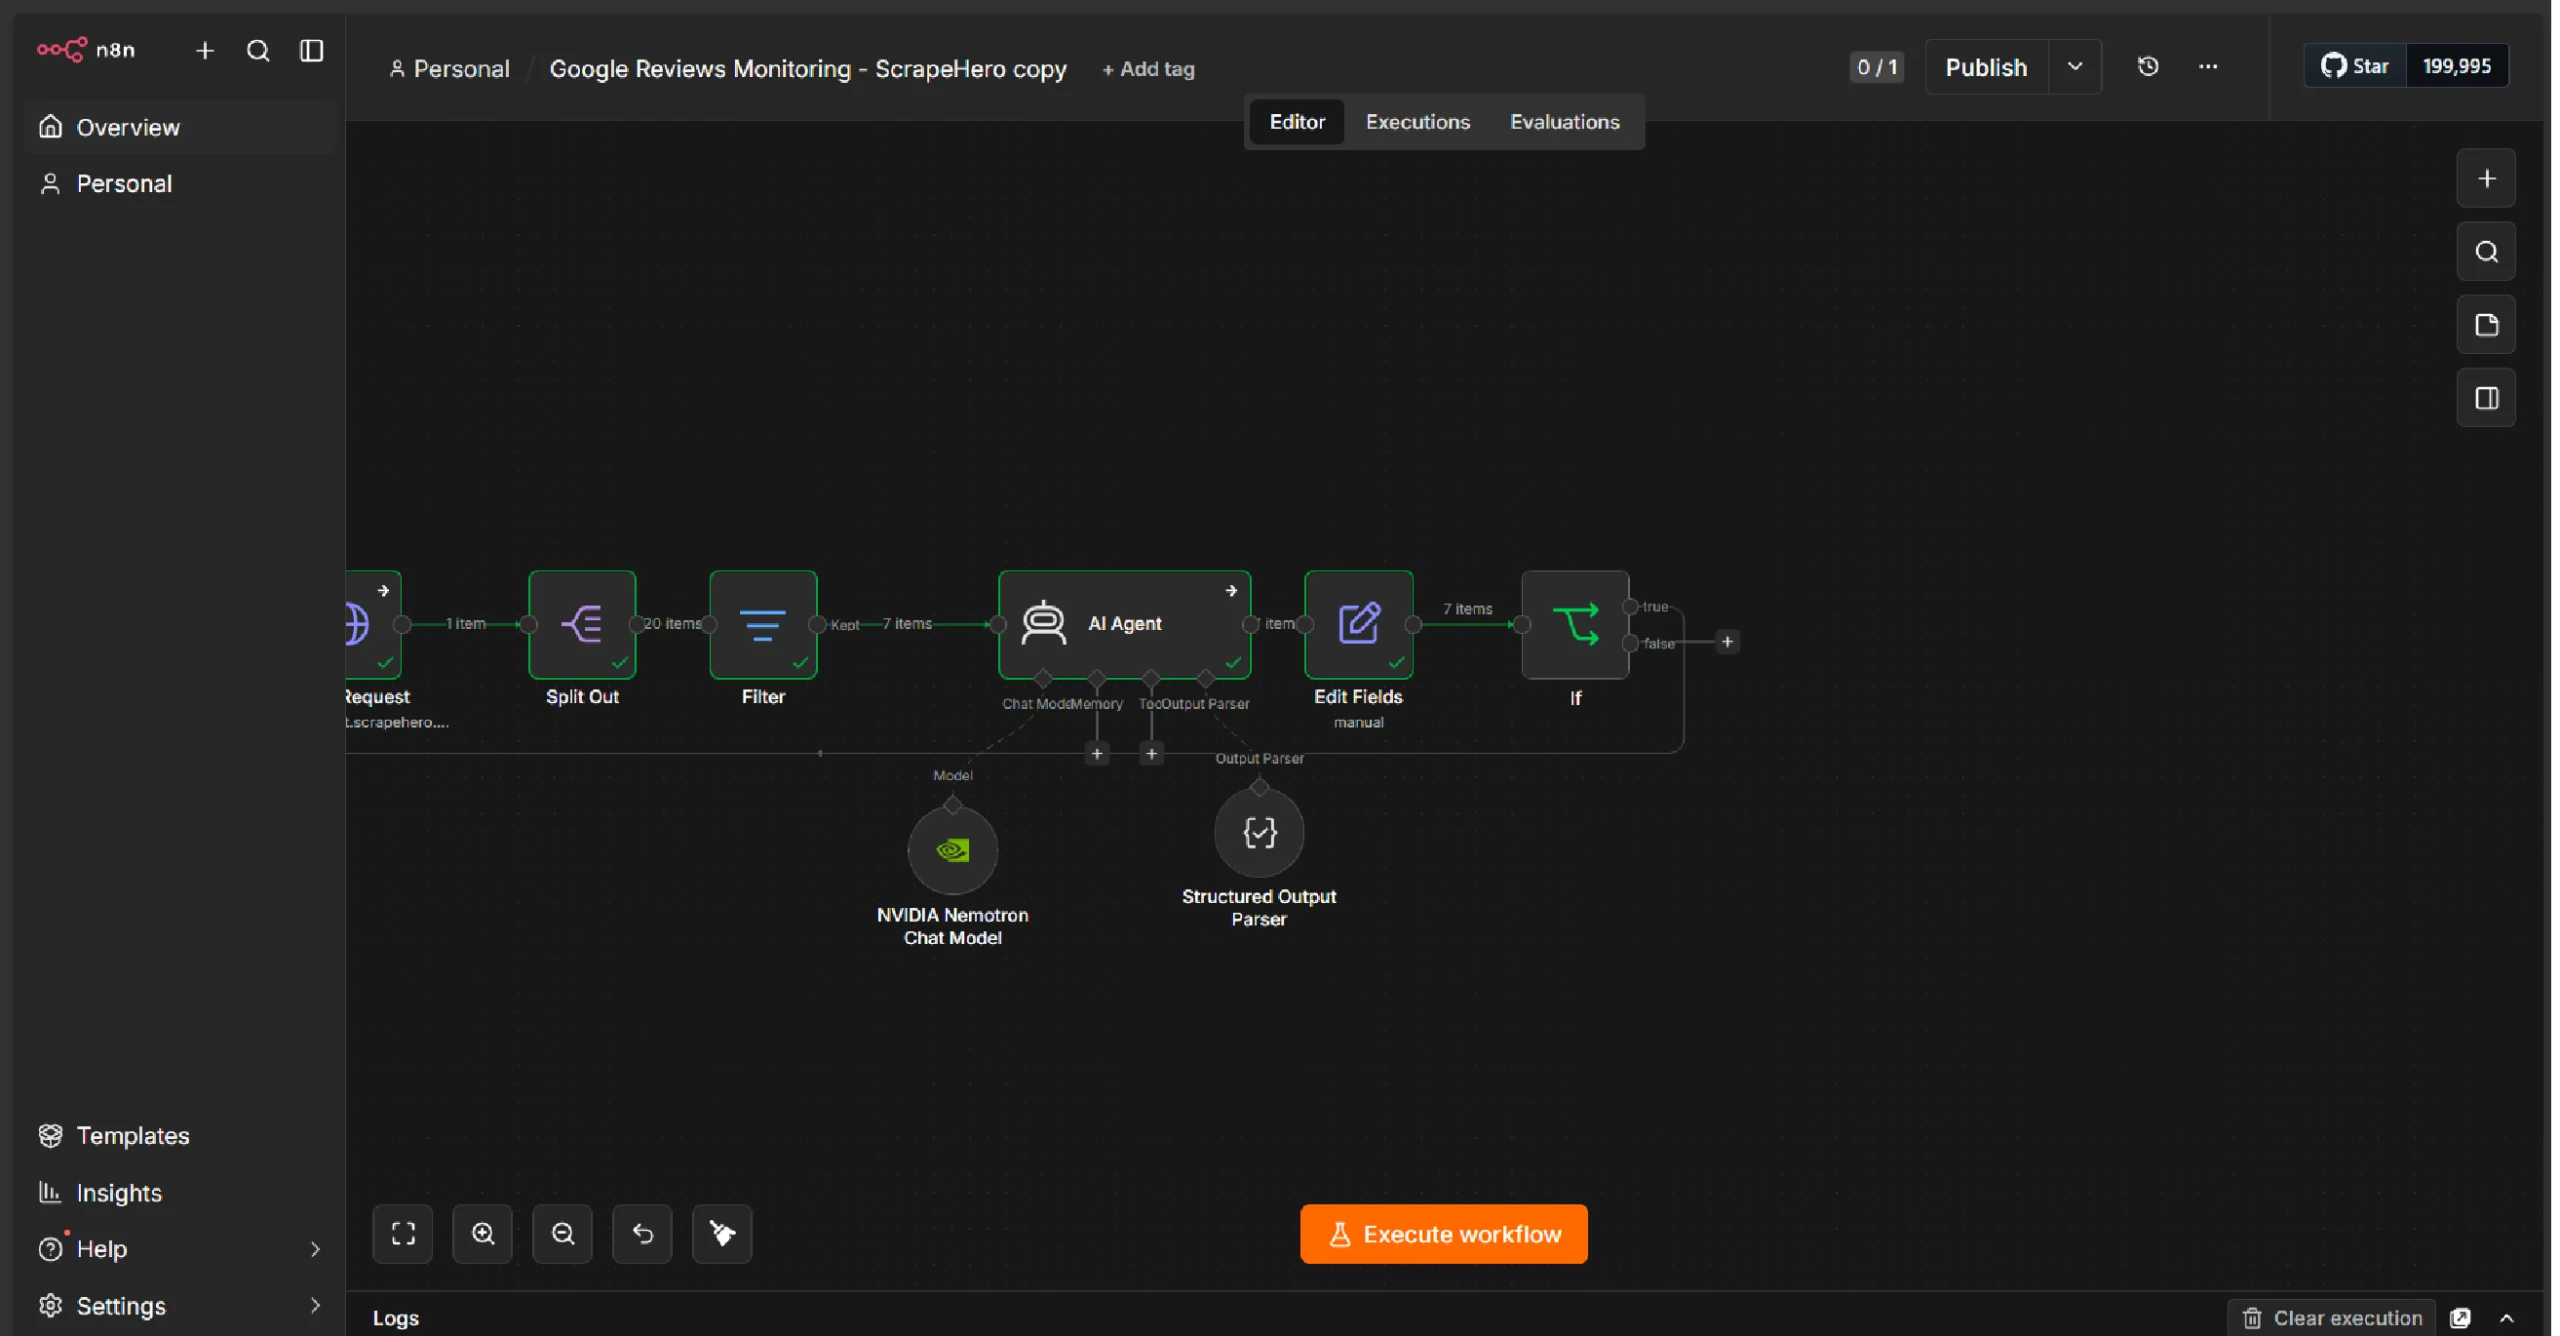
Step 10: Filter for High-Priority Reviews
Not every review requires an immediate alert. Filter the AI-analyzed results to surface only the reviews that need urgent attention.
1. Add another IF node after the AI analysis.
2. Set the condition: priority equals Critical or High.
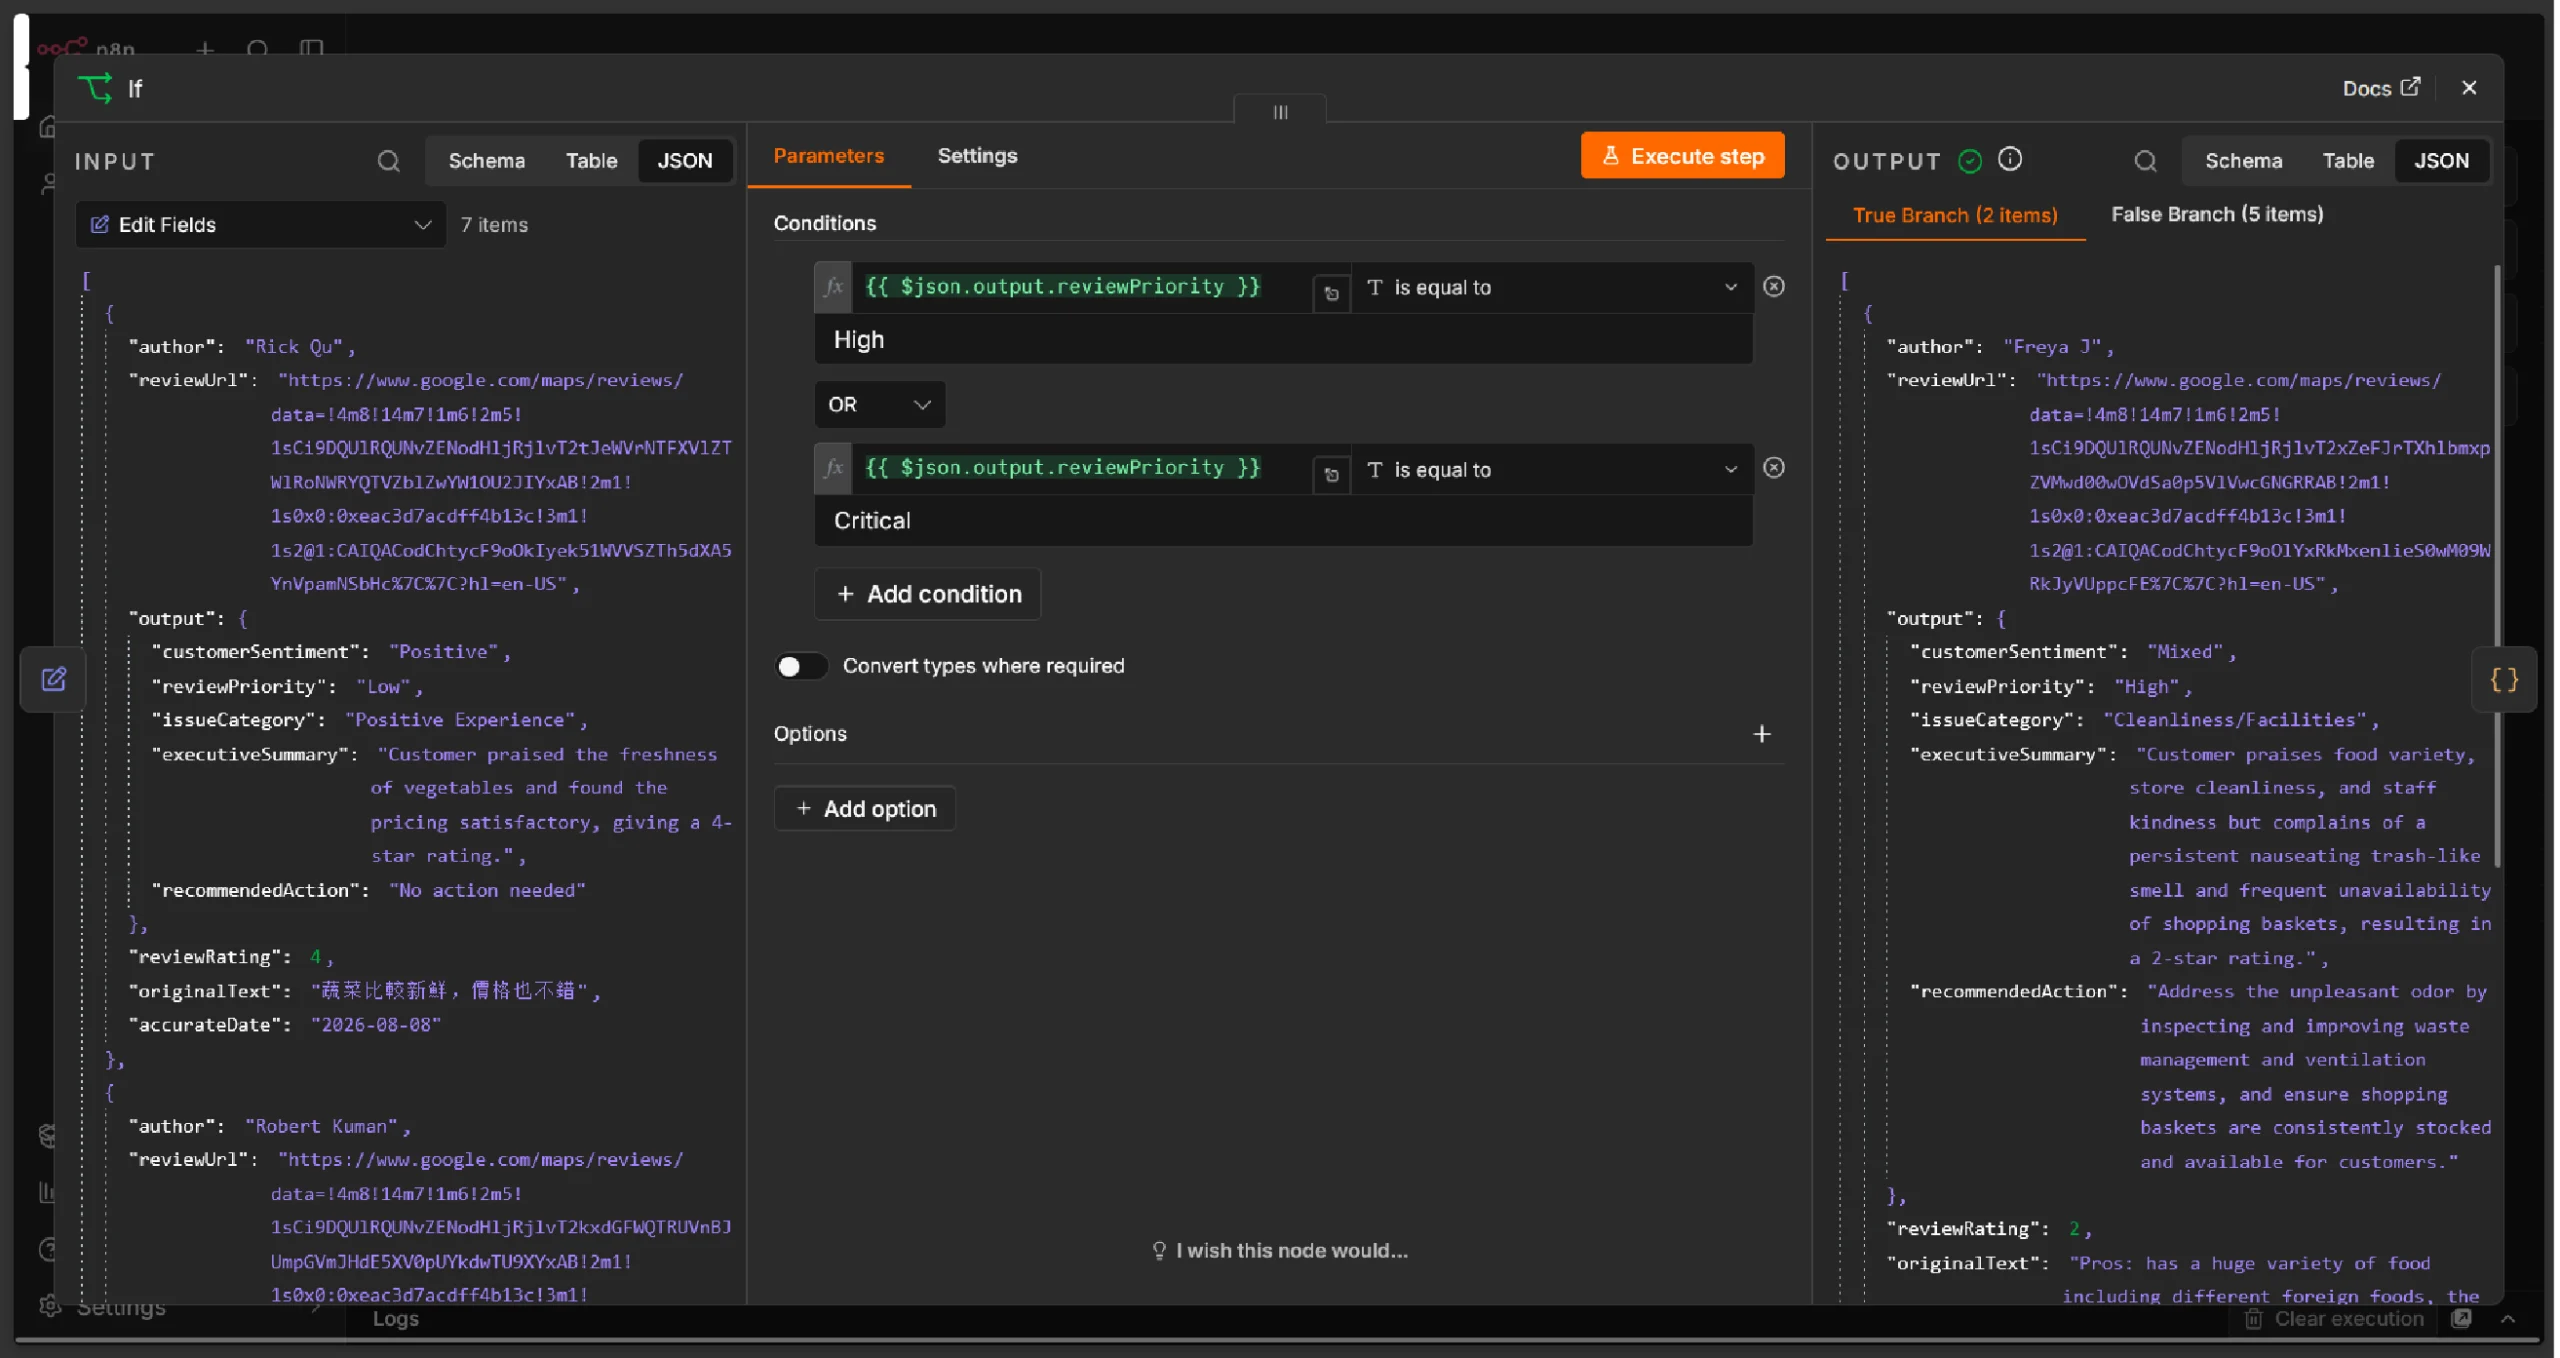
Only high-priority reviews will proceed to the email notification step.
Sending alerts for every review creates noise. By focusing on high-priority items, your team can concentrate on the customer issues that matter most — improving response time for critical feedback.
Step 11: Generate the HTML Email Report
Now, assemble the analyzed reviews into a professional email report.
1. Add a Code node to build the HTML report.
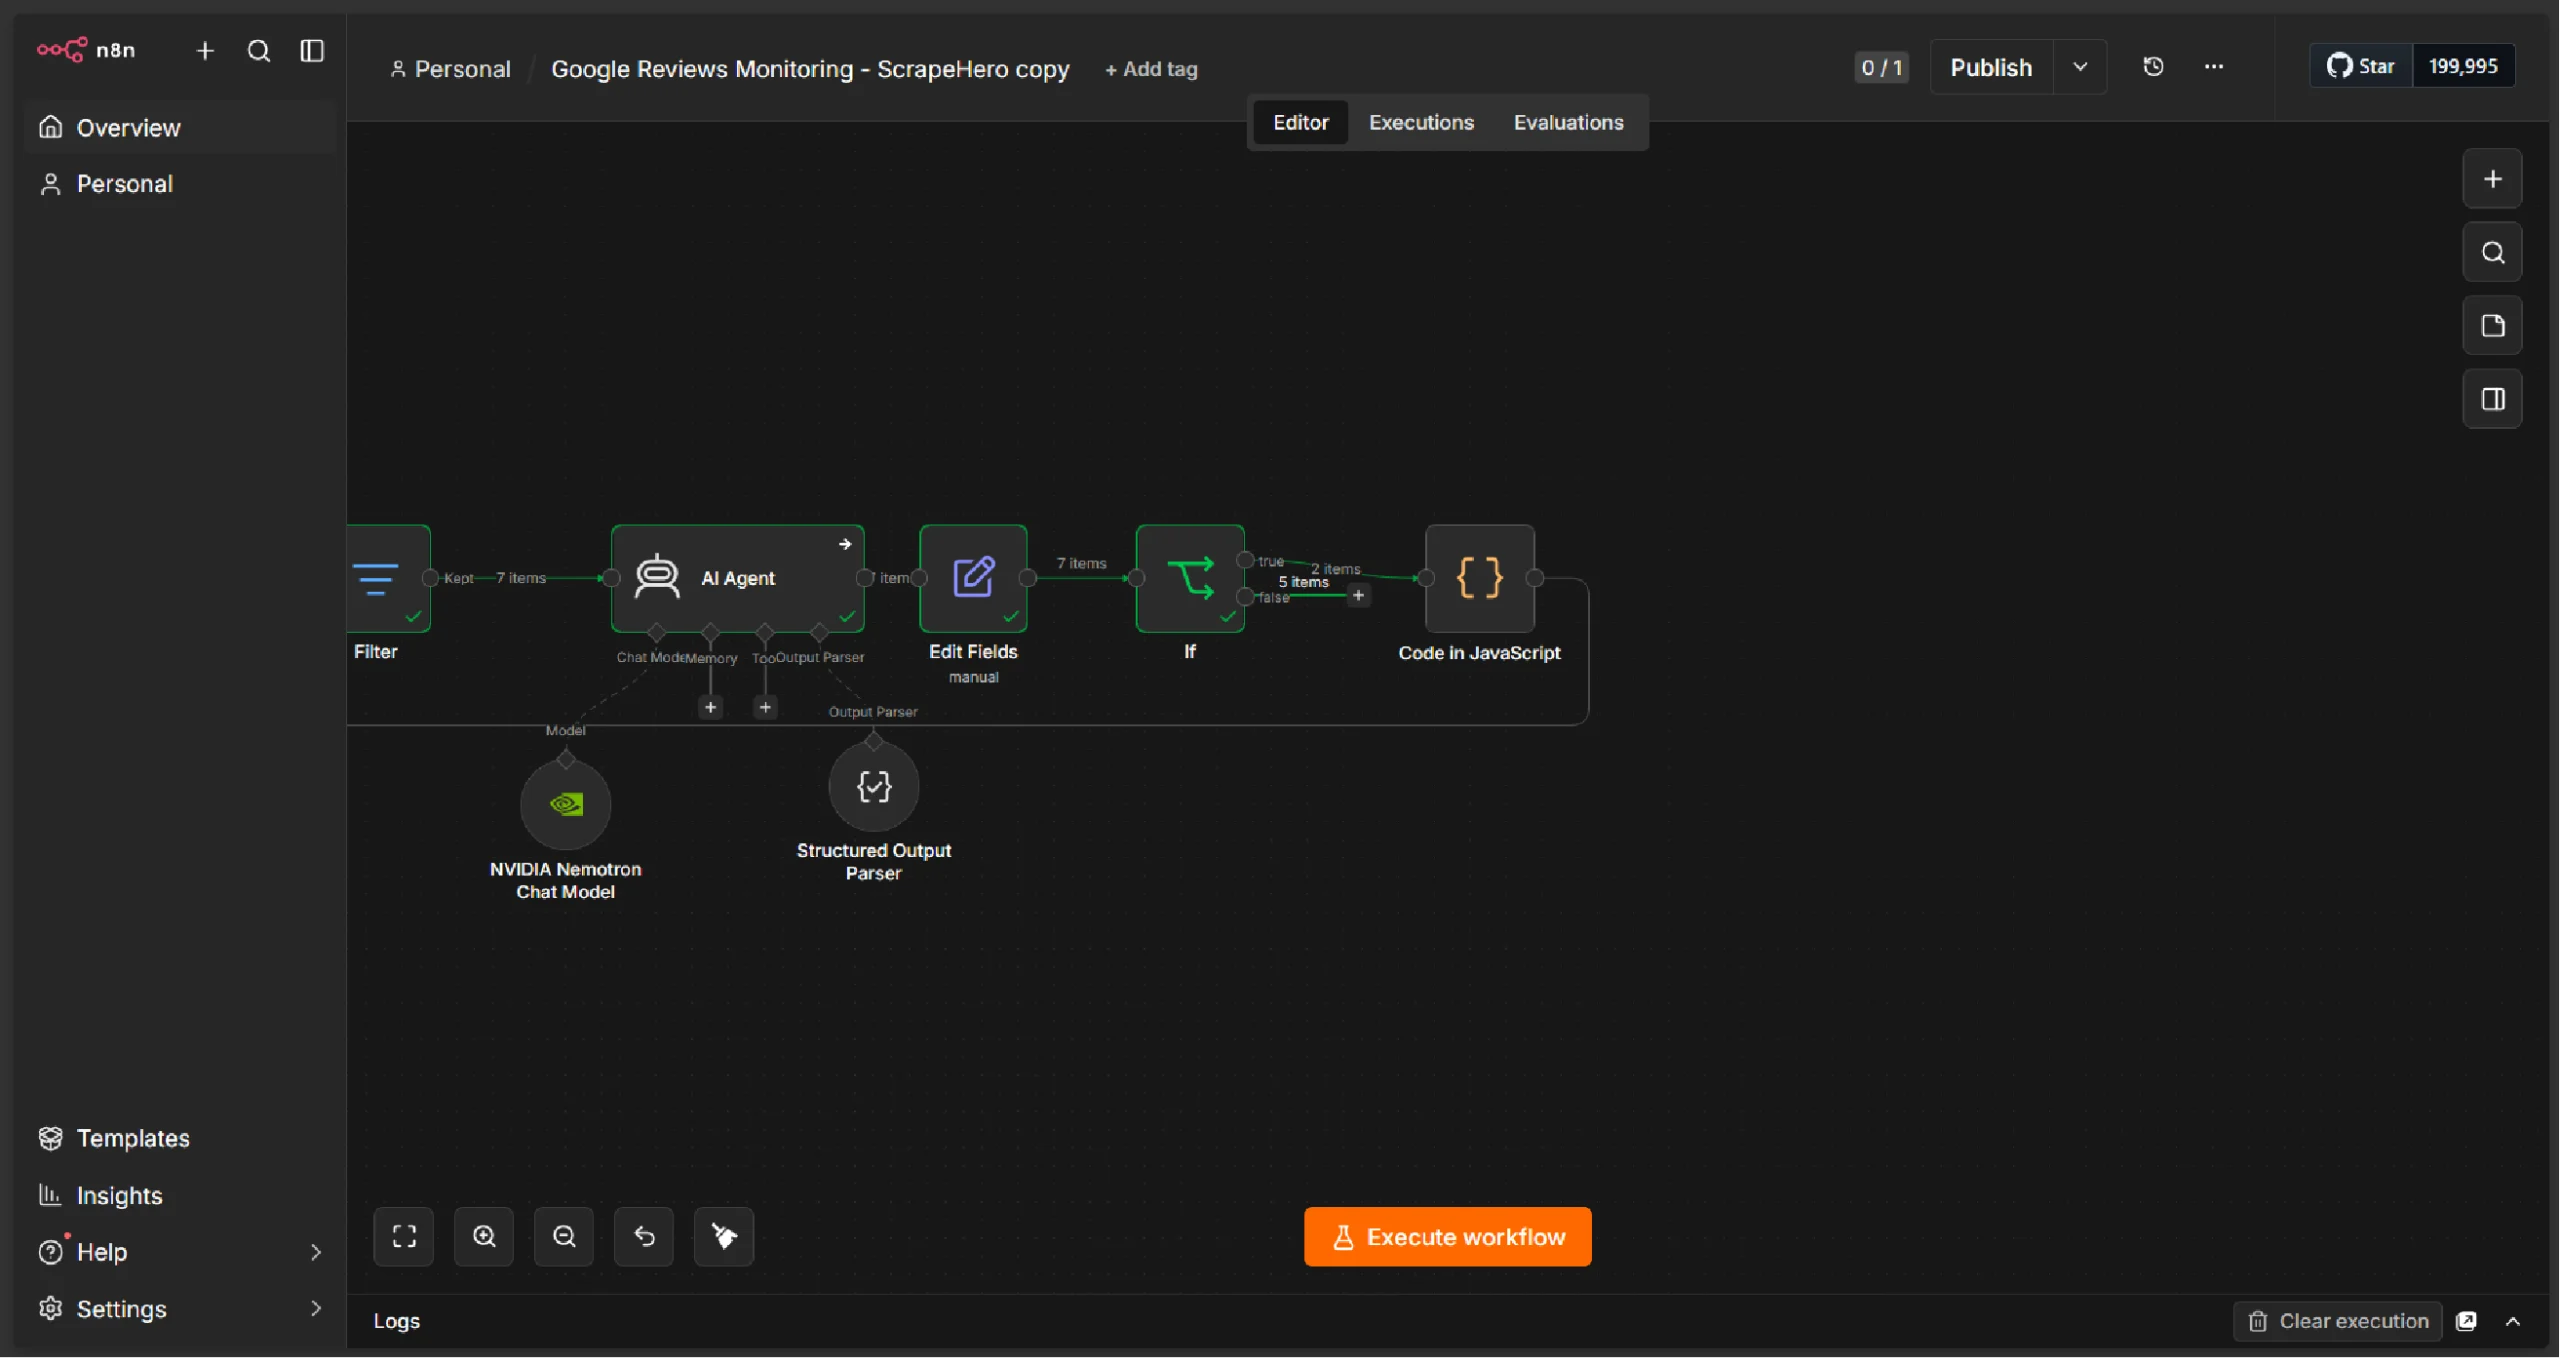
2. Use the output from the Set node and business name from the HTTP Request node to create an HTML report using JavaScript
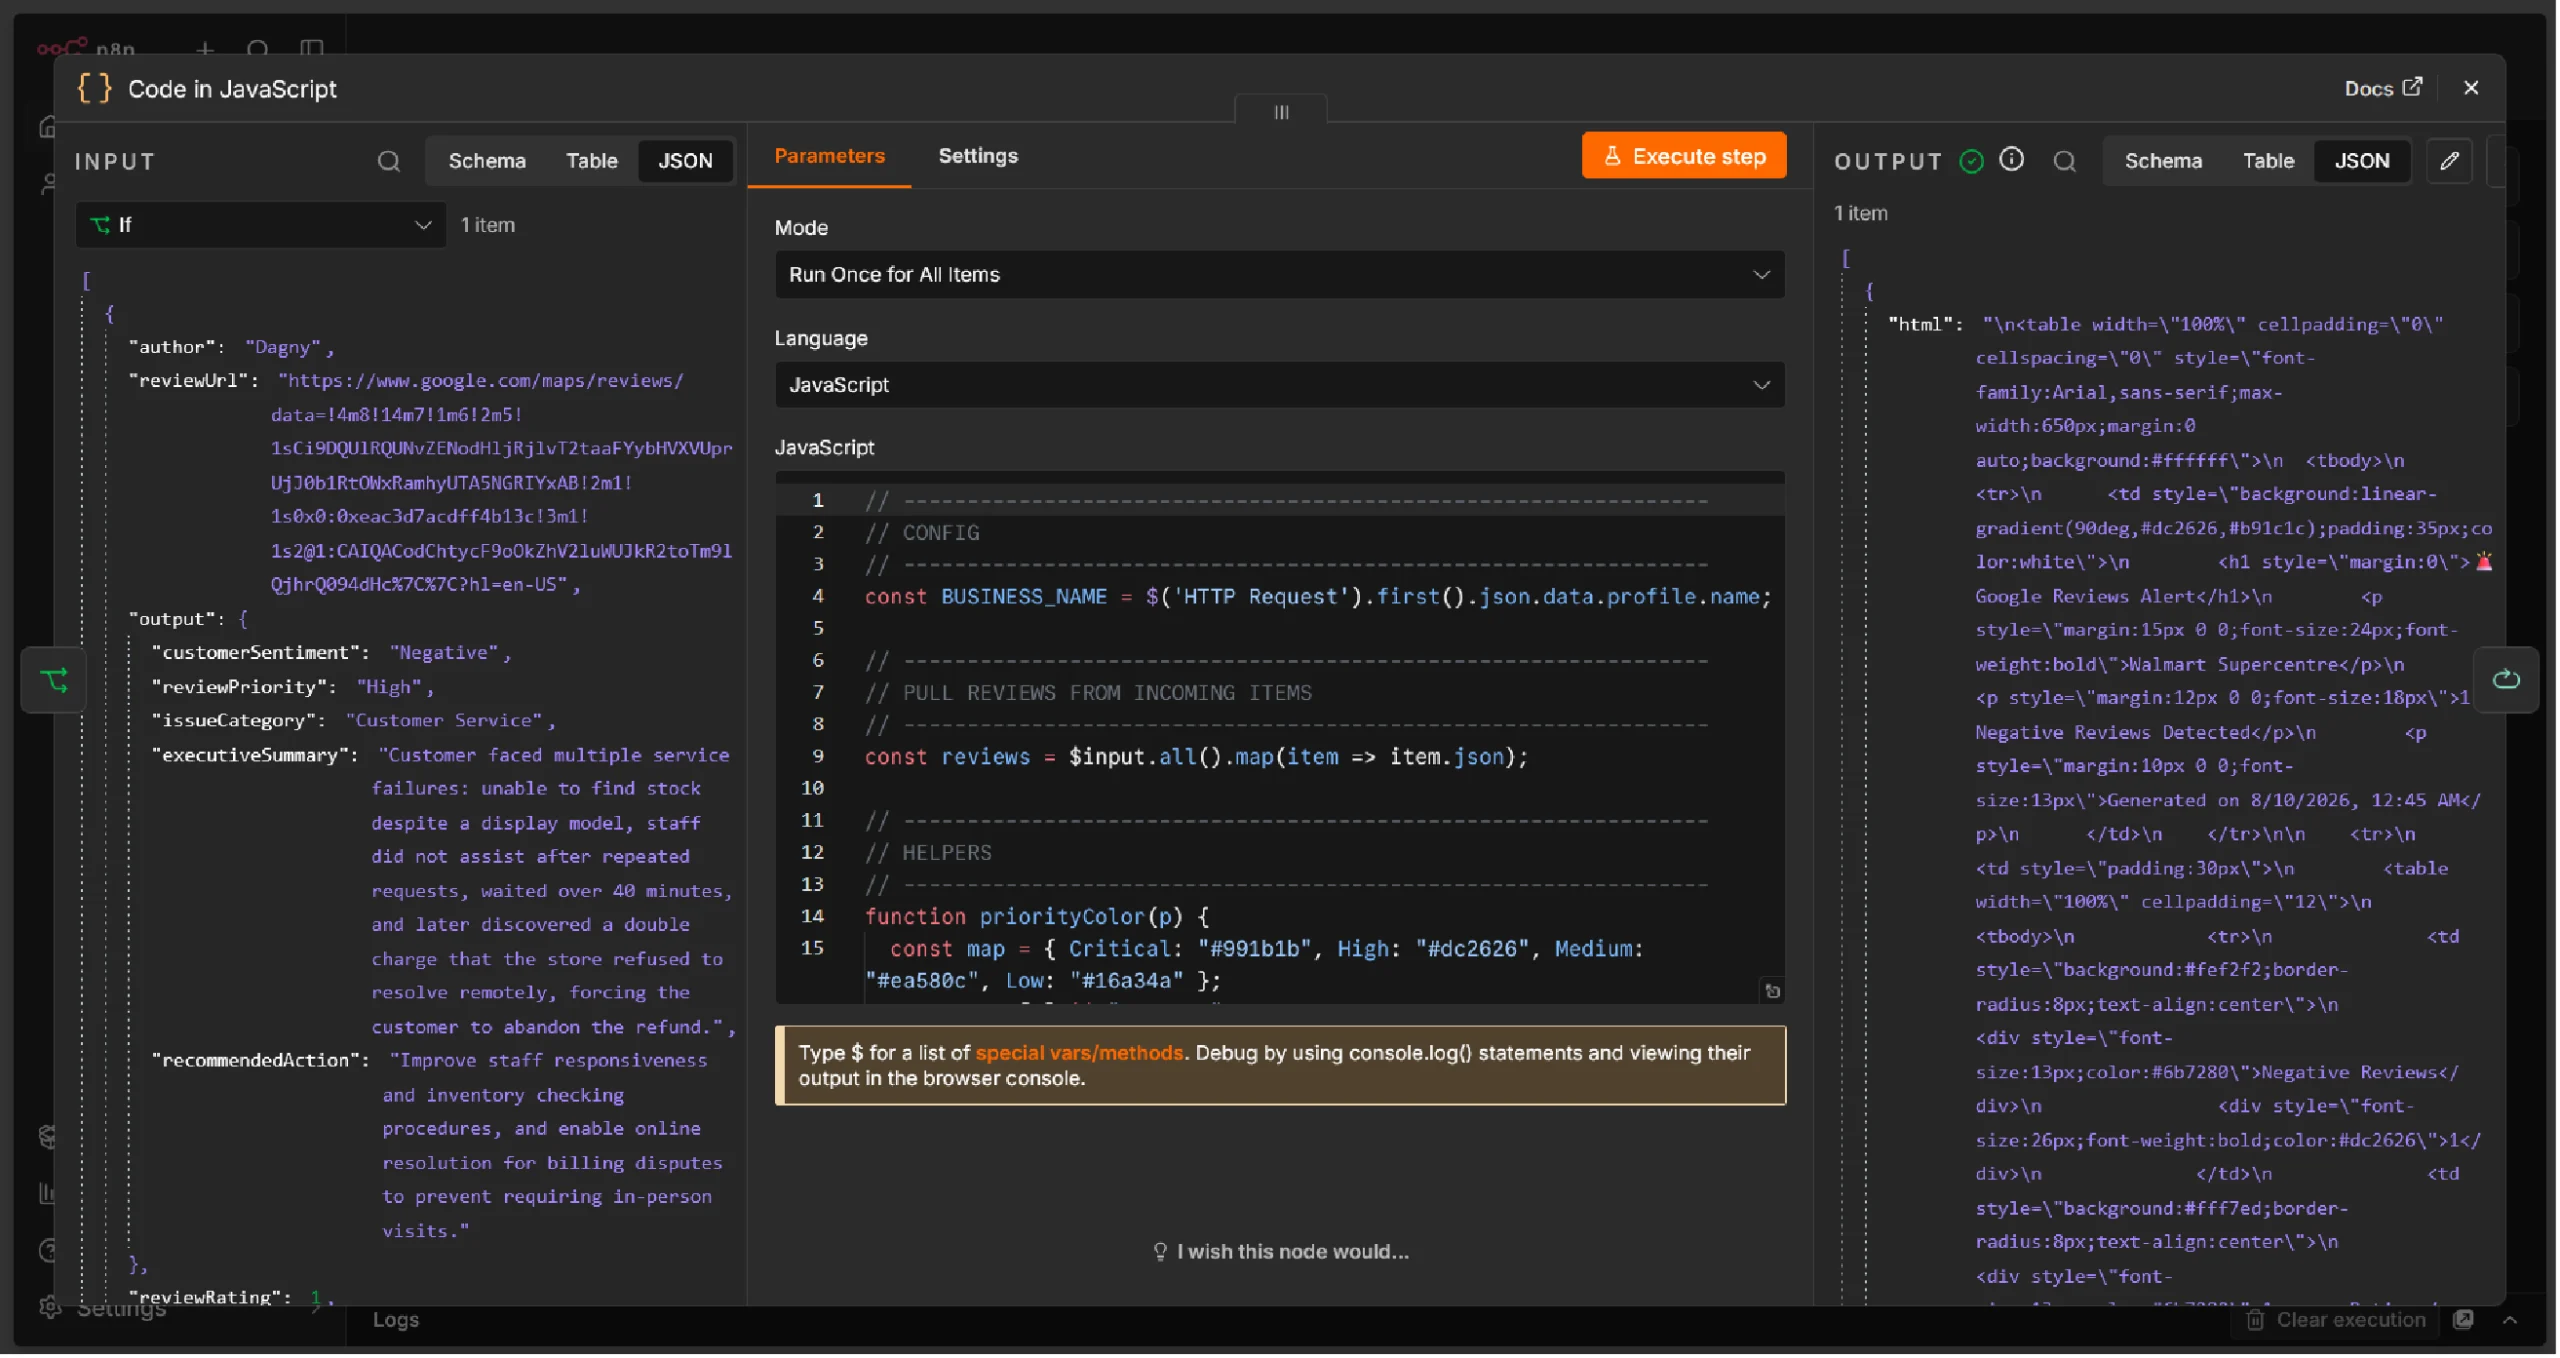
The HTML report should include these sections:
Business Information
- Business Name
- Report generation timestamp
Executive Summary
- Number of negative reviews detected
- Average rating of flagged reviews
- Total high-priority review count
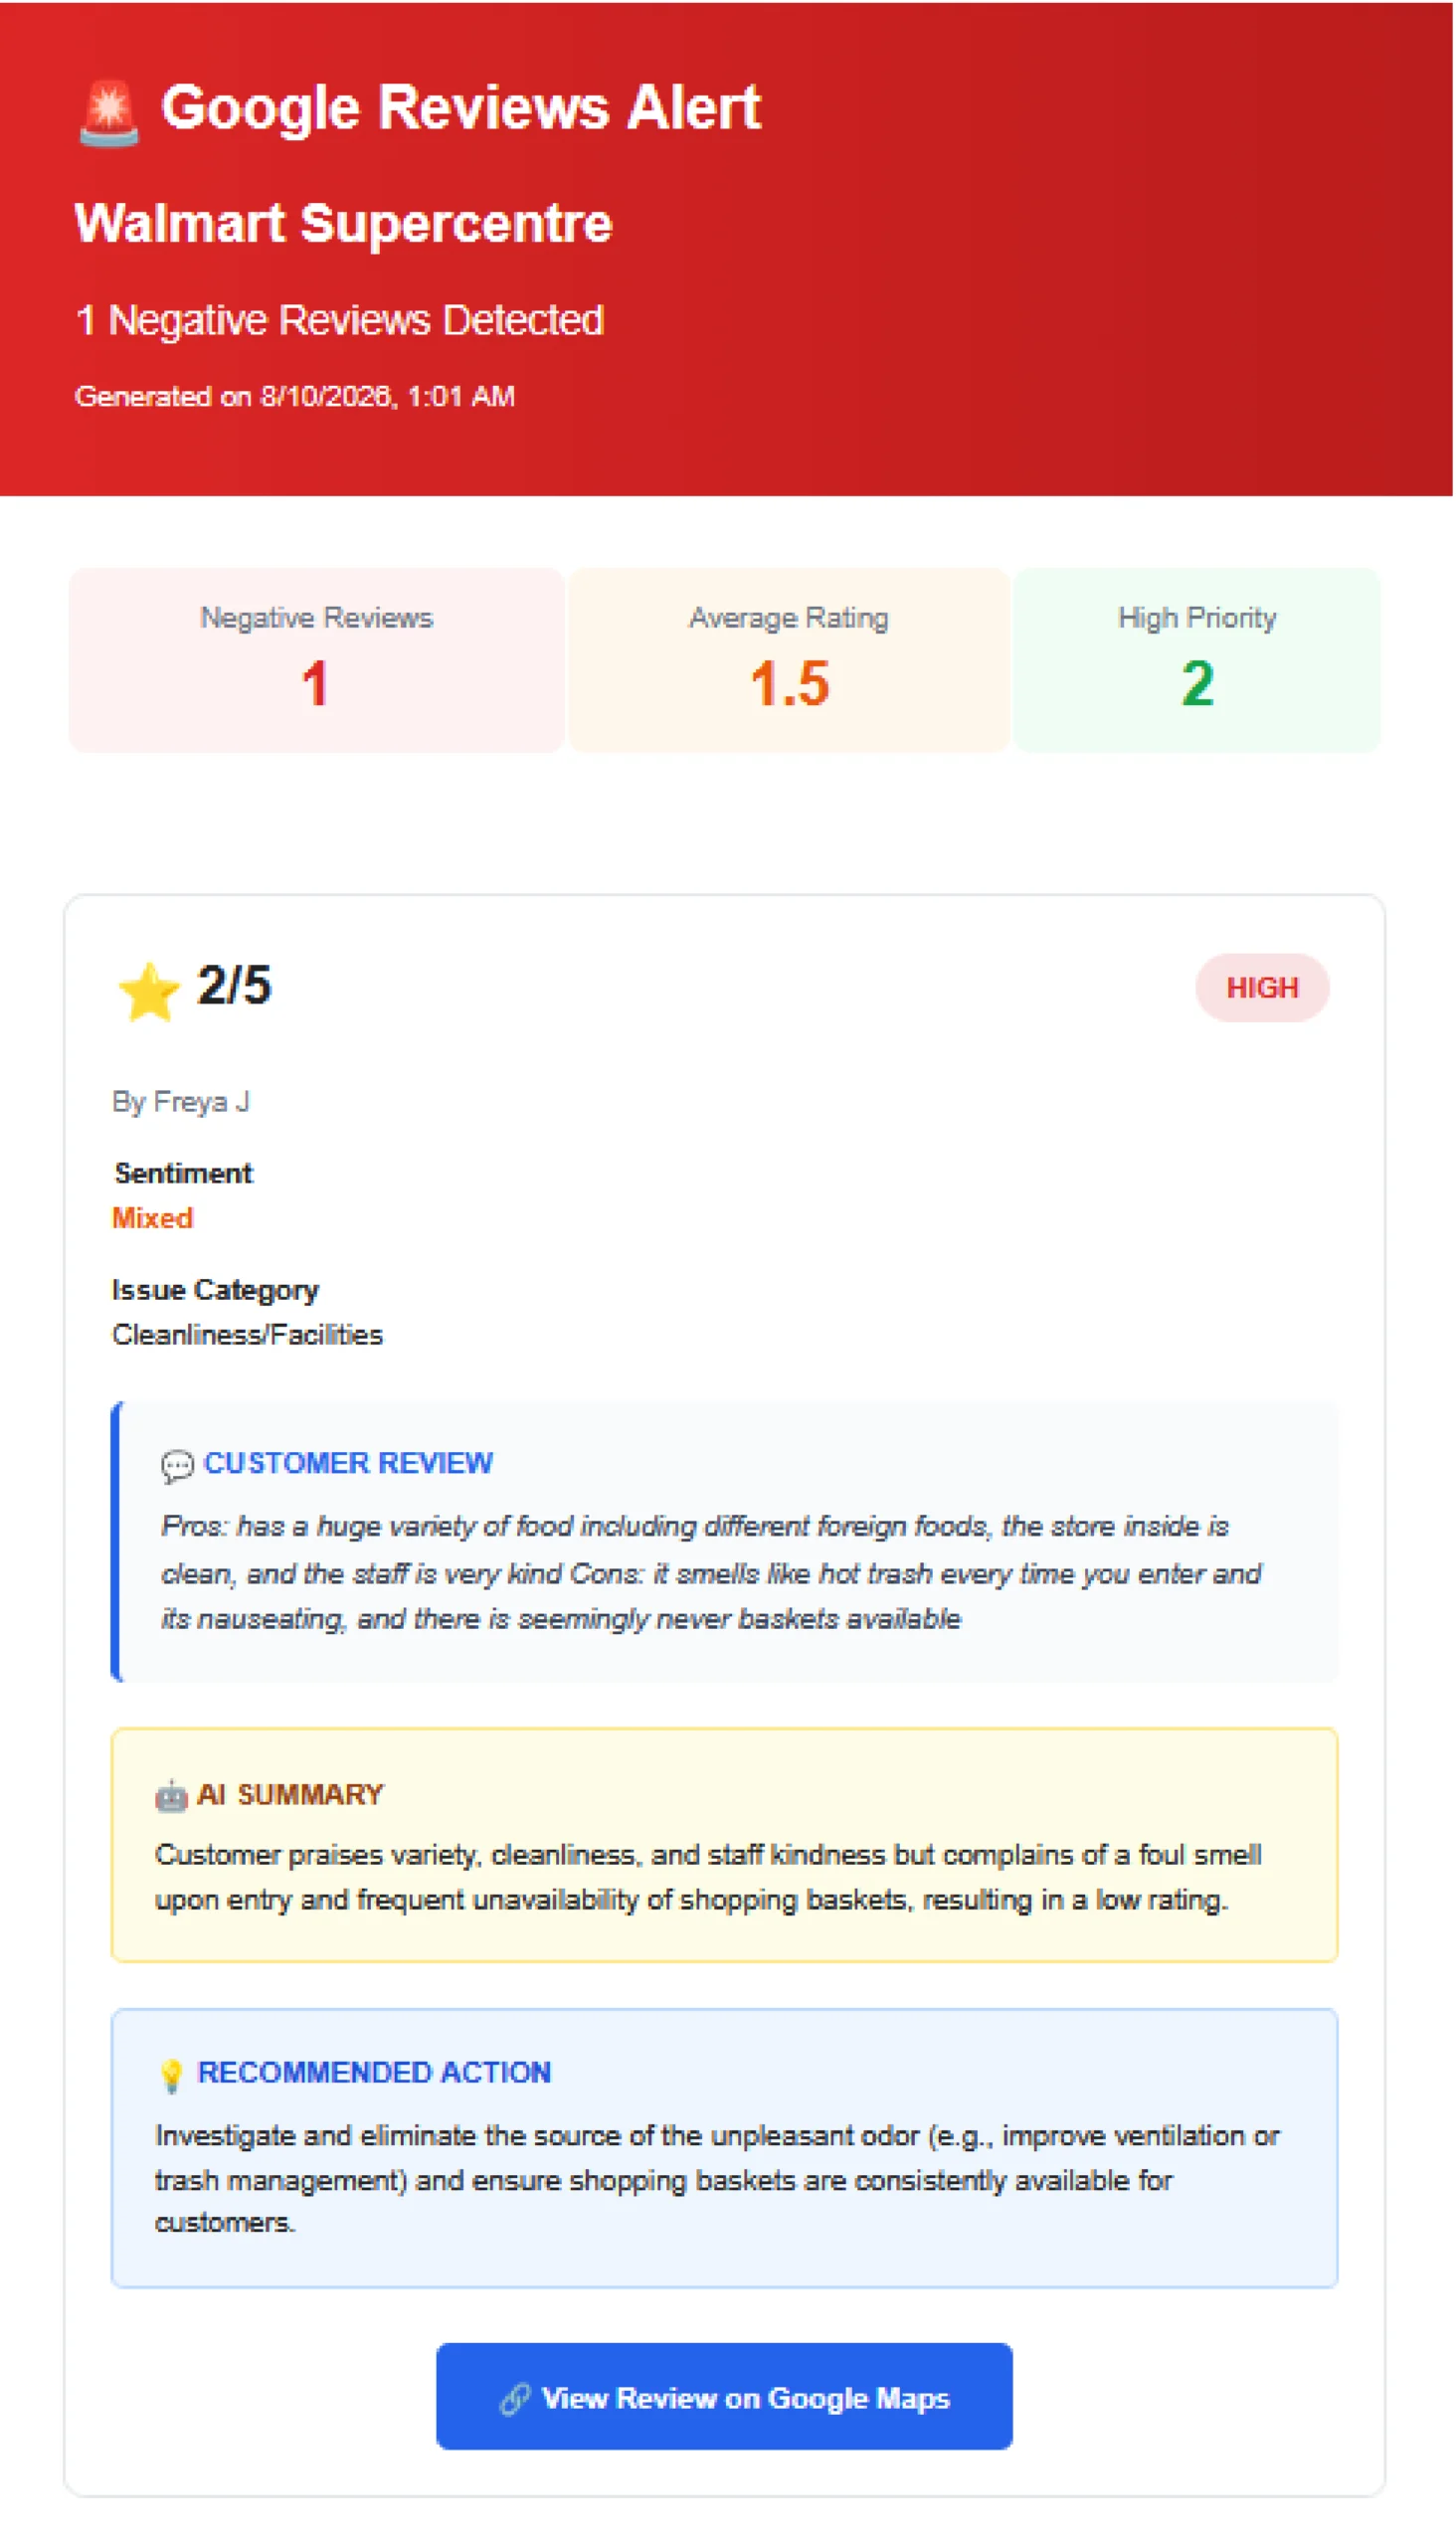
Individual Review Cards
For each high-priority review, include:
- Customer star rating (displayed visually)
- Sentiment badge (e.g., Red circle Negative)
- Issue category
- Original customer review text
- AI-generated summary
- Recommended action
- Direct link to the Google Review
Step 12: Send the Email Notification
Finally, deliver the report to your team.
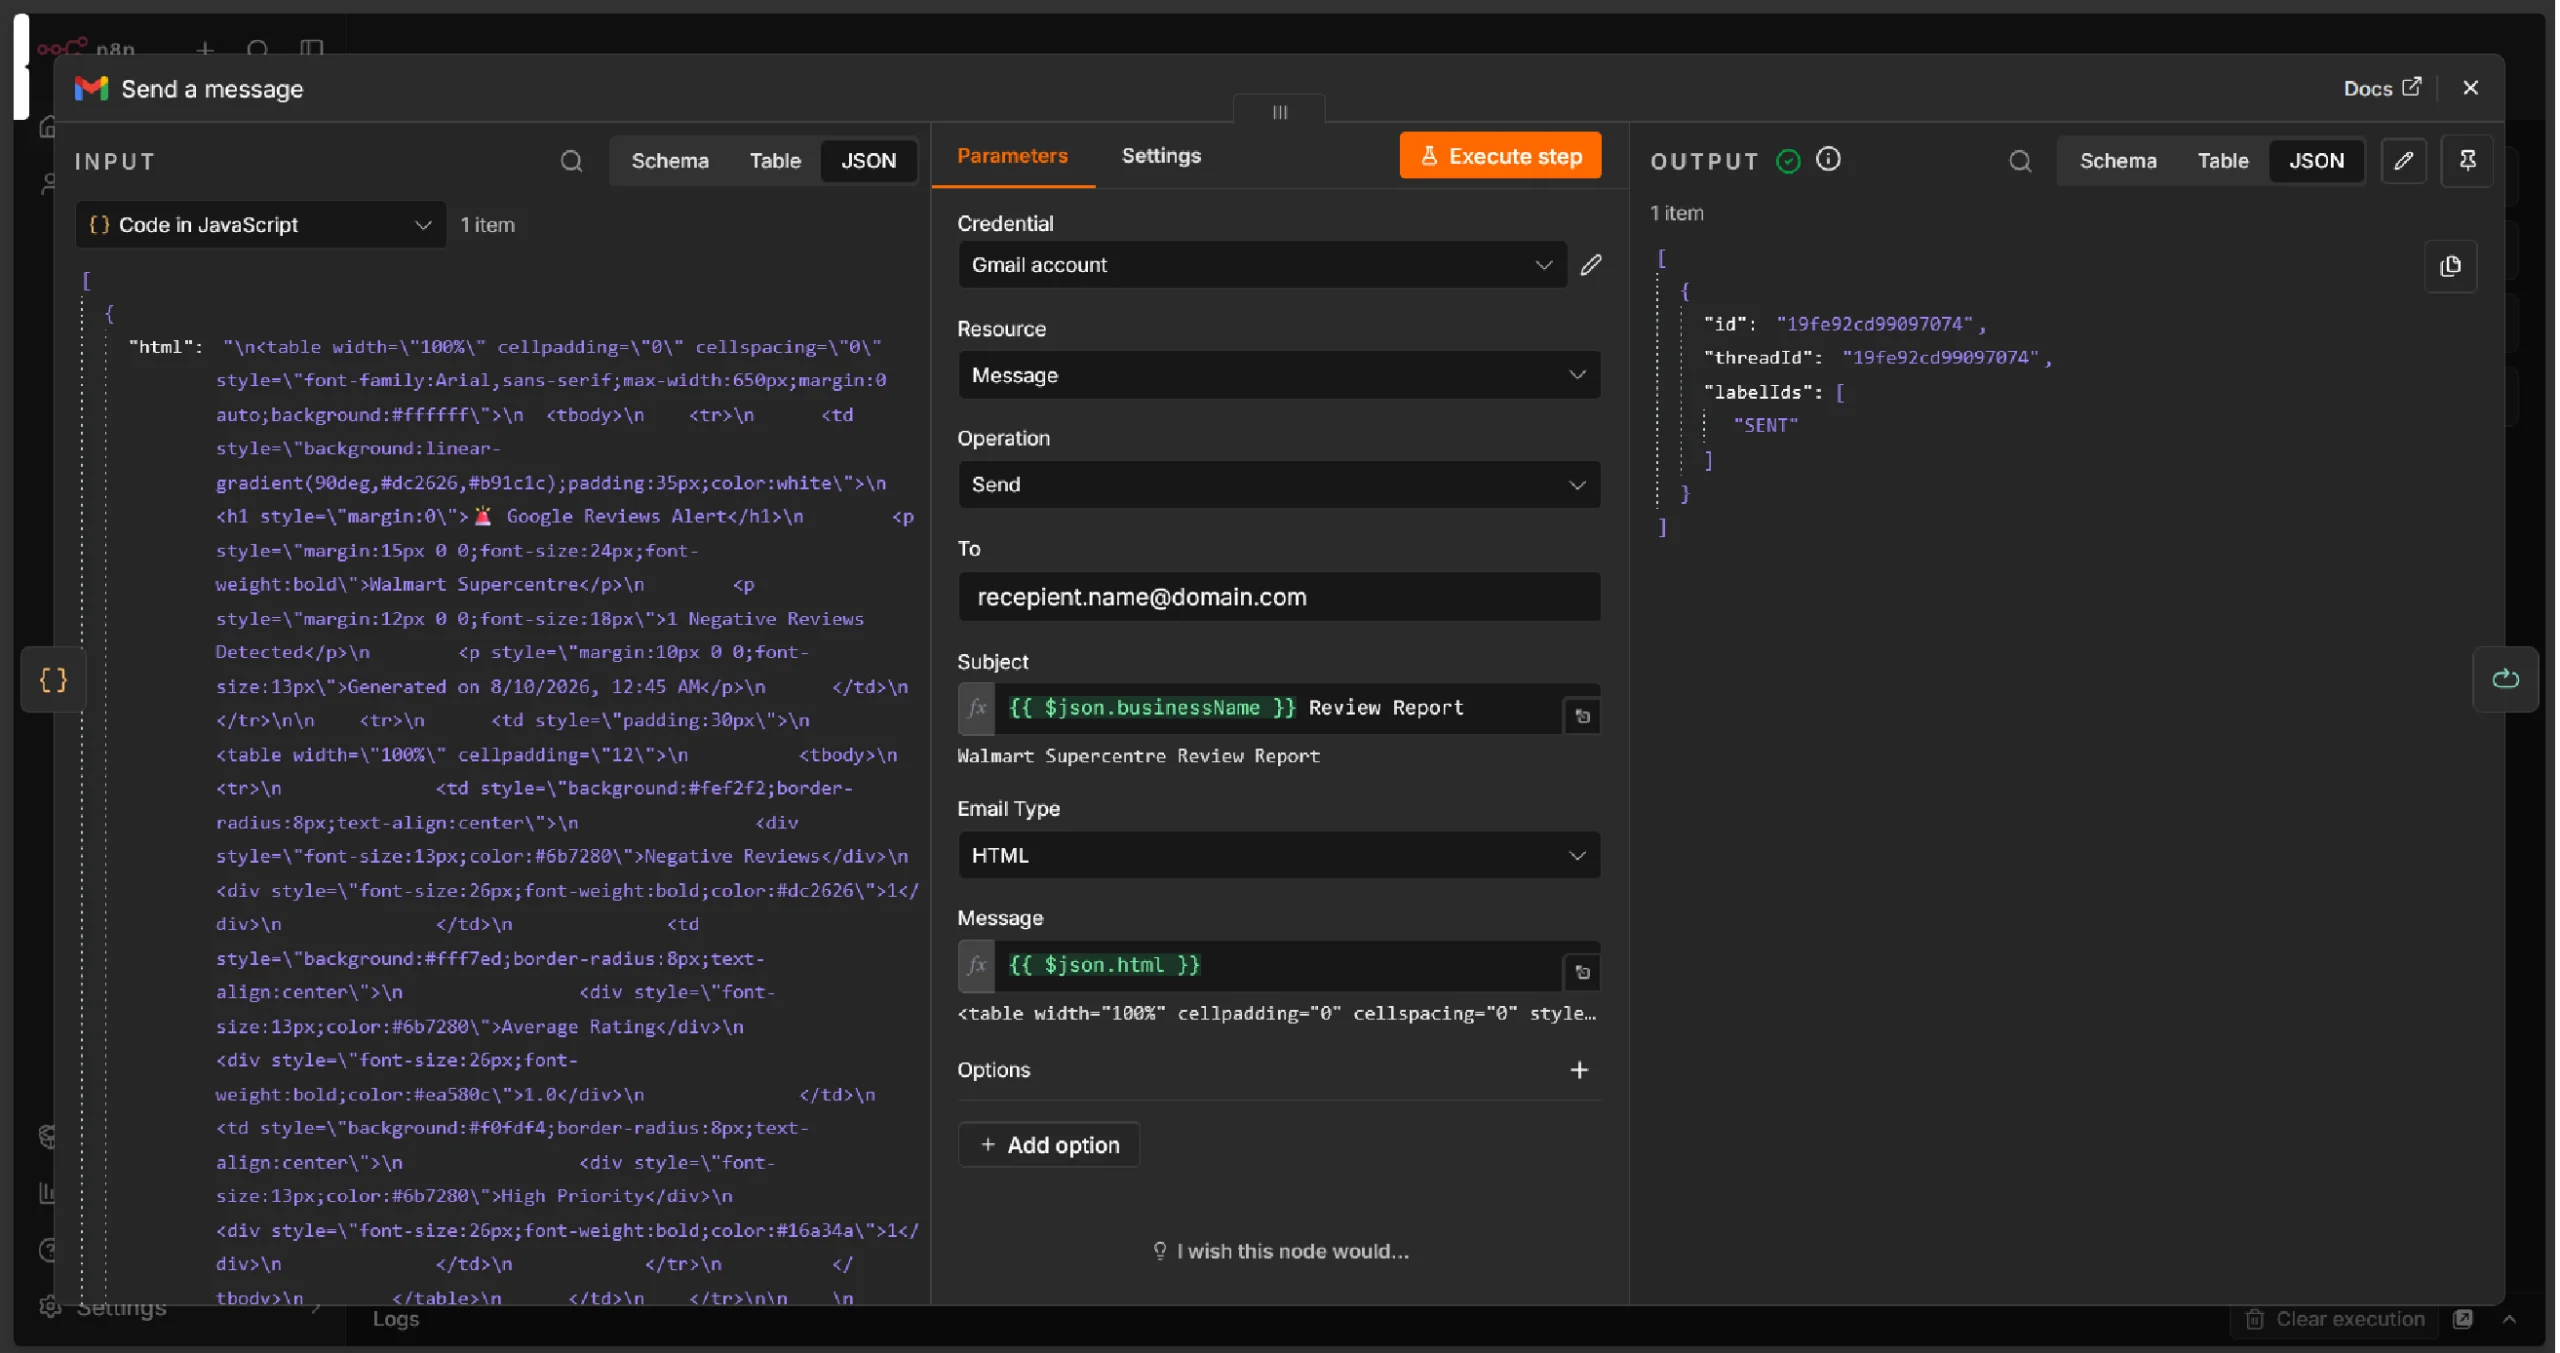
1. Add a Gmail node at the end of the workflow.
2. Configure the recipient(s)—your marketing team, customer support lead, or operations manager.
3. Set a descriptive subject line using dynamic data:
{{negativeCount}} New Negative Google Reviews – {{businessName}}
4. Set the email body to the HTML generated in the previous step.
5. Make sure HTML mode is enabled for the email body.
When the workflow runs and detects high-priority reviews, the recipients will receive an email.
Step 13: Activate the Workflow
Once all nodes are connected and tested:
- Click the “Test Workflow” button to run it manually and verify the output.
- Check the execution log for any errors or misconfigurations.
- Once satisfied, toggle the workflow to Active so it runs automatically on your configured schedule.
If everything goes smoothly, you’ll receive mail like this:
Complete Workflow Summary
Here’s the summary of the full node sequence for the Google Reviews Scraper n8n workflow:
| Step | Node Type | Purpose |
|---|---|---|
| 1 | Schedule Trigger | Runs the workflow at defined intervals |
| 2 | Google Sheets | Reads the list of businesses to monitor |
| 3 | HTTP Request | Calls the ScrapeHero Google Reviews API |
| 5 | Item Lists / Split | Splits reviews for individual processing |
| 4 | Filter | Keeps only recently published reviews |
| 6 | AI Agent / HTTP Request | Analyzes each review for sentiment, priority, and category |
| 7 | IF | Filters for high-priority reviews only |
| 8 | Code / Function | Generates the HTML email report |
| 9 | Gmail | Sends the alert email to stakeholders |
What This Unlocks for Your Business
Building this workflow transforms how your team handles customer feedback:
- Eliminate manual monitoring. No more logging into Google Maps to check reviews across locations. The system does it for you.
- Respond faster. High-priority reviews trigger immediate alerts, reducing your response time from days to minutes.
- Get AI-powered insights. Instead of reading dozens of long reviews, your team receives concise summaries with specific action items.
- Scale effortlessly. Adding a new location is as simple as adding a row to your Google Sheet.
- Protect your reputation. Early detection of negative feedback helps you address issues before they escalate.
Going Further
Once the core workflow is running, consider these enhancements:
- Historical review database: Store all processed reviews in a database (e.g., Airtable, PostgreSQL) to track trends over time.
- CRM or helpdesk integration: Automatically create support tickets in tools like Zendesk, Freshdesk, or HubSpot when a high-priority review is detected.
- Recurring issue escalation: Configure additional AI rules to flag when the same category (e.g., “Cleanliness” or “Wait Time”) appears repeatedly across reviews.
- Slack or Microsoft Teams alerts: Add a Slack or Teams node for real-time team notifications alongside email.
- Sentiment trend dashboards: Feed the data into Google Data Studio or Metabase for visual reporting.
Wrapping Up
Monitoring Google Reviews at scale doesn’t have to be a manual, error-prone process. By combining the ScrapeHero Google Reviews API for reliable, structured review data with n8n for workflow automation and an AI model for intelligent analysis, you can build a system that keeps your team informed and your customers heard.
The ScrapeHero API handles the complexity of extracting review data from Google — including dynamic rendering, anti-bot measures, and data structuring — so you can focus on what matters: responding to your customers and improving your business.
Sign up for a ScrapeHero API key and build your first automated review monitoring workflow. Have unique data needs or need a specialized setup? Tell us your requirements, and we will build a custom one just for you.
ScrapeHero is your #1 web scraping service. We combine automated scraping power with human-in-the-loop oversight to ensure maximum accuracy. Contact ScrapeHero today to get started.